It’s a pretty good principle that if one person complains or can’t figure something out, there will be many more that I never hear from. Soon after I released Search and Replace 2.0 a few people contacted me with concerns about copying from the four IPTC Location fields, and I had to admit that my changes weren’t as clear as I hoped.
So version 2.1 is released today with more tidying up and polishing, but mainly to bring back the buttons which copy IPTC Locations to keywords and to the IPTC Extension Location Shown/Created fields.
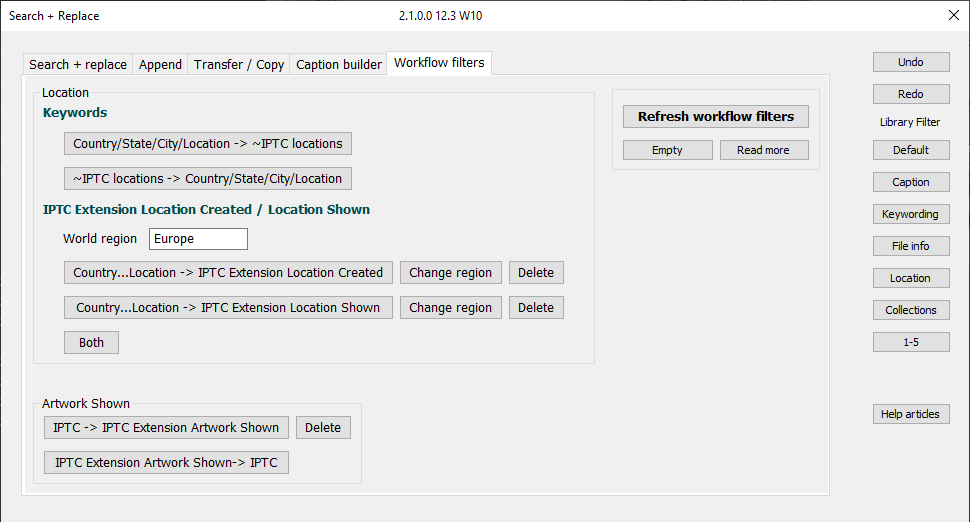
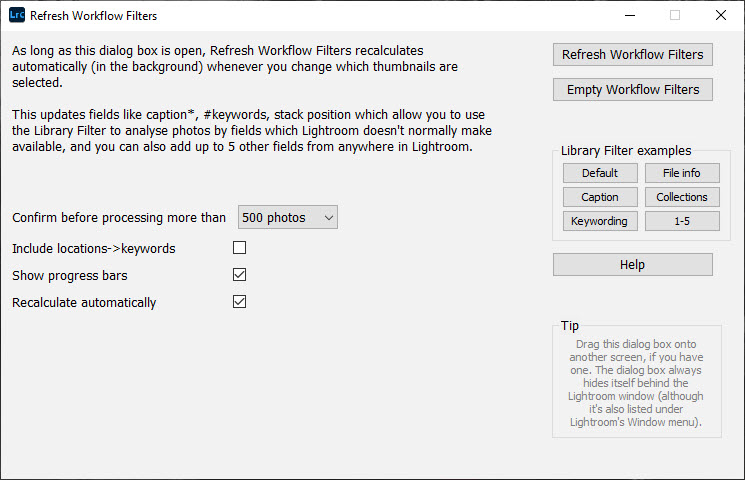
They’re all now on the new Workflow Filters tab:
I’m not sure many people really use the IPTC Extension Location Shown/Created (I certainly don’t) but I’ve taken this opportunity to add some extra detail to make working with those fields less awkward:
The new World region box lets you enter it in the dialog box, or leave blank, and you are no longer prompted for it when you copy from the four IPTC Location fields.
The new Change region buttons let you select a number of photos and change all their world regions
The new Delete buttons let you delete the contents of those fields without opening up the item in the Metadata panel
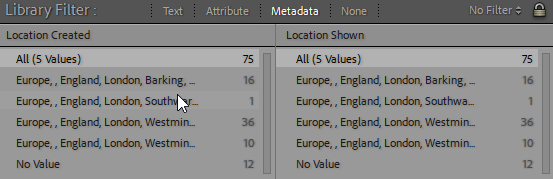
IPTC Extension Location Shown/Created are now also shown in the Library Filter by the Refresh Workflow Filters command, helping you review entries in those fields.
There are also extra options in the Plugin Manager:
When you run Refresh Worklow Filters you can also copy from the four IPTC Location fields to Keywords and to the IPTC Extension Location Shown/Created fields.
You can now keyword the top level keyword (a user requested)
You can customize the choices for the above World region box
Lightroom 12.3 came out today and the headline feature is an AI-derived Denoise. I’ll admit that I am ambivalent about it:
I’m not so concerned by noise that I’ve bought any of the 3rd party AI-based apps.
It’s slow
I don’t particularly want an extra (big) DNG in addition to the raw file. Maybe it’s only worthwhile for exceptional high ISO pictures?
I’d have preferred Lightroom to save a series of adjustment or offset values, not a fully-baked independent file.
I’d also strongly recommend reading this Denoised demystified article by Eric Chan:
I recommend applying Denoise early in the workflow, before healing and masking. AI-driven, image-based features such as Content-Aware Remove and Select Subject can be affected by noise, so it’s best to use those features on a clean starting point. If you do run Denoise on an image that already has Content-Aware Remove settings or AI masks, Denoise will automatically update those spots and masks. This is handy, but be aware that the content of those spots and masks may change unexpectedly, so it’s best to review the results carefully.
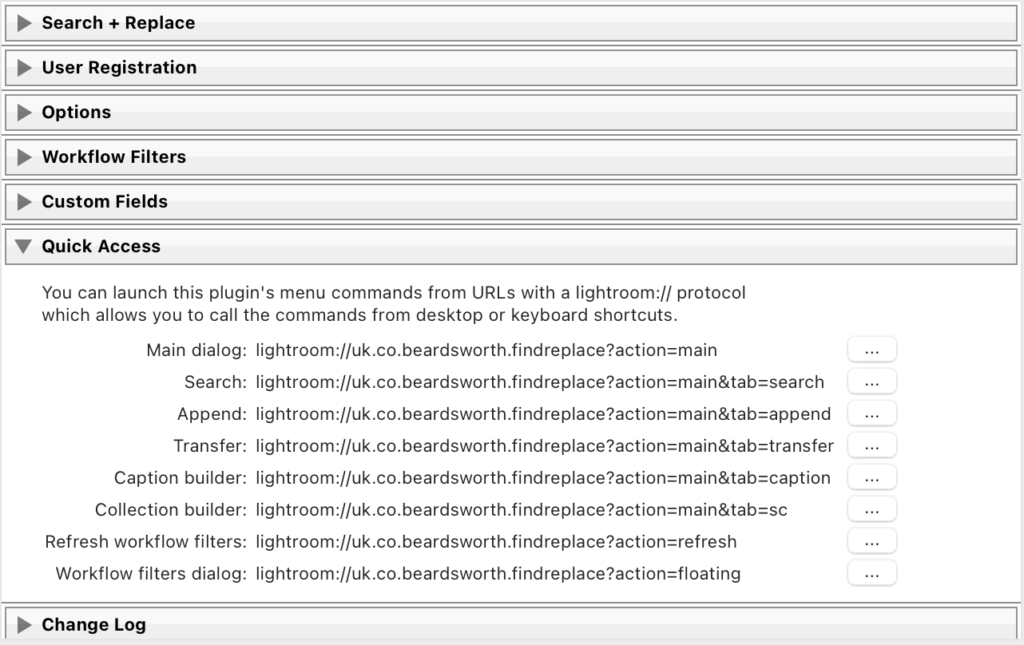
The Lightroom URLs and commands are listed in the Plugin Manager. You don’t need to set up all these shortcuts if you don’t want to do so, just those you think you will use
Version 2.0 is released today with a lot of tidying up and polishing, and a few subtle new features.
What I hope will be most popular is that you can now launch plugin functions from keyboard shortcuts. While the Mac operating system already lets you set up a keyboard shortcut to run the plugin’s menu commands, and this change means you can do the same on Windows too. But it’s more than that because it also lets you run other plugin commands which don’t have menu items and without opening Search and Replace.
This feature is not for everyone, but it should appeal to the plugin’s typical or advanced user. And it does not work out of the box – on your Mac or PC you need to set up these keyboard shortcuts and point them to the lightroom:// URLs listed in the Plugin Manager (right). Note that there is more than one way to set up keyboard shortcuts.
I think it will help to give a practical example of where I like pressing a keyboard shortcut to run one of the plugin’s commands. Imagine you often copy from one field to another, such as the IPTC Location to the Title field, or from the Job to Keywords. You can set these up as shortcuts like lightroom://uk.co.beardsworth.findreplace/?action=transfer&source=location&target=title&method=replace. The element lightroom://uk.co.beardsworth.findreplace tells the operating system to interpret the URL in Lightroom with this plugin, and then the following arguments tell the plugin it should copy the location to the title.
You may not have noticed this button, and I remember being surprised when I saw it
How do you post to Instagram from Lightroom on your Mac or PC?
About 6 months ago Instagram quietly added a “+” button to their web page. I use this as my usual way to post photos, especially multiple photo or “carousel” posts.
If I am posting a single image, I simply export from LR and use the “+” button, choosing “original” from Instagram’s crop ratio choices.
However I usually make multiple-photo or “carousel” posts, using photos with differing crop ratios, and this causes a small problem. Unfortunately Instagram assumes all the photos have the same dimensions.
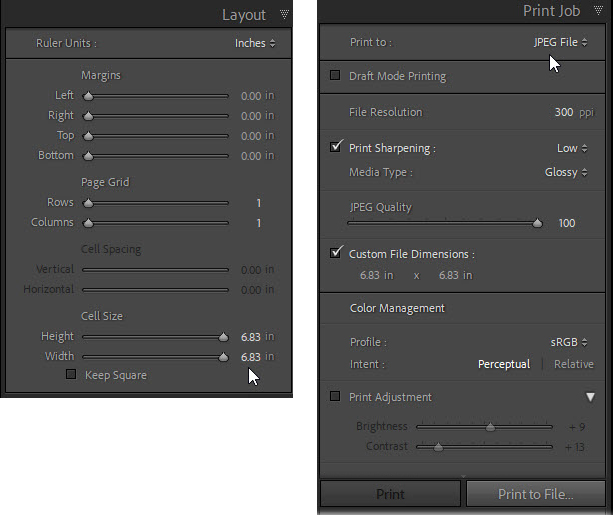
So the way I get around this is using Print and a Print template (zip) which outputs square 2048 pixel JPEGs, with white space being added around any non-square photos. After “printing” the photos as JPEGs into a folder on the desktop, I then switch to my web browser and use the “+” button to create the post.
I’ve attached my Print template above, but to create your own these are the key panels:
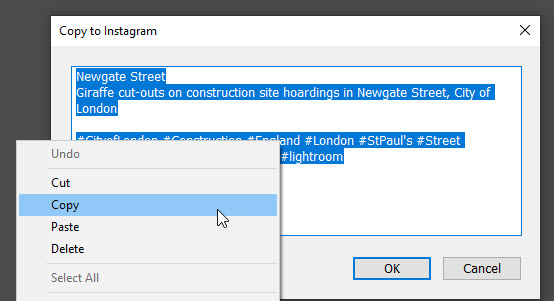
A second problem is that Instagram strips metadata from your files and doesn’t use the captions or convert the keywords to hashtags. Often I just type them all again, but sometimes I run this little script which displays a dialog box in LR from which I can copy the text. It includes the title and caption,and converts multi-word keywords into single-word hashtags, and notice that it includes some hashtags that I use on many images.
I’ve just released version 2.0 of my Video Metadata plugin which reads and writes metadata to video files, something long-available in Adobe’s Bridge but which another Adobe’s Lightroom still cannot do.
The changes are quite subtle but the main ones are:
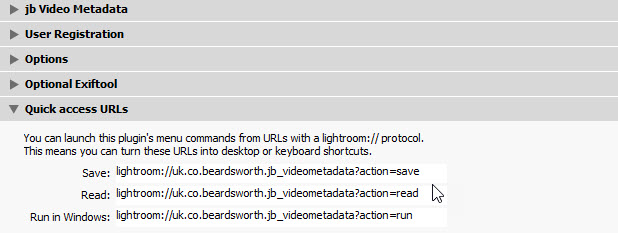
Quick access URLs to allow commands to be launched from keyboard shortcuts (setting up)
A new Run in Windows/QuickTime command to play videos in the operating system’s default video player
These two features work well in combination. I don’t know about you, but I remain very frustrated that Lightroom doesn’t play videos as quickly or reliably as the operating system, and that’s why I added the Run menu command.
While this simply launches the Windows player or QuickTime, I wanted to avoid having to navigate through the menus each time. So the Run menu can now be launched from a quick access URL.
For example, here in Windows I created a new shortcut on my desktop and copied the URL (see above) into the shortcut’s properties, then set the shortcut key to Ctrl+F1 which doesn’t seem to be used by any other program (the shortcut can be anything you want).
This means that I just select a video in Lightroom, hit Ctrl+F1, and the video is launched in Windows Player.
Released a couple of days ago, Lightroom 11.2 just has a couple of little tweaks to masking and “improved responsiveness in the Library module, especially during multitasking” (see this short video).
A couple of days ago Adobe posted a sneek peek of a feature coming in the next version of Lightroom – bringing together local adjustments as Masking and adding significant new capabilities.
I use local adjustments extensively, mainly the Radial and Linear Gradients, the brush to a lesser extent. For example, I frequently add a little Clarity as a local adjustment, often with a small boost to Shadows. To my eye rather than making the whole image area “shout” with the Basic panel Clarity (which I rarely use), this combination of local adjustments make faces or other key details stand out. It’s a modern dodging and burning, if you’re familiar with darkroom techniques!
So I’ve been one of the lucky ones who has been able to try out these new features, and have been given permission to give my impressions publicly.
Old frustrations
Adobe have addressed some of the frustrations I used to have with local adjustments. One is how they were in different “silos”. What I mean here is that I often want to fine tune a photo, sometimes from a year or more ago, and suspect that I might have done a local adjustment over a face. So first I’d look in the Radial adjustments, not see one, and then see if I’d used the Brush, or vice versa. They have now brought all adjustments together in a floating Masks panel, and that means I can instantly see all the local adjustments at once. Great, that’ll save time.
Another similar frustration was that I often want to make similar adjustments in different parts of a picture but was forced to fine tune each local adjustment individually. For instance, imagine there’s more than one face that I want to emphasize, so I might add a couple of my Clarity/Shadow Radial filters. But then if I wanted to change both adjustments, I’d have to select one and then the other. I much prefer Nik’s SilverEfex where you could group and fine tune multiple control points at once. Adobe have fixed that inefficiency, so here you can see that Mask 4 is a group or “layer” of three Radial Gradients sharing the same slider values. Again, this is great.
So you’re now wondering what if you now want to adjust one of the three Radial Gradients independently? In that case you just drag that Gradient and drop it on the Create New Mask button. The Gradient is now moved onto its own mask with the same initial settings.
One downside is that this dragging and dropping – which is so useful – isn’t mentioned on the Help panel that appears when you click the little ? button they’ve hidden at the top of the Masks panel. This Help lists a lot of keyboard shortcuts, probably too many, but doesn’t give the user a hint about dragging and dropping.
New features
Four new ways to select image areas for local adjustment
So they’ve united the old splits or silos between the different local adjustment tools, and they’ve allowed you to group local adjustments. For me those are big, practical wins.
But new features are what usually draws the eye, and Adobe have added new ways to select image areas for adjustment:
Automatically select the subject
Automatically select the sky
Automatically select a colour range
Automatically select a luminance or brightness range
The first two will probably attract most attention, and no doubt there will be many images which fool the AI-based logic and no shortage of “it didn’t recognize my kangaroo” complaints.
Yet while subject and sky selection are handy enough on their own, for me the real power of these tools comes once you combine them with the other local selections – adding or subtracting. There’s also an “intersect” which I suspect few people will ever need or use (even if they find it via its Alt/Opt modifier key).
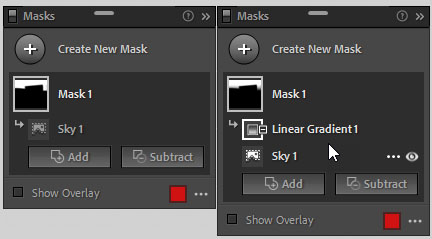
Here for example I first selected the sky using the new tool, but initially it produced a sharp edge. Fair enough, the shape is from a modern building. So I then added a Linear Gradient and set it to “Subtract”
Notice how subtracting a gradient from the sky blurs the outline
– ie subtracting from the sky selection – and this combination of two selections has produced a softer edge around the building.
A couple of thoughts on the Sky feature:
I am surprised that Adobe didn’t add some kind of sky replacement feature.
It’s a shame that there’s no feathering control that would allow you to smooth the edges of the adjustment. As shown on the right, you need to add one or more subtractions.
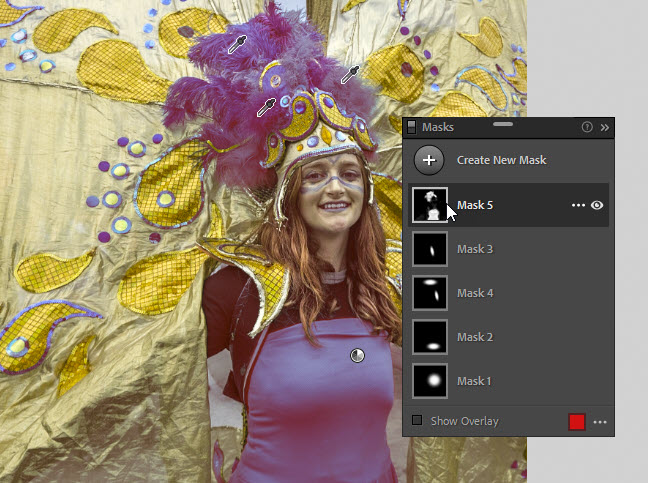
While it’s likely that the Sky and Subject selections will draw most attention, don’t ignore their Color Range counterpart. For some photographers, it will be at least as useful, and here you can see how it allows one to select and adjust the blues in this image.
In this screenshot the cursor is over the mask and the red overlay makes the blues purple, if you’re wondering.
Notice how I used Shift + click to add different shades of blue to the range – these are the Color Pickers on her headdress. Shift + click is already standard elsewhere in LR whenever you use a Color Picker.
Yes, it was always possible to use the HSL panel to change all the blues throughout this image.
But remember my earlier comment that the real power comes from combining the tools, so here the Color Range selection can be used in conjunction with other selections. For example, I might add Radial Gradients to subtract her t shirt and her face paint, and this would allow me to change the blues only in the headdress and wings.
Conclusion
This is going to be a major upgrade to how many of us work with images. I’d say that in some ways I do find Masks less pleasant an experience, more fiddly than the old local adjustments. The Help panel shows how in some ways it’s over-specified. On the other hand, they’ve successfully unified the local adjustments into a single feature, and the new ways to select image areas make Masking an altogether more powerful tool. Even fewer trips to Photoshop?
No excuse for not using a mask
To finish, while I have shown screenshots from Classic Lightroom, I have always been a big fan of Lightroom Mobile and would advise anyone to explore what they can do with it. Sometimes on the train home I’ll import new raw files using my iPhone, or I’ll play with adjustments to pictures I imported earlier when I was at home. It’s so damned convenient to have this mobile extension of Lightroom. And as you’d hope, the new Masking does work in all parts of the Lightroom world.
So here I added a Select Subject – but doing it on my phone. Mine’s not the latest phone – it’s an iPhone 8 – and the raw file isn’t in the cloud which means Lightroom Mobile is working from a smart preview.
In this case the selection isn’t perfect, even if it is pretty good. But for me Lightroom Mobile is not the final stage before printing or whatever, and I don’t expect perfection. What I want is, as I say, the convenience of trying these things when I’m on the move, and I can easily refine the Select Subject in Classic Lightroom.
I’m not being cruel when I say that I can’t tell you when you’ll be able to get your own hands on Lightroom 11. But it can’t be too far away now, can it?
Update November 1, 2021
When I wrote this post in late September I wasn’t allowed to write about other features, but one of the most handy is that you can now filter on months and dates. So imagine you want to find all the pictures you’ve taken at Christmas or in the first week of November, this long-requested little feature is ideal.
Today I released version 2 of my plugin Capture Time to Exif. You can download it from Photographers Toolbox or allow it to automatically update. The main changes are:
Major update of the interface’s layout
Better handling of Exiftool on Mac
The latter is the more important and was necessary because Catalina and Big Sur users often found that the plugin wasn’t working. Everything looked fine, there were no error messages, but nothing was happening to the images because its Exiftool component was being blocked by Apple’s recent changes. Many users read the documentation and tips to install a separate copy of Exiftool, then tell the plugin to use this copy, but this method is now mandatory for Mac users and should be automatic.
Other changes in 1.30:
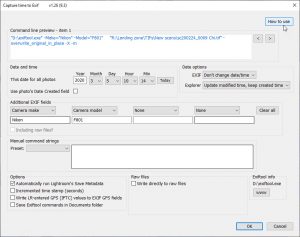
Added thumbnail showing the photo referenced by the current command line
On Windows the command line preview can be saved automatically to the desktop as a batch file
On Mac the command line preview is displayed in a dialog box which can be copied
Exiftool commands are saved in a jb Plugins subfolder of Documents (to avoid clutter)
Changed text message when user writes to raw files
Can now set blank values for the Additional Fields
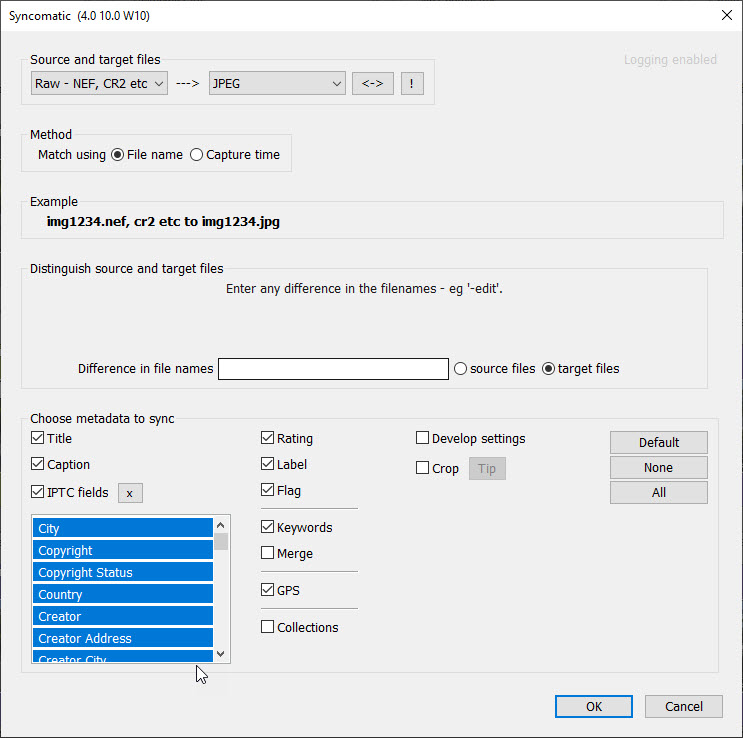
As well as the performance improvements which the Coronavirus lockdown gave me an opportunity to write, this version was triggered by a feature request to allow the user to choose which metadata fields should be included in the sync operation.
Previously, while you could choose Title and Caption on their own, most people seemed to be fine syncing all metadata between two groups of images or within stacks. This produced a simpler interface, which people readily understood. To throw in a couple of clichés, “less is more” and “be careful what you wish for”.
With the easing of lockdown in the UK, I did plan to mark my second vaccination by officially releasing the big plugin updates of the last year. That process begins with Syncomatic 4.0.
It’s not a radical upgrade and the new features seem barely worth a full version number. But that indicates a database upgrade and also, unfortunately, the dropping of older operating systems. I just wish Adobe would drop their “3 versions back” policy and only force an OS upgrade when really necessary, but I don’t expect that to change!
For me the good features are:
Upgrade filename now defaults to include the Lightroom version, something I have suggested a number of times to Adobe. It’s goodbye to helping clients figure out whether Lightroom Catalog-2-2-2.lrcat is their latest catalogue!
Not much has changed in 3.3 – except for performance….
Over the years I’ve heard from a few people using the plugin to sync metadata between far larger numbers of files than I really anticipated – not thousands but tens of thousands. They were finding that the plugin worked, but very slowly indeed.
So I had looked over the code and occasionally experimented with different approaches, but I didn’t want to risk fixing a plugin that wasn’t broken. After all, no matter how slow it may have been, it was always a lot faster than synchronising large amounts of metadata manually!
Earlier this year someone had reported that the slowdown wasn’t linear and suggested that processing bigger numbers of images made the plugin exponentially slower.
The Covid-19 lockdown and my low opinion of the UK government’s abilities gave me lots of home-time to mull over the problem, and the exponentially-slow performance theory did make a lot of sense. The code was written to allow for multiple occurrences of the target filename, so each source photo was being compared against each target photo, even after a match had already been found.
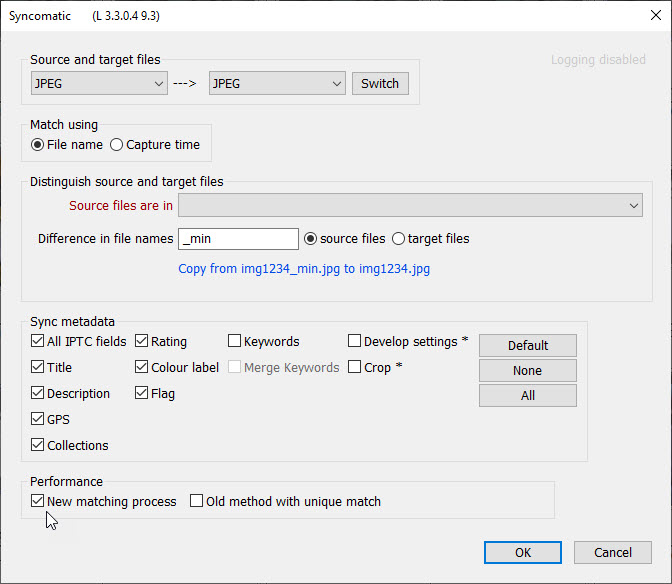
So my initial optimisation was rather inspired by how people often delete dating apps after meeting the perfect match. That’s the Unique Match option (right). With my test sample of 776 pairs of photos, it completes 4 times faster than the old method.
The second idea was a complete rewrite of the matching process, and there I had the benefit of 10 years’ more experience of programming in this environment. That’s the New Matching Process option, and with my test sample of 776 pairs, it completes 33 times faster than the old method. With more photos, the improvement should be even more noticeable.
My recommendation is to enable the New Matching Process, which is now the default. Please test it carefully and let me know your thoughts. I’m not planning other changes to the plugin, but if you make a persuasive case…. Update: The new process is now the standard process.
I’ll also share my stats below:
9.3’s out now and while it’s not terribly exciting it does contain three small improvements:
You can now create ISO adaptive presets without hacking xmp – select some low and high ISO images that you’ve adjusted and just save a preset, making sure you choose the adaptive ISO option.
There is a new local adjustment to shift the Hue. It’s useful enough to change the colour in a part of the image, but Hue really only comes into its own when you combine it with the Range Mask.
HEVC video files are finally supported in LR on Windows. This is important because it’s now the default video format on iPhones and made it awkward managing those video files with photos shot on the samer mobile phone.
This image shows what I mean about how the Hue shift slider comes into its own once you combine it with the Range Mask. Here I sample the colours in the mask (coincidental choice of picture!) using the Range Mask’s dropper. In this case a single click with the dropper was sufficient but one could also hold down Ctrl and drag over the mask or use the Shift key to select multiple sample points.
The problem of managing PSBs remains for any PSBs which are bigger than LR’s 65,000 pixels long edge or 512 megapixels limits. But maybe my indifference was deepened by knowing that there was already a way to manage PSBs and that it can help with files of any size.
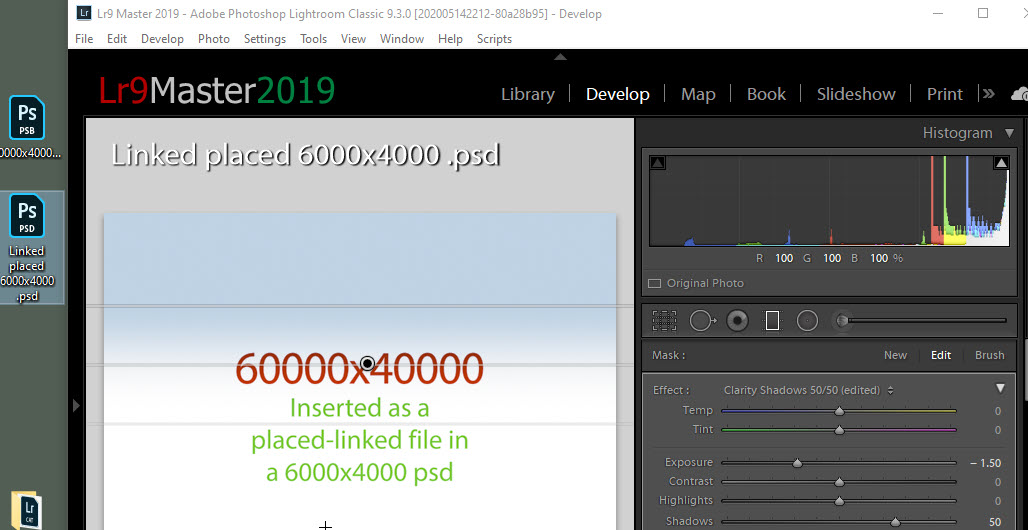
Essentially, you can create a proxy file representing the PSB and catalogue the proxy, be it a JPEG or whatever. In my view it’s more effective to take advantage of Photoshop’s File > Place Linked command and place a link to the big PSB in a smaller TIF or PSD which LR can catalogue and even adjust.
So here on my desktop (left column) you can see a 60k*40k PSB that I couldn’t import into LR, but which I added to a 6k*4k PSD using File > Place Linked. And in LR I’m making adjustments to the PSB.
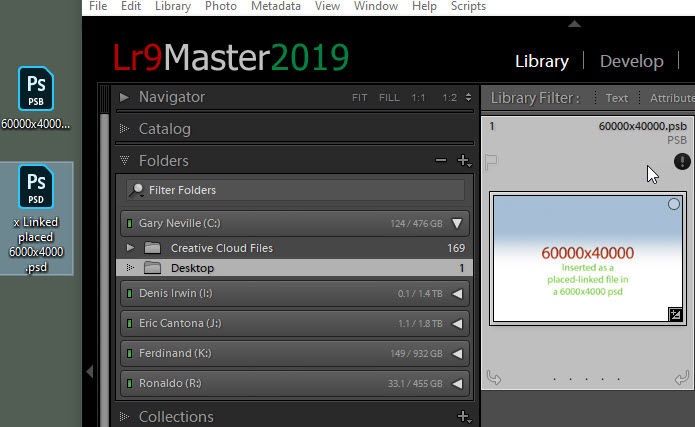
As an alternative, you can get the proxy file into LR, then make it go missing and fix the missing link by pointing to the PSB. So here you can see how I renamed the PSD on my desktop, and then pointed LR to the PSB. The advantage is that I have the actual PSB catalogued in LR, so I can see and manage it, but metadata won’t save to the file and I can’t adjust it in LR.
I’d go for the first method, but I just wouldn’t hold my breath waiting until there’s no need for any such stopgap.
I said April, and it’s the 30th, so here is Search & Replace 1.7 with extra features and general tidying up to make it more intuitive to use.
This will be called 2.0, but first please just use it as you would normally do, and let me know of any problems. I am not expecting anything but I have made a lot of changes, so if the problem is serious I’ll fix and update the plugin as quickly as possible. After all, I am at my desk….
Try enabling the highlight new features button, or take a look through this list of changes:
Reset buttons added to plugin panel in Plugin Manager
IPTC locations to keywords updated with do-no-export at each level
Added This Photo button to search/append/transfer only for selected photo
Auto-completion of text in Search tab
Changed layout of Append tab
Added box for a space between text and sequential number on Append tab
Stopped workflow filters from creating Unknown state and city levels
Transfer to keywords rebuilt – more fields, top level group keyword
New ways to change case of field and added previewing
Replaced case change button with checkboxes
New checkbox to highlight new and reworked features
New checkbox shows summary of Before
Button to swap over search and replace fields
Moved iView tab into its own file and wrapped it in a function
When only one photo is selected, the annoying message has be replaced by buttons to select all.
Smart collection panel added
Trial mode warnings made more obvious
Information about separator character improved
Added ability to select the plugin’s custom fields as target fields
Added ability to select any plugin’s custom fields as source fields
Fixed bug affecting Favourites on Transfer tab
Added Switch button on Transfer tab which switches the source and target fields
Added change log in Plugin Manager
Added more logging, listing system and preferences
Tidied up the Workflow Filters tab and added some buttons from the floating dialog
Disabled main buttons on SR and A tabs when keywords selected as target field – misleading as plugin doesn’t change these fields
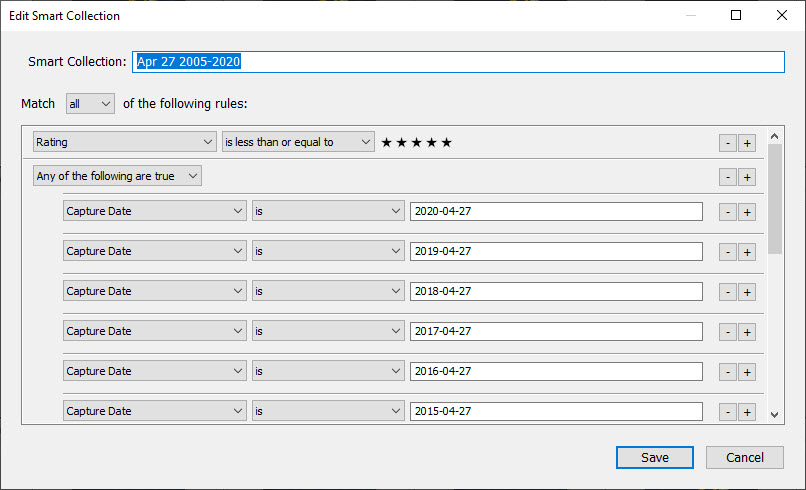
The new On this Date feature
Give this a good workout! Here you can see a great example of what I want it to do, so reading from the top:
Create a smart collection based on the capture date (edit date is the alternative)
Target the 27th April, or “In range” let’s you specify a range of dates, while “Days” produces one smart collection for each day in the range
Do every year from 2005-2020 – this is in the After panel
Include criteria from a previous smart collection called “One star” – shown in the Before panel
Save it in the Best collection set and call it April 27 – the little “!” button calculates this if you don’t want to type
I’ve just released version 1.26 of my plugin Capture Time to EXIF which lets you write to EXIF fields by sending commands from Lightroom to Exiftool. In no particular order, these are the changes:
Updated Exiftool for Catalina
How to Use button – links to video on operation and troubleshooting
Added more EXIF fields to Metadata panel so more fields like camera can be written by the plugin
Fixed bug creating batch file
Improved preview when user chooses to use the Capture Date entered in the Metadata panel
Save Exiftool Commands are now sticky
Added Change Log in Plugin Manager
Added Troubleshooting tips in Plugin Manager
Refined handling of raw files – Exiftool also rewrites any xmp file
Added Plugin Manager option to use your own copy of the Exiftool app
And video!
While I try to make my plugins as intuitive as possible, what seems intuitive to one person isn’t necessarily true for others. And although I seek to ensure that they work properly, I can only anticipate so many variations and possibilities, so sometimes stuff will go harmlessly wrong. Documentation can help, but seeing something in operation is often more useful, and during the Coronavirus or Covid-19 lockdown I am recording a few videos as well as updating some plugins,
I’ve just uploaded video showing Capture Time to EXIF and demonstrating basic operation and debugging:
Updating a scanned photo with the camera make and model
Using the command line preview to debug Exiftool problems
It’s recorded on Windows but I mention some Mac-specific details and will add some Mac recordings as soon as I can.
And by public demand (why? why? why?) you do hear the sound of my voice. For now I’ve resisted the terrifying temptation to record a piece to camera, but you never know….
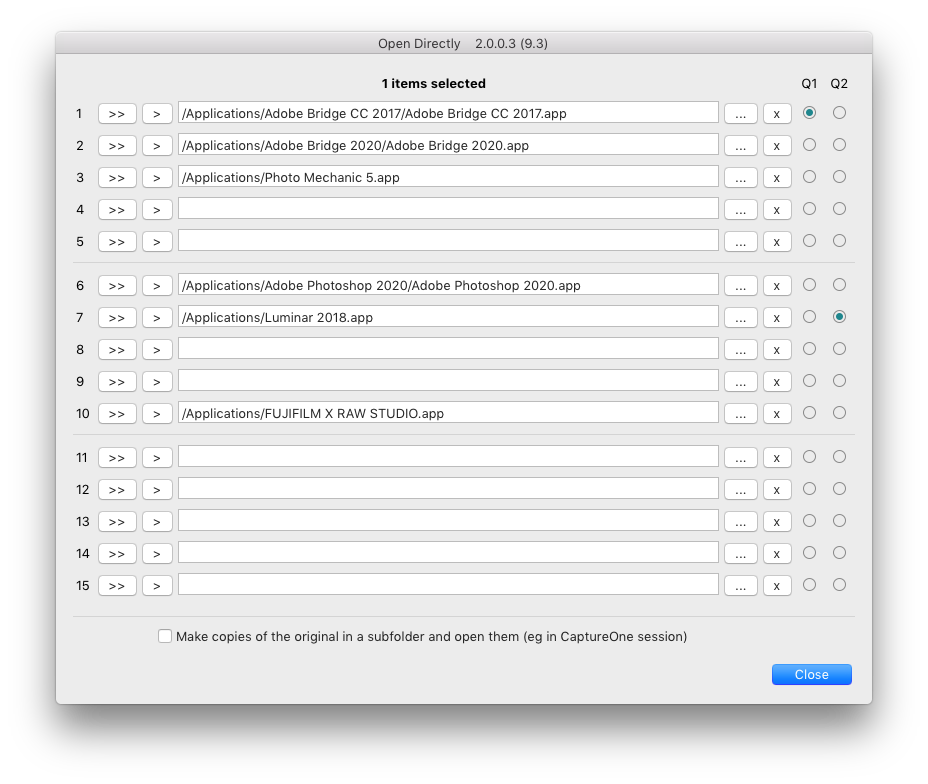
Last week someone emailed me asking for an improvement to my plugin Open Directly. This plugin allows you to send raw files directly to other programs. For example, let’s say you want to process a photo in Capture One. If you followed Lightroom’s External Editor method, Lightroom would first convert raw files to PSD or TIF and would defeat the purpose of sending them to Capture One. The Open Directly plugin simply sends the photo directly to the other program.
As I was already working on big improvements to the Search and Replace plugin, it was a perfect time to ask – I have the time, and needed a change. The request was only whether I could increase the number of supported apps from 6, and that was pretty easy, and I ended up polishing a few other aspects of the plugin.
Quick menu names can display the name of the app which they launch – previously you had to remember which app would be launched
So version 2 has a range of enhancements:
Number of apps increased from 6 to 15
Second quick menu added, so you can send a photo to an external app without going through the dialog box
The user can choose which apps can be launched via each quick menu
Quick menu names can display the name of the app which they launch
Added reset buttons in Plugin Manager
Added a change log
Try it now and let me know if you find any problems.
This new file is called version 1.7 but will be released as version 2 later this week. If you already own it, the upgrade will be free.
As they say, the devil makes work for idle hands….
The right hand column lets you decide which apps will be available in the quick menus
As I have written in another post, I am a big advocate of importing files using the Embedded and Sidecar Preview workflow. With my Fuji X-T2 set to Raw+JPEG, it allows LR to quickly display full resolution previews from the sidecar JPEGs. But once I have reviewed the pictures, I no longer need the JPEGs for any purpose and they just use up storage space, so for a couple of years I have been using this little script which you may also found useful:
The script simply loops through the selected raw files, looks in the Explorer/Finder folder for JPEGs with corresponding names, and deletes any it finds. Other JPEGs, for example ones which you shot on the phone and don’t match a raw file, are ignored. Two little details:
The script can’t tell Lightroom that the JPEG has gone, so you’ll still see RAW+JPEG on thumbnails. You can get rid of this by either:
Doing a Folder > Synchronize – which is what I do
Running batch rename – what I used to do
The script’s free and not supported.
Installation and setup instructions are at the start of the file.
When Adobe revealed the new way to set ISO-dependent defaults, I was glad they hadn’t added a slick UI for a task that people might only perform once or twice, if at all.
But I was quite surprised that they expected users to hack xmp files using text editors. As with the move to profiles, Adobe seem to have wanted to get this done quickly and for all Adobe Camera Raw-based apps at once, whatever the rough edges for individual apps.
This got me thinking though. Forget fancy AI-driven stuff or machine learning, why not let the user select images that they edited previously and generate the xmp preset by averaging the slider values for each ISO speed?
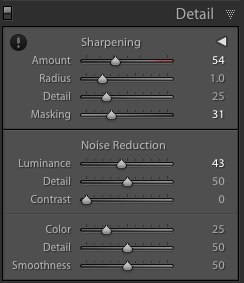
That was effectively how I created my own new defaults. In fact I used my plugins to tabulate the sharpening and noise reduction values by ISO, then slotted the numbers into the xmp file, and I don’t know why Adobe didn’t offer more assistance to those who are disinclined to mess around like this.
You can try this little average sharpening and noise reduction script which follows up on this idea of generating the preset’s ISO lines from one’s previous editing. You select a bunch of edited photos, run the script, and it puts the ISO-dependent lines in a text file on the desktop – you slot these into the xmp preset file. Setup instructions are at the top of the file.
I see this as a curiosity, something one might do once, and not get too obsessed by the detail.
While this site is about Lightroom, I thought this article From the ACR Team: Merge to Panorama was worth pointing out as it combines in-house knowledge about the LR/ACR processes with thoughts about using the camera to take advantage of them.
You may have noticed something a little different about my panorama workflow in ACR compared to what you may have done with other stitching tools. I did all my editing, including choosing a raw camera profile, after stitching the panorama. The Merge features in ACR work their magic at a very early stage in our raw processing pipeline. This means two things: 1. The image created by the merge should be treated just like any other raw file as far as editing is concerned and 2. You can (and should) save your editing for the merged result. As a photographer, I love this order of operations because I much prefer making my edit decisions while viewing the final panorama and giving up the flexibility of a raw file is not something I want to do until I have to. Some of the edits you may have made on the original images are copied to the result, but only a couple are actually “baked in” and not editable after the merge.
One of those crucial “baked in” edits is dust spotting. I’d always try to correct dust spotting before merging because spots typically recur at the same place in each frame. Selecting all of the frames and using LR’s AutoSync mode, I can correct the spots on one frame and AutoSync automatically syncs the correction to the others. That’s a lot more efficient than leaving dust spot corrections until afterwards and correcting that same spot of dust on 5, 10, 15 or however many places it occurs.
And there’s an interesting Paul Trani video on sharing from Photoshop. I’ve always used Generate a lot, mainly for web design work, but the sharing of Photoshop Cloud Documents is new and could be handy. Maybe you never needed that feature and you will soon forget just how it works. But the key is simply to remember that xyz can be done. If you just remember that possibility and keep it somewhere in the back of your mind, on the day that you do suddenly see a need for it, figuring out how it works will be easy.
 IPTC Extension Location Shown/Created are now also shown in the Library Filter by the Refresh Workflow Filters command, helping you review entries in those fields.
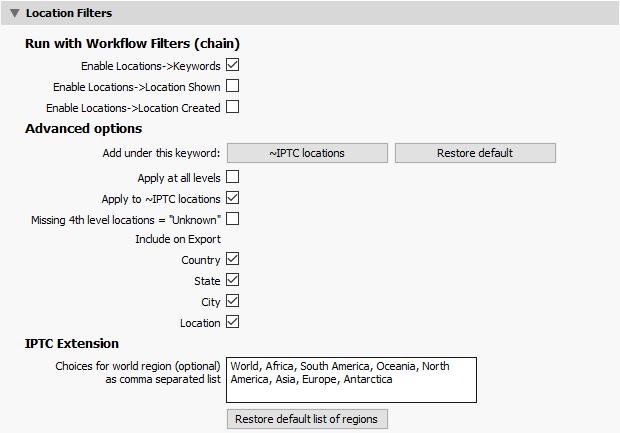

 The changes are quite subtle but the main ones are:
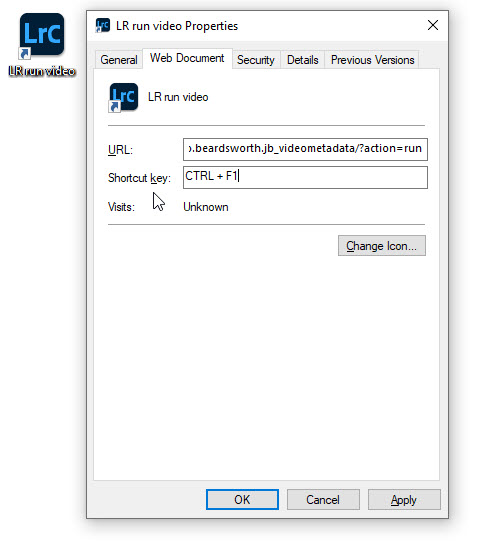 the shortcut key to Ctrl+F1 which doesn’t seem to be used by any other program (the shortcut can be anything you want).
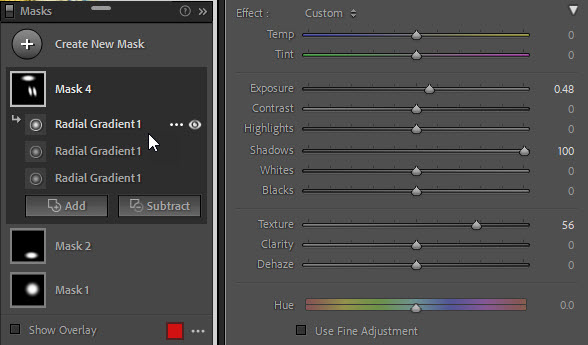 Another similar frustration was that I often want to make similar adjustments in different parts of a picture but was forced to fine tune each local adjustment individually. For instance, imagine there’s more than one face that I want to emphasize, so I might add a couple of my Clarity/Shadow Radial filters. But then if I wanted to change both adjustments, I’d have to select one and then the other. I much prefer Nik’s SilverEfex where you could group and fine tune multiple control points at once. Adobe have fixed that inefficiency, so here you can see that Mask 4 is a group or “layer” of three Radial Gradients sharing the same slider values. Again, this is great.
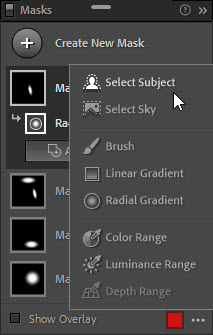

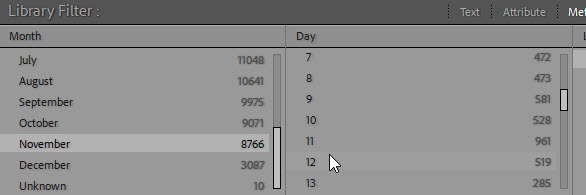 I wasn’t allowed to write about other features, but one of the most handy is that you can now filter on months and dates. So imagine you want to find all the pictures you’ve taken at Christmas or in the first week of November, this long-requested little feature is ideal.
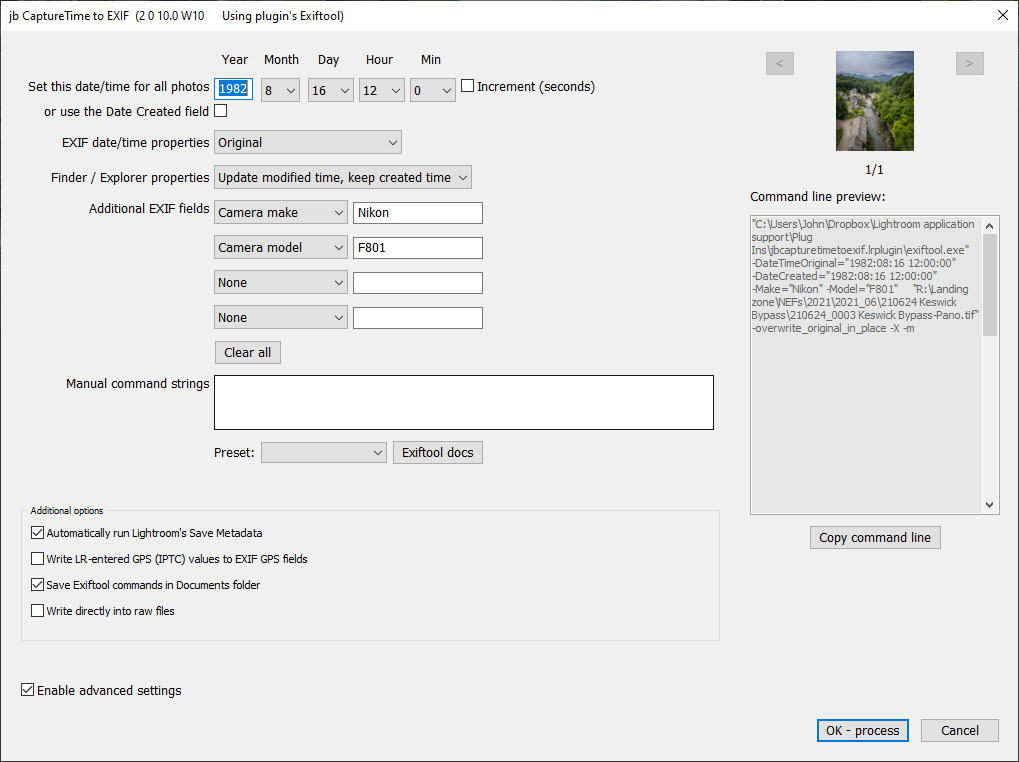

 So I had looked over the code and occasionally experimented with different approaches, but I didn’t want to risk fixing a plugin that wasn’t broken. After all, no matter how slow it may have been, it was always a lot faster than synchronising large amounts of metadata manually!
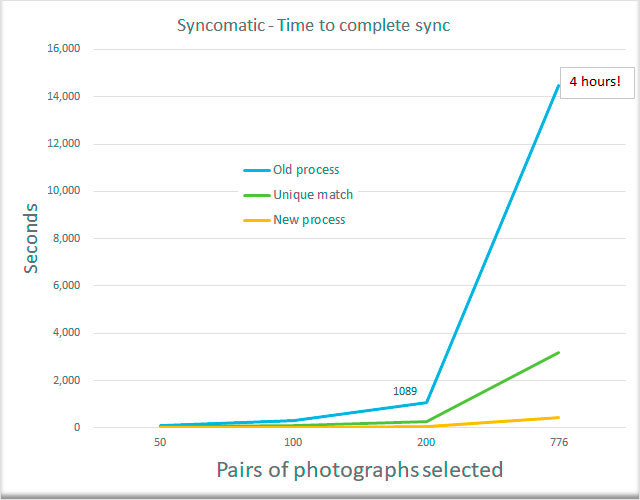


 Added This Photo button to search/append/transfer only for selected photo
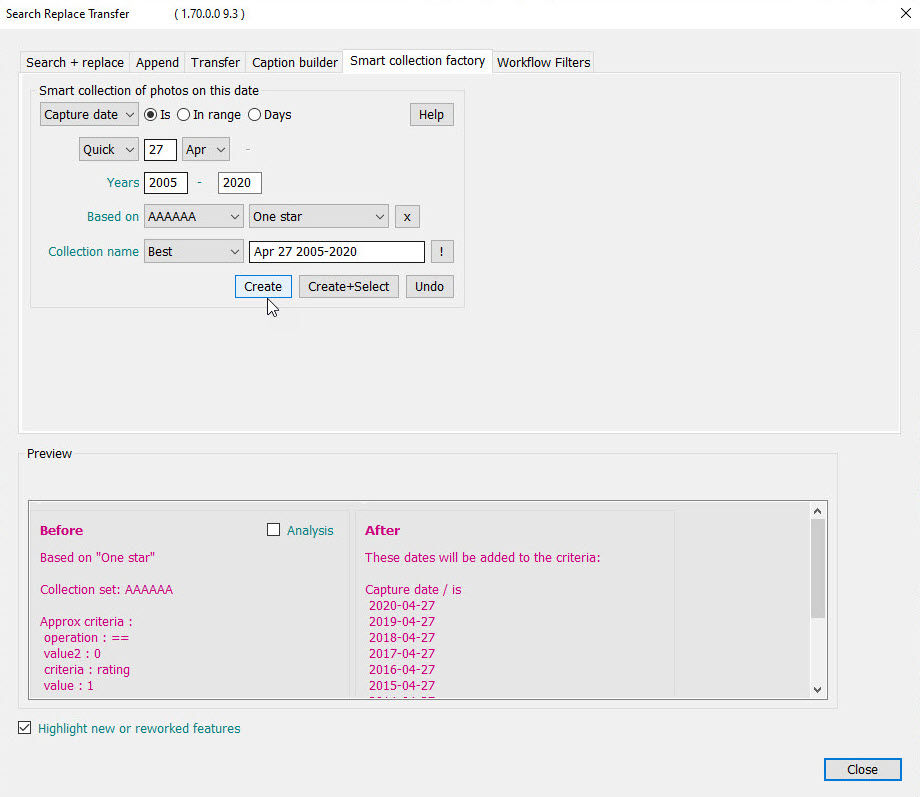
 I’ve just released version 1.26 of my plugin
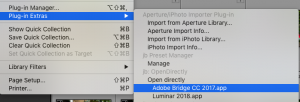
 When Adobe revealed