Lightroom 8.2 Enhanced Details

1:1 view
Lightroom 8.2 came out yesterday with a single new feature worth highlighting – the Enhanced Details commend. This applies AI or machine learning – what I call “educated brute force” – to the process of converting a raw file (more tech info here). To put it in Adobe’s words:
In this release, we’re introducing an all-new Sensei-powered feature, Enhance Details. Harnessing the power of machine learning and computational photography, Enhance Details can now be found in Adobe Camera Raw, Lightroom Classic CC, and Lightroom CC for Mac and Windows, and takes a brand new approach to demosaicing raw photos. Demosaicing is an integral process to raw processing and works at the pixel level, converting the information captured by a camera into something that looks like the photos we all expect to see.
The new Enhance Details algorithm enables you to increase the resolution of both Bayer and X-Trans based photos by up to 30%. Enhance Details works on any raw file apart from files converted to a linear raw file, HDR or Panorama merged files (though you can apply Enhance Details to the ingredient files first and then merge), smart proxies, lossy compressed DNGs, or DNGs saved with 1.1 compatibility. Applying Enhance Details to your photos can greatly improve fine detail rendering, improve the reproduction of fine colors, and resolve issues that some customers reported with their Fujifilm X-Trans based cameras.
I guess I am not a pixelpeeper!
I have tried Enhance Details on a lot of images, especially Fuji X-Trans, but while I find the results interesting I find it hard to get very excited about the feature.
It is slow, and the differences are hard to see, so whether it’s worth the time or worth cluttering the catalogue with large duplicate files, for me the jury is out.
But it is worth investigating. I’d just describe Enhance Details as more of a technology preview and I very much agree with Julieanne Kost’s comment:
… I would suggest applying it on an image-by-image basis starting with images that have visible artifacts and which require the highest level of quality (images that will be printed large format, for example)…..
Any Difference?
 One thing worth trying is to create the EDNG, then select it and the RAF and send them to Photoshop using Edit In > Edit as Layers in PS.
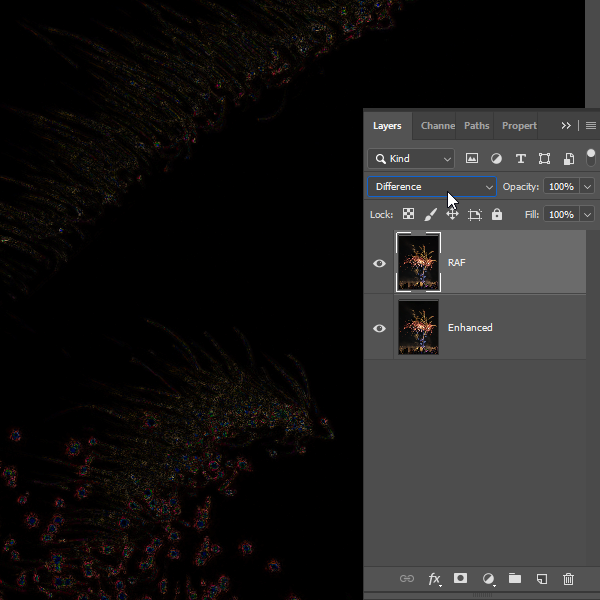
In the Layers palette, you can set the top layer’s blending mode to Difference.
Black then indicates no difference between the images, and you can see some effects as you zoom in to 1:1.
You can just see there is an effect (benefit?) with pictures like this which have lots of fine detail.But it isn’t clear on many images.
Whether it’s worth the time or cluttering the catalogue with large duplicate files, I’m not sure. But it’s worth investigating.
Or subtract one image from another
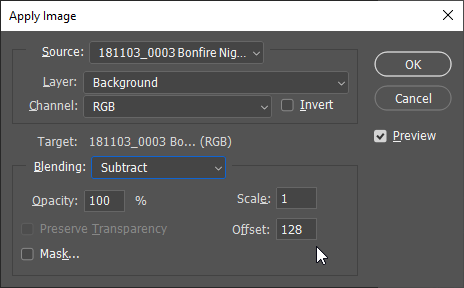
There is another way to assess the benefit – Photoshop’s rarely-used Apply Image command.
- Make sure nothing else is open in Photoshop, an optional step which keeps things simple
- Select the raw file and the EDNG in Lightroom, and choose Edit In > Photoshopso we open the
 two files
 - In Photoshop, activate the raw file and choose the menu command Image > Apply Image
- From the Source drop-down box, select the other file ie the enhanced version
- Set the Blending Mode to Subtract
- Scale should be 1
- Offset should be 128
- Click OK and we’re subtracting one image from another and then adding 50% grey to make it easier to view

Sometimes it’s easier to review differences by subtracting one image’s pixels from another. I don’t usually use this method, since the Difference mode is easier, but it is worth knowing how you can use blending modes for analytical as well as creative purposes.