Where’s the beef?

Ars Technica reports Expression Media ripped out of Microsoft Expression Studio:

Expression Media, Microsoft's digital asset management software for cataloging photos, video and music, will continue to be available as a standalone product but will no longer ship with Expression Studio, effective with the upcoming Expression Studio 3 release. Microsoft will continue to market Expression Media to digital photographers, who make up the largest customer base for this product, and will continue to invest in digital photography. Expression Studio and Expression Media will be sold separately.

Despite the headline, that's not necessarily bad news. Equally, it's not good either - it's simply impossible to know whether Expression Media has much of a future. It's now 3 years since Microsoft bought iView, and the longer they fail to drive the product forward and deliver an exciting new version, the less relevant it will inevitably become.

For instance, only yesterday Jeffrey Friedl released a Lightroom plug-in which allows you to catalogue video files in Lightroom, so how much longer will it be until he or someone else includes all file types?

Or here is a screenshot of my own plug-in which adds user-definable custom fields to Lightroom and includes read/write from XML. Those two features mean I'm just a short step for DAMkind away from reading iView/xMedia data exports and writing to Lightroom custom fields. Could do it now, in fact. Even if I never release that plug-in, I could use it for my own final move away from xMedia and that would be another advocate gone. Disinterring my old analogy of DAM and serial monogamy, how often do lost loves ever come back?

DPi and an announcement

Last week's DPI show was fun. Only doing one platform session a day, it was a lot less arduous than the three daily sessions I did at Focus, and it meant I spent my time doing Q&A on Lightroom and Photoshop. Working one to one, or with small groups, you're able to establish their needs and explain in real detail, and you feel they go away knowing exactly what they're going to do next. In many cases, that was to buy Lightroom or to use my favourite features - Auto Sync above all.

Anyway, I didn't get much time to go round the other stands, but I did have a closer look at Blurb's books than I'd managed at Focus. I've still not got round to finishing the Civil War book, other things getting in the way, but I was again very impressed with the quality and have got to get mine done. But most of all, I learnt something that really delighted me - this week Blurb are going to….. Oops, I'd better point you to Blurb's blog:

We

Zipping Lightroom backup files

While Lightroom's backup files are self-standing catalogues, and can be run without any further fuss, they do take up a lot of disc space - until you realise how much they shrink when zipped. I've always zipped them because of this space issue, but another reason requires me to break a little confidence…. A while ago I met someone who had double clicked his backup catalogue files and had managed to get new pictures into the backups and into his master catalogue, insofar as it was possible to identify one in the hundred or so he had accumulated.

Anyway, The Photo Geek (Matt Dawson) has developed a handy plugin for zipping Lightroom's backup files:

One obvious downside of backing up is the increased consumption of disk. For example my backups for a ~10000 photo catalog are around 220Mb each. Multiply that by 52 backups a year and 11Gb of my laptop

SlideShowPro 1.96

SlideShowPro's latest update is a bit more significant than most - it introduces a “Ken Burns” pan and zoom effect - so I'm downloading it right now. A Lightroom version of this is here now.

Search and replace – the very first release


The term Release Candidate reminds me as much of Ronnie Biggs‘ impending release from jail, but here is a Release Candidate of BeardyReplace, my Lightroom 2.3 plug-in designed for changing text in Metadata Panel fields. It does three things:

search and replace plug-in1. Searches and replaces metadata text
2. Appends text to metadata fields
3. Transfers text between metadata fields

“Search and replace” hunts through the chosen field for a word or phrase, and replaces all its occurrences with alternative text. So for instance, you may have some images captioned with “Close-up of columns at Paestum” and others with “Frontal view of columns at the Capitol, Washington DC”. How do you insert the word “Doric”? You could select the first group, then add the word, and then do the same to the second group. Tedious? Well, this command lets you search for the word “columns” and replace it with “Doric columns”.

“Append” adds extra text to the chosen field, either before or after. For example, imagine some images’ captions are “Close-up of columns at Paestum” and others have “Overview of temple at Paestum”, how do you add the text “, Campania, Italy” to all the images in one action? You would normally have to select each set at a time, so the Append command lets you add the text “, Campania, Italy” to all of them at the same time.

“Transfer” copies data between fields, replacing the existing contents or compounding them. If you want to copy the filename to the title field, or as shown here add the contents of two fields, this tool can handle many of the basic tasks.

The plug-in targets images in the same way as Lightroom. If you have selected some items, then it will only update them. If you have no images selected, it assumes all visible images should be targeted. In each case, there’s a preview of the effect – using the arrows, you can move through the targeted images one by one, or just drag the slider if there are lots of pictures.

One thing worth knowing is that Lightroom’s SDK has a very clever feature that most other scripting environments ignore – code-driven changes to field values can be undone by the user. So if you put incorrect data into a field, it doesn’t matter if you did it the usual way or via a plugin. On the other hand, it’s also worth adding that I may have found a bug where undo fails to restore previous data in the title field. Other fields appear to be OK, but I’ll update this once I know more.

It is a demo version, limited to 30 runs, and I’ll probably make the unlimited version available through e-junkie at $10? Any thoughts?

Note for coders or Mac users wondering why nothing’s happening
One little oddity / annoyance is that after you enter some text, on Mac you have to tab out of the text box to make the button active (on PC, it’s normal – you just click the button). It all comes down to how the text entry boxes “lose focus” and therefore make the button available, and the answer is on p71 of the SDK manual:

There is a platform difference in the focus behavior:
➤ In Windows, the control loses focus when the user clicks outside it.
➤ In Mac OS, it loses focus when the user uses TAB to shift the focus, not when the
user clicks outside the control.

Blur with Clarity

Maybe I’m unable to appreciate the subtleties he’s trying to express, but I was somewhat underwhelmed with both of Alain Briot’s essays on in-camera blurred landscapes (part 1 and part 2). Such images “need to rely both on color, placement of elements and use of shapes and lines to be successful”, “the type of light you use is very important”, “good processing is crucial”, and “setting the black, white and the grey points precisely is crucial to the success, or failure, of these images”. Well, I never. But then at last there is something specific to camera-blurred images:

I found that using a [Photoshop] high pass contrast filter on top of the image, after all the adjustment layers are completed, helps a lot in defining the detail level of the image.

Because these images are by nature less detailed, sometimes increasing the level of detail is necessary. This helps bring up the interest level in the image as well as make the image more engaging visually for the viewer. Of course adding details is not possible. All we can do is increase what is there. We cannot add anything new. And again increasing what is there through sharpening only takes us so far since there is little detail to start with.

This is where High Pass Contrast processing comes in. This approach basically increases the local contrast between objects, or more appropriately here between the different areas of color and contrast. In effect, to my eyes, it increases the contrast of the lines in the image, the black level of these lines I think.


I do something very similar – but in Lightroom. Its Clarity setting has pretty well the same effect.

Here it is set to 100, which is unusually high for me, and in this case I’ve also given it a second dose using a gradient filter over the whole image (the same technique as in my Ultra Clarity preset, only with a single gradient). Normally I wouldn’t go anywhere near that far, and a much more moderate Clarity setting is usually all that one of these blurred image needs (or can stand).

The picture, if you’re interested, shows the Kingston Lacy beech avenue which runs for over 2 miles along the busy main road between Blandford and Wimborne in Dorset, and it’s a well known location (see one example) that couldn’t be much more perfect for the exercise-averse photographer. You park right by the trees, prise your backside from your Recaro bucket seats and you’re all set to go….

Thoughts on learning Lua

No, I’m not going to write any tutorials, but Sean suggested writing some thoughts on learning Lua for Lightroom….

Getting this far with Lua has been a real struggle. I am not a trained programmer like Jeffrey Friedl. I know no C, C++, Cocoa etc, so I don’t know if Lua is easy for people with such a background (though it heartened me when he described Lua as “horrid”). But I do have a lot of experience of the various flavours of Microsoft VB and VBA, and of JavaScript, PHP, AppleScript, ActionScript 2 and 3, and other useful technologies like XML, SQL etc, all self taught. That brings a confidence that things should be possible, but it barely overcomes the why the bloody hell should I add features that should have been there in the first place? So over the last year the effort has been pretty sporadic, learning a certain amount, achieving something vaguely interesting, and then finding something else to do with my time.

I’ve always liked Microsoft’s approach to scripting professional applications – the Office suite being the prime example. There’s an assumption that you’ve got to enable the end users to do it themselves. In Cubicleland you don’t want to wait for the IT guys to write that code to automate your budgeting spreadsheet or interface with the MRP system. Bringing in a programmer means jumping through authorisation hoops, and inevitably you’ll find yourself left with something you can’t tweak as you perceive the task has nuances you hadn’t anticipated. Rely on self-interest and provide a user-friendly language and tools, and the end user should be able to do the job. That’s how I began going off the rails.

In InDesign and Photoshop, Adobe provide the perfect triangle of scripting languages, VB+JS+AS, so you can automate and streamline your work. Integration with the non-Adobe world is enabled with two platform specific languages, while cross-platform functionality is there for an Adobe-centric workflow. Imagine how great that would be for Lightroom. Someone somewhere would make Photoshop do something like apply NoiseWare or other noise reduction to a batch of images with different settings for differing ISOs. Or say you wanted to bring into Lightroom all that metadata originally entered in Aperture or that is now in the Excel data exported by some other DAM. Again, one VB or JS or AS script could do the job, and if the coding hits a problem there would be a world of experience and existing code and examples that even an ex-accountant could adapt.

Lua by comparison is a niche language, and what documentation exists is written for programmers. You have to write the code in glorified text editors rather than helpful development environments such as Microsoft’s VB IDE, and when there’s a syntax error it’s in gobbledegook that’s only intelligible once you have enough experience not to have made the mistake in the first place. Lightroom’s SDK is also mainly targeted at the developer, provides just half a dozen examples, and you can no longer learn by taking apart others’ plug-ins because everyone’s now encrypting them.

But Lua is not going away, and after a load of grumbling I usually snap (and funnily enough, as I added that link I realised that I’m wearing my Mt St Helens t shirt).

So what I’ve been doing over the last year is attacking Lua every so often. Little and often. You also need to approach from a number of directions until the penny drops. Once you’ve got the SDK, I would suggest customizing a copy of the web template. As it’s in Lua, it will get you familiar with the syntax and structure. It also has HTML and CSS elements, so you’re not totally on foreign territory, and you can focus your efforts on producing something you can use. In my case I just adapted the built-in web template so my online contact sheets have star ratings to help draw attention to the best images (as if they won’t do so themselves!).

Second, look at customizing the FTP client that’s provided in the SDK. That exposes you to how export plug-ins work, and also to the way the Plug-In Manager works.

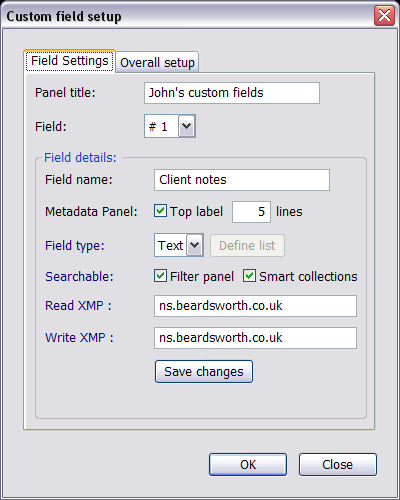
The third area of the SDK is custom metadata, and again there’s an example which you need to tear apart and put back together again. Here you can add new fields to the catalogue, new metadata panels, Library Filter columns, and Smart Collection criteria. This area is where I’ve spent most of my real effort, and it typifies something I dislike about Lua – that you need to proceed by trial and error. Change a line, reload the plug-in, see if you’ve broken anything, hope the error message is remotely decipherable, and then see if it still does what it’s supposed to do. Only then is the SDK documentation and attempt to marry up its descriptions to what you think you’ve just done.

That’s not the only reason I keep both the SDK PDF and the API html open all the time – it’s also so you can see what else is in the toolbox. For example, while writing the last few days’ plughini I noticed that you can code the progress bar. While that’s off the critical path for now, sometimes the really hard bit is realising that something can be done. So look at others’ plugins, and note what is possible.

So a lot of of the learning process is about taking apart a series of substantially-discrete components. Adding custom fields, reading and writing fields, calling dialog boxes, accessing operating system properties…. All in a language that glories in making itself doubly obscure by calling arrays “tables” and forcing you to define that each line of code as a “row”. It’s a bit like building your own car – put the effort into learning to make the bodywork, tyres, leather seats etc, and eventually the experience coalesces and you can bolt together something that’s roadworthy. For those who know Trainspotting, and perhaps another volcanic analogy lurks here, it’s all a bit like Renton getting his fix.

Lightroom Plug-in #1 – PseudoRatings

Imagine you want Lightroom to print contact sheets with the rating under each thumbnail, but you want them to be shown as stars. This can be handy when you're sending the contacts sheets to someone and want to point out which images you consider to be the best.

Perhaps unbelievably, Lightroom won't do it out of the box- you can only print the ratings as numbers. So a while ago a client got me to write a Bridge JavaScript which converts the ratings into asterisks and places them in the barely-used IPTC Subject Code. You select the thumbnails in LR, save their metadata, find the files in Bridge, run the script, return to Lightroom and then read in metadata. At the end of all this palaver, Print can then reference these “pseudo ratings” in the IPTC Subject Code field. It works, but it's hardly “it just works”, is it?

So plug-inPseudoRatings is a little plug-in for Lightroom 2 and 3 that eliminates this roundtrip to Bridge. The plugin comes with an explanatory PDF, a print template that uses the Subject Code, and a thoroughly mercenary link to my Amazon wish list.

While the plug-in does have its immediately-practical purpose, that's not the real reason for creating it. It may have taken me almost a year to get round to it, but finally when the neighbourhood's bubbling with a fifth of the UK's confirmed swine flu cases, it seems a good time to learn the horrid Lua programming language that's required for writing Lightroom plug-ins….

The bleeding war book

So often it takes a fresh pair of eyes to notice something. As I wrote here, I'm designing my Blurb book in InDesign rather than following BookSmart's canned layouts, meaning the recommended workflow is InDesign > PDF > Photoshop > PNGs > BookSmart. While I could set up a Configurator app to automate saving multiple PNG files, these Photoshop batch processing things always break or involve an inordinate - if for some enjoyable - amount of tinkering (hence Lightroom).

But there's an easier way… InDesign > PDF > Acrobat > PNGs > BookSmart. So you create the book layout in InDesign, then export the PDF and choose the option to open in Acrobat. Once in Acrobat, it's File > Save As, and PNG is one option. You get one PNG per page, and they're numbered sequentially so you just import them into BookSmart, check they're sorted by filename, and then use AutoFlow to create the pages in the right order. It makes revising the design and getting it into BookSmart a relatively slick process.

Yes, I know the page numbers look odd - these are from different spreads

With the workflow wrinkles being smoothed out, I'm now putting more thought into the layout, and the big decisions so far have been about borders and bleeding. My initial inclination was that I wanted all pages to have the non-bled art book style of the above screenshot. So a single image centred on the page, with a brief title, a page number, and no decoration - just lots of white around the picture. And to my eye a plain, fine black border looks as right on the book layout as it does on an inkjet print (it's slightly exaggerated in the screenshot but the one on the left has the border).

Yet the more I've been playing around, the less sure I am that this design works. For one thing, have you ever noticed that pictures in coffee table books never have borders? That's the case even when a bright area lies close to a picture's edge and seems to leak out into the surrounding paper. Of course, it's not a rule or convention that one needs to follow, but “borderless-ness” (an Iain Dowieism?) seems inevitably intertwined with a bigger decision about whether to keep the non-bled fine art look which suits the above portraits, or adopt a mixed layout with fully-bled pages. In terms of my bookshelf, it's Fay Godwin's Our Forbidden Land versus Don McCullin's Sleeping with Ghosts, and a much-published friend put it really well:

I do think these considerations should be primarily content driven. Fay Godwin's landscapes are for the most part timeless, immutable and essentially static so the design should reflect that unlike my dynamic and anything but static pics of musicians!

Don McCullin it has to be ;).

Punch the sky – updates

Just a couple of updates to yesterday's presets - 4 punch graduated filter and ultra clarity.

Punch the sky

Regular readers of my Lightroom rantings will no doubt be aware that I’m not a big enthusiast for Develop presets, and I use them so rarely that I probably wouldn’t miss them if they weren’t there (along with Quick Develop, the Tone Curve, Snapshots, and the Filter Panel).

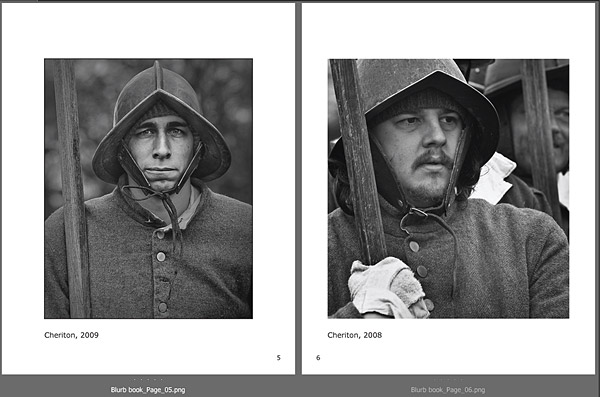
But to be fair, presets are an efficient way to apply a consistent treatment, and I do have a few that I use now and again. My ire is really better directed at the unending stream of presets being offered up as though they’re the dog’s bollocks, and at the enthusiasm of those who keep gobbling them up by the dozen. So why am I posting this 4 punch graduated filter preset?

Well, I’ve not had a Pauline moment (or as a vegetarian been eating those canine orbs) but wanted to illustrate a point about applying Lightroom’s graduated filters to weak-looking skies. As in this article, the obvious approach is to add a Graduated Filter with a negative Exposure or Brightness value, mimicking the effect of graduated lens filters on the upper part of the frame. But it isn’t the only way to approach the problem.

The first picture here is the unaltered image and while there is some cloud detail, much of the sky is weak. A negative Exposure or Brightness Graduated Filter would darken all tones at the top of the image, so often my first choice is something we could never do with lens filters – Clarity. 
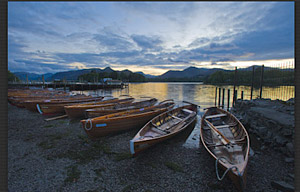
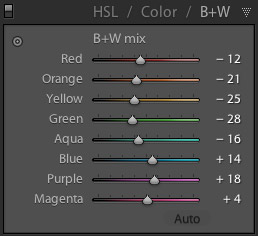
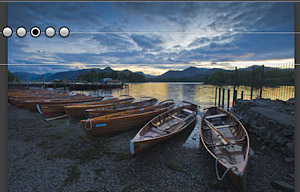
This slider increases local contrast, and can be applied to the whole image (in the Basic panel) or with the graduated filter tool – in which case you can apply it as many times as you want (even to the entire image what, another preset?).

In this case I’ve applied it 4 times, darkening my clouds and making them stand out much more against the surrounding lighter areas. It is an effect that can, of course, be overdone and perhaps works best where the clouds are heavy, and less well on blue skies with puffy white clouds. It’s also not a case of either Clarity or Exposure in a Graduated Filter, but using them in combination for more subtle results – with a bit more punch in the sky, you can set more restrained Exposure or Brightness values. That’s the 5th, middle dot.

As for the preset, I grouped the 5 filters to make their relationship obvious. I’ll have to upload it to the Adobe Exchange – it’s the dog’s bollocks, honestly.

A brand new DAM

It was no secret that it was on the way, but my friend Peter Krogh’s The DAM Book has now been listed on Amazon US and Amazon UK. The original book was immediately unusual in its cover not being emblazoned with “Photoshop CS2” or focussing on the image processing side of the pixel mountain. Peter rightly saw that the management and safeguarding of digital photos was digital photography’s dangerously-neglected aspect, and this understanding of the real needs meant the book’s shelf life extended across software release cycles and remained applicable after entirely new programs were introduced. But even long-lasting underlying principles eventually need dusting off, and this new version of the book is a complete rewrite. Thanks Peter for asking me to tech edit a couple of chapters – I look forward to my signed copy!

And now for some of my own reflections… (or alternatively). When you look back at the the original book, it offered a solution containing four main strands – Bridge, iView, Photoshop, and DNG tying it all together and letting you see the adjusted raw data in any other program. I had already adopted the same sort of workflow before the original book came out, and my first contact with Peter was when he noticed something I’d posted about DNG in a forum. In fact, around the time he must have begun his book for O’Reilly, my UK publishers had turned down my similar book proposal as they thought their US partners – O’Reilly – simply wouldn’t be interested in the topic….

So I was already very much in agreement with his approach then, and it’s interesting to consider how things have changed over 4-5 years. For the better? Well, I’m not so sure. In Lightroom and Aperture we do have a pair of new and significant cataloguing programs which combine processing with DAM, but extensible XMP’s promise of portable metadata remains unfulfilled by them (Aperture can’t even read sidecar files) and the idea of a DAM program limited to camera-originated file types is now challenged – if it was ever valid – by our having three DSLRs that can output video too.

Have things changed for the worse then? No, not that either – the old four-legged solution still works fine, Bridge CS4 is a big leap forward (for example), Adobe have maintained parity and let you do the same adjustments either in Lightroom or the Camera Raw dialog (perhaps surprisingly when they could have introduced more product differentiation here), while iView’s still there in its Microsoft Expression Media guise and still shows your DNGs’ adjusted appearance. Bigger raw files keep piling up, Nikon and Canon still fail to offer DNG as an option, still offer in-camera settings that only make sense if you use their own raw converters and which you never have time to set when you’re busy snapping, and otherwise-excellent programs like Capture One still insist on new file formats (at least for now only their medium format back customers are being offered this delightful suppository).

But we will continue to cope – all this still hasn’t overwhelmed the fingers in the dyke of yet-bigger hard drives, multi processor cores, and all that the extra RAM – and we’re still successfully finding yet more comforting ways to slow computers down to our thinking speed. Maybe “different” is all we can ever expect, and success in DAM is still being there, still holding back the flood (the version on Fripp’s Exposure LP is even better).

Pandora’s box – or InDesign to Blurb

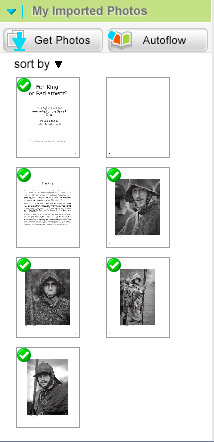
There’s never one way to do something, and whether it’s climbing a hill or putting together a book, it usually makes sense to have a good look around before setting out. Initially I’m going to do a test book with the minimum number of pages and trying out things like colour images (eek) or double page spreads which the final book probably won’t contain. So I’ve been reading through forum posts (RSS feed) or the Blurberati blog, and playing around with Blurb’s BookSmart – pretty well confirming my feeling that it’s a bit too limited for how I like to work.

What I mean here is that once I see an image in a layout, there’s a pretty good chance I will want to adjust it again. This expectation may be a personal thing, always wanting to fine tune and never saying something’s finished. Or perhaps it’s more in the very nature of putting together a book where the images have to look right in context rather than individually. Either way, BookSmart doesn’t let you do anything smart, and you’d have to reopen the original in Photoshop or Lightroom, create a new JPEG, and replace the one that’s in BookSmart’s My Imported Photos.

That’s a rather pedestrian way to work, and nor do I like the thought of retyping captions which are already in the images’ metadata. So rather than do any layout work in BookSmart, I’ll take advantage of having InDesign where I simply link to the originals, double click to re-open them in Photoshop, and add captions by scripting. Another advantage is that I could take InDesign’s PDF and to an alternative print on demand service, go down an eBook route, or even output to Flash (for no good reason other than being able to do so!). Only at the very end of the process, when I’m happy with how the book looks in InDesign, will I need to go to BookSmart.

The fun is in getting InDesign layouts into Booksmart because Blurb doesn’t yet accept PDF files (maybe later this year) and InDesign doesn’t export PNG which Blurb say is preferable to JPG for text quality:

Even in the latest InDesign (CS4), exporting to JPGs (300dpi or 600dpi) results in subpar text in your bound-and-finished Blurb book. It is better to export from InDesign as 300dpi PDFs, rasterize those in Photoshop (300dpi, RGB color, anti-aliasing checked) and save out as PNGs (8-bit, non-interlaced). Sounds like a pain, and I admit, PDF support would indeed make life easier for all of us. But if you can set up a batch action in Photoshop, this process is really a breeze. And, most importantly, it results in very clean custom text.

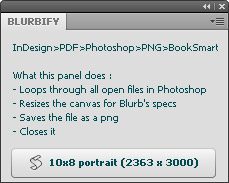
So I’m going to have to go on the rather circuitous route in Designing Blurb books in Adobe InDesign – ie InDesign > PDF > Photoshop > PNGs > BookSmart.

Photoshop is merely a stepping stone between PDF and PNG, but opens each page in the PDF as a separate file – no fun saving between 20 and 100 out to PNG and making sure the files would be numbered so that BookSmart’s Autoflow button would put the PNGs in the correct order. As I’d been looking for a good use for Adobe Labs’ Configurator, thus was born a very beta Blurbify….

Robin at by theartofengineering has done a really helpful series of posts:

And here are Blurb’s full-bleed page dimensions.

Derrick Story podcast

Derrick Story's latest podcast is Adobe Engineer Pops the Hood on CS4:

Meet Winston Hendrickson, Sr. Director, Engineering, Digital Media, for Adobe.

During this chat in a conference room at Adobe headquarters, Winston and I talk about what's happening under the hood for Bridge, ACR, and Photoshop. He explains lots of goodies such as, the difference between the Lightroom and Bridge “databases,” the similarities between the Develop module in Lightroom and the sliders in ACR, improvements in Photoshop, and some great lesser-known features such as Camera Profiles. Terrific, informative interview.

SSP Director 1.3

I'd been holding off upgrading SlideShowPro Director until I had enough time to do so properly, but I was itching to try the smart albums included in version 1.3.

Here I've set my new photos section so it's now calculated automatically. I always find that any “latest photos” section soon becomes static, or involves some duplication of effort. So this section now shows photos since a certain date, but excluding those in a couple of albums which are reserved for this blog. As I already use Director's Lightroom export plug-in, which makes adding new pictures a moment's work, and smart albums mean I could update a number of albums in a single export. They're not terribly sophisticated yet, and target far fewer fields than in Lightroom, but are a great start.

It’s damp Up (Pacific) North West

Laura ShoeBefore the credit crunch washed away O'Reilly's Inside Lightroom blog, its content had only just benefited from a new wave of writers including Seattle-based Laura Shoe.

Her Digital Daily Dose is a not quite daily blog on digital photography with some well-written posts on Lightroom such as snapshots and virtual copies, and on on my favourite Photoshop CS4 feature, content-aware scaling (they should have called it “smart transform”).

This image is from her Photo Illustrations section.

Grayscale killer, qu’est que c’est

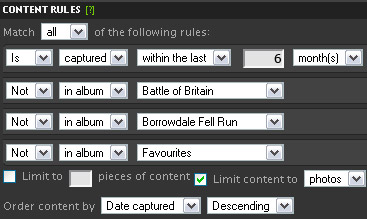
I know, I've said before that I'm too English or middle-aged to appreciate words like “awesome” or “wow”. And I wouldn't normally mention Matt Kloskowski's latest Lightroom tip as it isn't new to me - but I do appreciate the rant:

So here's an easy one that I've been using a lot lately (because I just discovered it). It's the V key in the Develop module. This simple little key changes your photo from color to grayscale. By the way, the word “grayscale” is just geek-speak for Black & White. Seriously, I don't understand why it's not called Black and White. That's what photographers call it right? I know graphic designers use the term grayscale but when was the last time you said “Hey, he shoots a lot of great grayscale stuff”, or “Wow, look at that awesome grayscale photo!”

Take a bow, Matt, you're in exclusive company. Some of us hate “grayscale” so much we've abolished it. Realisant, mon espoir.

Speak wisely

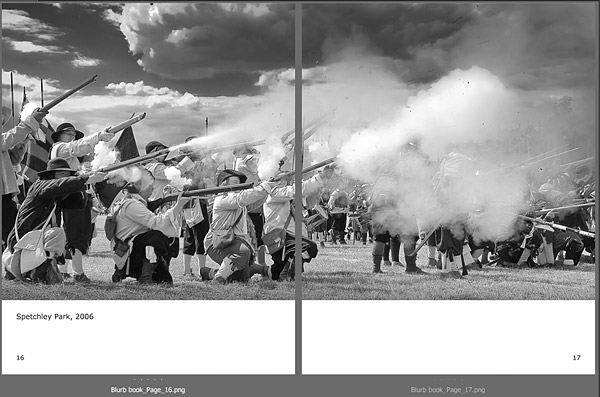
Anyway, getting back to the post I'd intended to write, for a while I've been intending to do a book of my English Civil War pictures and thought it would be interesting to blog about the project. I actually mentioned it 18 months ago when the idea was to go through Lulu, but I soon found myself short of time and all that energy went into learning InDesign. In any case, Lulu seems much more suitable to another project, and I saw Blurb's stand at Focus on Imaging and think it looks the better option for a coffee table book. It's now time to get started.

Very typically for me, I already feel more concerned about the details of the workflow. There is a “marketing strategy” and I'll blog later about a way I'm hoping to use on-demand printing as part of it. There's a book plan too - mainly pictures but also text pages to explain the themes, and perhaps satisfy a long-overdue ambition to write a history book by the age of 30….

But you very quickly get into the nuts and bolts. How much of the work can I do in Lightroom, how much in InDesign, how much in Blurb's BookSmart - and how flexible can I keep the whole chain? A good example is that each picture will have a brief caption, probably an abrupt what / where / when - so this picture from Sunday would be “Pikeman, Cheriton, 2009”. I'm really - really - not into unnecessary retyping and want to add these captions automatically, but unfortunately using Lightroom's title field would produce many inconsistencies - some might be “Pikeman”, “Cheriton”, “Pikeman looking worried”, “Rob or Joe”. You can fix these upstream in Lightroom or downstream in InDesign or BookSmart, but then you're into cascading the changes downwards or finding efficient ways to control the process. So right now I'm trying out a few ideas (Blurb's forum) and I'll go over a few options in my next post on the project.

So any experience of producing books with Blurb?

3000 roundabouts in Birmingham, Warwickshire

Focus on Imaging showReally enjoyed Focus on Imaging. Presenting was nerve-wracking, of course, and I really felt out of practice, but the most fun was being on the stand answering all sorts of questions, most common being what's new in CS4, should I upgrade to CS4 or get Lightroom, how's Lightroom different from Photoshop, why won't CS3 read my 5DMkII files, and should I switch to Mac for Lightroom (answer: yes if you want to, but don't feel you need to do so - look at the Dell XPS Studio 64 bit Vista with 12Gb of RAM). Hardly any time to look around, and less time to do shopping for myself, but I did get a chance to examine some Blurb photo books and was very impressed with the image quality, both colour and black and white.

It was particularly good to put faces to names I've known online - such as Chris Bishop, Richard Earney of Inside Lightroom, and Sean McCormack. Poor Sean, I was only giving the fella a lift back to his hotel, and we must have discovered every roundabout and closed car park south of Birmingham before - half an hour later - he reached for his iPhone and its GPS. Later that evening (we went for a pint, a bite, and a natter in the loudest darts pub in the Midlands) it didn't take him so long - the first wrong exit from a roundabout and out came that iPhone. But at least he told me one thing he'd discovered - I'm actually friendlier in person than he'd ever expected. Now that's a compliment - and a justifiably backhanded one too. Phew!

Bottom fishing

Speaking of being opinionated, you wouldn’t be surprised to hear I’m more of a BBC or PBS kind of web site viewer. It’s a big turn-off if a site seems too commercial or its language sounds too “Yoof TV” for my taste. So its title alone has always made me feel that Matt Kloskowsky’s Lightroom Killer Tips wasn’t my kind of reading – as well as its excess of presets. That’s OK – there’s room for all sorts – and Matt’s writing is nowhere so gee-whiz or the site so boorishly-commercial that I overlook its RSS feed or podcasts. And every so often, there’s a gem which surprises those of us who think they know it all – such as this tip on multi photo layouts.

The key to the method is hacking a Lightroom print template file. Using Notepad or TextEdit, you change one setting, and this genetically-modified template can then be used to breed other custom layouts. So I used this template to show my red-legged spider from a couple of weeks ago with the frames that immediately preceded it (proof, if needed, of what always seems to happen when you just force yourself to keep working the same subject for a few minutes more).

Naturally enough, as we’re in the week of Darwin’s 200th birthday, there are one or oddities and everyone’s in a trial and error phase. What I seem to find is that it works best if you don’t drag images onto the layout. Instead, choose Selected Photos in Print’s Toolbar, and as you select a picture it is added to the preview – without the need to delete the funny placeholder. To get the pictures in specific cells, change the thumbnails’ order in the Filmstrip by dragging and dropping them until the layout looks how you want.

I can imagine though that at least one Aperture-using reader is sharpening his keyboard in derision at what for Lightroom users is a hot – or as Matt puts it “cool” – tip. Somehow, it all reminds me of the supermarket’s vegetable area and the more expensive tomatoes which have the ludicrously-unnecessary labels. You know the ones, they say “grown for flavour”.