Managing panoramas

Here’s a quick tip for managing panorama frames.

My own long-term practice has been to assign the green label to originals which are intended to be the component frames of panoramas, HDR, or other multi-frame techniques.I also stack them.

I do this as soon as possible after importing the files from the card. The risk I’m trying to avoid is that I might review one of these frames on its own and decide it’s a dud – badly composed/exposed – and delete it.

Green warns me that the frame is actually destined for stitching or whatever. That colour then carries over to the combined image, so I can then do smart collections by label and file type.

Solo Mode

What:

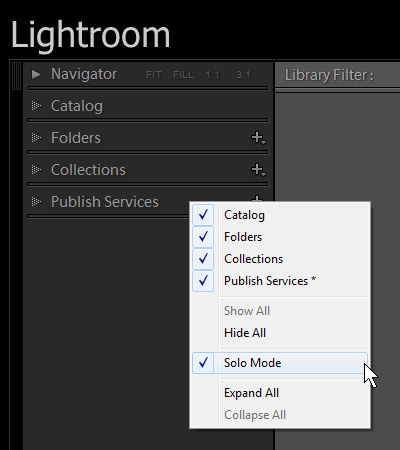
  • Right click one of the section headers, such as “Publish Services” in Library’s left panel
  • Tick “Solo Mode”
  • You need to do this to each panel in each module

What happens

  • When you click on one section’s header, that section opens and the others close

Why:

  • It really cuts down on the scrolling up and down the left and right panels

How to make Flash galleries show more than 500 pictures?

You need to modify the Flash template. This is at

  • Windows: C:\Program Files\Adobe\Adobe Photoshop Lightroom 4.x\Shared\webengines\default_flash.lrwebengine
  • Mac: Applications\Adobe\Adobe Photoshop Lightroom [version]\Shared\webengines\default_flash.lrwebengine

Copy that lrwebengine to

  • Windows: C:\Users[user]\AppData\Roaming\Adobe\LightroomWeb Galleries
  • Mac: [user]\Library\Application Support\Adobe\LightroomWeb Galleries

Open the file galleryInfo.lrweb in a text editor. Notepad is fine on Windows, or TextEdit on Mac where you may need to right click the lrwebengine and select “Show Package Contents” to get to the file itself.

Look at line 21 and replace the following lines with this:

title = LOC “$$$/WPG/Templates/Flash/Bluefire1=Lightroom Flash Gallery > 500”,

id = “com.adobe.wpg.flash.bluefire1modified”,

galleryType = “Flash”,

groupPath = “resources/mediaGroupData/group.xml”,

mainSWF = “resources/gallery.swf”,

maximumGallerySize = 50000,

How do you enable Auto Sync in Library?

AutoSync mode in Library means that metadata changes apply to all the selected images, and is normally enabled by clicking a switch in the right panel (F8). But what if that switch isn’t visible?

It took me a while to figure this out, but the switch is only visible when you are in Loupe view (E) and when multiple items are selected. So when you’re in Grid view, you get the “Sync Metadata” button. But when you’re in Loupe view, that button changes to “Sync” and it is inactive if only one image is selected. If multiple images are selected (via the Filmstrip) that Sync button has a little switch that lets you go into AutoSync mode.

Why are colours different in Flash galleries

It’s because the Flash gallery’s SWF (the Flash file) isn’t colour managed.

Flash does now support colour management.  But the SWF would have to be ActionScript3 (the version in Lightroom is AS2)

You also have to consider what the person viewing your site is using. Assuming the visitor isn’t using a Flash-hobbled device like an iPad, that computer would have to be running Flash Player 10 and would only get good colour if the monitor is properly colour-managed.

Alternatives:

  • If you want to use a Flash-based gallery, look at SlideShowPro for Lightroom. It’s not colour-managed though.
  • If you can code Flash, get SlideShowPro standalone
  • Commission me to build a colour-managed Flash site

Anyone using speech recognition with Lightroom?

Speech recognition seems to have been the coming technology since I don’t know when  – I seem to recall seeing DragonDictate in the late 90s – but it is one of those technologies that never seems to have arrived as a first-class way of entering information into a computer or getting it to do what you want. When I first booted up my new PC last year, I noticed that speech recognition was now built into Windows 7 and while it’s not at all bad, I probably don’t use it often enough to become really productive.

For an exercise, this morning I tried it with Lightroom and was quite surprised how well it allowed me to navigate around the program. For example I could move around the modules or select individual panels, but I kept hitting limitations – selecting one collection in the collection panel has been beyond me, as has activating the box in Keywording where you can type in words. On the other hand, once you are in the right context it’s possible to gain a little speed, especially if you know your keyboard shortcuts. So by preceding the shortcut with the instruction “Type” it’s possible to do things such as set ratings or pick flags, by saying “Type P”, “Type U” or “Type X” are the equivalent  of hitting P, U or X, and the same applies to stars and labels, while “Type G” or “Type E” allowed me to switch between Grid and Loupe views. Other tasks like entering keywords were possible, but once once I’d manually entered the correct area in a panel. And it still seems very slow though. Anyone out there using speech recognition with Lightroom? Is it just a matter of persevering until I’ve enough experience of the speech recognition tool’s foibles? Or is it a technology that still lies just beyond effective reach?

Emailing from Lightroom

Here’s a quick summary of how to email files from Lightroom:

  • The built-in way is to export files as JPEGs to your hard drive, then attach the to an email. Neat, eh? 1990s retro computing enthusiasts line right up!
  • To email files directly from Lightroom, see Andréas Saudemon’s Mac-limited export plug-in Send By Mail Plug-in for Lightroom
  • For Windows and using an email client like Outlook see Steve Sutherland’s MapiMailer Email Export Plugin for Lightroom
  • For those using Gmail on Mac or Windows see Tim Armes’s LR/GMail

Wouldn’t it be so much easier to have File > Send as Email?

MediaPro1

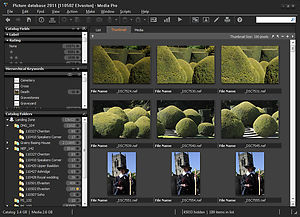
Last year PhaseOne finally acquired – “liberated” may be a better word –  Expression Media from Microsoft and gave it back its old name, MediaPro. I say “finally” because they had tried to add the original iView MediaPro cataloguing program to their CaptureOne raw conversion products back in 2006, and also because in those five years the post processing and cataloguing landscape has been transformed with the introduction of two major programs that combine those once-separate activities. To give an idea of how completely things have changed, I remember announcing Microsoft’s takeover to a trade show at Manchester United’s stadium, and since 2006 oil money has transformed City from a long-running joke into a pumped-up monster which might no longer need to call in Channel 4’s Time Team archaeologists to find any trophies (oh for the Arab spring to sweep away Abu Dhabi’s feudal rulers – that would be so City). Of course, some things stay the same and after Sunday’s demolition of Abramovitch’s expensive toy, United are on the verge of the 19th league title and another European Cup. But the change in how photographers now manage and process their pictures is “massive”, and first Apple’s Mac-limited Aperture and then the continuing and apparently-irresistible rise of Adobe’s Lightroom make me wonder if there’s any space left for the old favourite. Still, the €50 upgrade from Expression Media may not be an Hernandez-style bargain but is about the right price. At €160 new, MediaPro looks overpriced – more like an Edin Dzeko?

A lot of the work appears cosmetic – a modern, gloomy-grey interface – and almost all the familiar features remain untouched. But

  • I spotted that the Virtual Earth geotagging feature has been dropped, very quietly, and while I imagine it was Microsoft’s code it’s still a shame to lose one of the few positive things that Redmond did with the program (apart from eventually selling it on). Instead of geotagging within the app, you now have a menu command Window > View Location on Map which displays the first selected image in a Google Maps browser window (it’s little better than a script I think I once wrote!).
  • One very welcome improvement is the lifting of the 128,000 file and 2Gb catalogue size limits. This was probably top of my list – back in 2006 when I met with Microsoft.
  • When you “sync” or save metadata back to the pictures, you can now write  it to sidecar files. Creating sidecars was one of many features that the iView guys had begun and making them work effectively should have been low hanging fruit for Microsoft. Removing the odd limitation to output sidecars to one folder at a time means it’s easier to exchange metadata with C1 and other programs that rely on sidecars (it was always possible with DNGs, of course!). Sadly though, you still have to invoke the sync operation manually, and it still overwrites any Adobe Camera Raw metadata.
  • A second change isn’t mentioned, and I may be wrong in imagining it, but importing speed seems to be enormously improved. Almost instantly I could scroll through thousands of freshly-imported raw files – when you’re used to Lightroom, it’s quite remarkable.

If you’re unfamiliar with the program, take a look at series of tutorials by Peter Krogh who has also written some thoughts here. I’ll add other links as/if they appear, but already there’s Why Separate is Better Than Integrated, a curious defence from Capture Integration of the decision to keep P1 and MediaPro as separate programs (maybe they should call themselves Capture Separately?). Take the alleged problem attributed to Lightroom’s integration where:

“the photographer is tethered to a laptop for instant review of the images by an on-site Art Director. During the shoot cataloging features are completely useless”

Unfortunately this is not fundamentally a result of these two functions being incompatible in a single program but simply of it being Adobe’s first attempt at tethering, and not getting every detail right. Lightroom certainly could, probably should, have an option to switch tethering so it’s limited to the second screen, leaving the main screen to be used as normal. Another example of how it’s merely a design/implementation detail is how there isn’t yet the ability to add an overlay during tethering – a lot of tethered work requires shooting to a magazine cover or other layout (vote here). One could also see it as a result of Adobe’s failure to respond to small studios’ needs for Lightroom to have multi-user capability. So again, nothing to do with separate or integrated!

“take for instance the needs of a Wedding Photographer who is creating/updating his collection of his best marketing materials. In this case the ability to deeply refine/adjust the image is moot.”

Again, unfortunately not! Look at one very common way Aperture fans explain their preferences over Lightroom – they can be doing any task, such as creating a portfolio, and quickly make adjustments without needing to go into another of those nasty un-Maclike modules. Or think how often people demand Adobe merge the Library and Develop workspaces. The trouble is, a lot of photographers do have 5 second attention spans and no matter how much Lightroom’s modular design steers them in the direction of working methodically and efficiently, they don’t want to complete one task before moving onto another. “Creatives” do jump about.

I doubt we’ll ever get close to 2006/2007’s promise of “one ring to rule them all” where the whole photographic workflow would take place in one environment, but separating managing and post processing is like pulling apart the two supporting pillars of a modern, efficient workflow. If you do use CaptureOne, it makes sense.

As a final point, Aperture seems stuck in its niche and no longer the “Photoshop killer” that so spurred Adobe on, Lightroom increasingly appears to be growing organically and without the need for continuing major investment, and at the same time the excitement seems elsewhere – Adobe can’t take the risk of not putting enormous energy into creating solutions that either run on, or create content for iPads (other tablets exist). Now, more than any point in the past 5 years, I’d love there to be real competition to Lightroom.

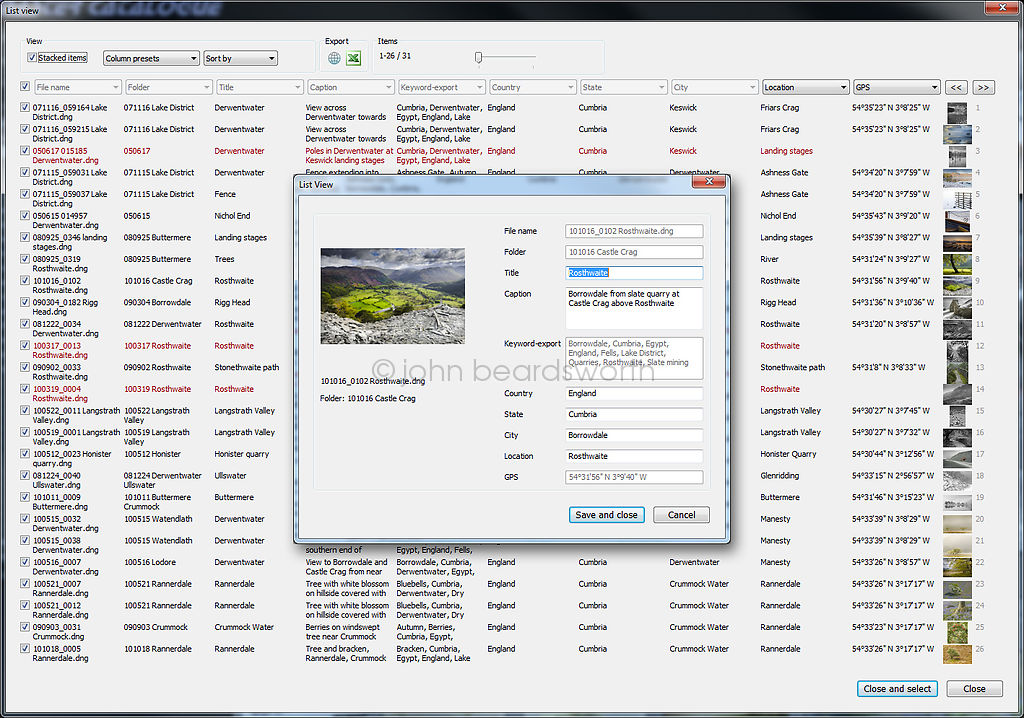
List View – new Lightroom plug-in

It’s been bubbling away for a while, and some people saw it late last year, but in the next few days I’ll be releasing a new plug-in – List View.

It does exactly what the name suggests and provides a list view which some of us feel is sorely missed in Lightroom’s Library. After all, it’s a lot easier to review your metadata in a list than by scanning a grid of thumbnails.

The plug-in currently provides 3 different views. This is the standard view where each row has 2 lines per item for up to 30 pictures, while compact and expanded views show smaller or larger thumbnails. The thumbnails, incidentally, are drawn from the catalogue itself and therefore show each picture in its adjusted state.

Once List View is displayed, scrolling through thousands of items is blazing fast. Note all 10 columns can be changed in registered version - 8 disabled in trial.

Other things you can do with List View:

  • Change the information in any column
  • Save columns as presets
  • Sort by any column
  • Export metadata to a browser
  • Export metadata directly to Excel
  • Edit metadata in a File Info panel

As with my other main plug-ins, it’ll be available from Photographer’s Toolbox. Pricing will initially be £8/$12 which may rise as I add other features. What better way to celebrate the Windsor family wedding?

A perfect shot – in the foot?

No matter how much the Lightroom ethos is about designing a program for photographers from the ground up, there are still those atavistic folk who want to do things just as they suppose they’ve always done them. So every so often you’ll get people wanting Undo to be Alt-Ctrl-Z because it’s how Photoshop has always worked, forgetting that the vast majority of programs use Ctrl-Z. Others will demand point curves, with RGB channels too, crop tools that behave just like Photoshop, or even the ability to work in Lab mode (eek). And I suspect that’s the underlying – and questionable – reason why onOne has released a preview of “Perfect Layers“:

Perfect Layers is the fast and easy way to create layered files in Lightroom. With Perfect Layers you can create and edit multi-layered Photoshop files directly within Lightroom

For an idea of what you might do with the program, as well as Scott and Matt’s video on OnOne’s site, see Sean McCormack’s Quick look at Perfect Layers.

onOne’s product range has always puzzled me – a jumble of filters they’ve developed and ex-Extensis tools “allowing [photographers] to create the images they want and [cliche alert] get back to what they really love to do: go shoot!” Even if I felt Perfect Layers filled an important gap, I’d question that $160 is “a very affordable and reasonable price” – for $100 the excellent Photoshop Elements 9 can do layers and a whole lot more. Apparently it makes financial sense as part of onOne’s $500 suite, but as I understand it anyone who has the suite would already own the full-blown Photoshop.

In my view a more serious mistake is presenting what is an external editing program as working “directly within Lightroom”, and the connection with Scott Kelby will draw even more attention to this hype. As Jeffrey Friedl points out in his hilariously-caustic The Amazing Marketing Power of Scott Kelby:

But what really surprised me is that no one (but me) called him out for his bald-faced lie. [I don’t think Jeffrey uses Twitter]

Scott knows full well that it’s not “Layers in Lightroom”, of course, because he’s an expert in this stuff in general and he helped develop this specific product, but perhaps the marketing potential of the lie was just too tempting to pass up.

There are some interesting comments on that post, not least from Andrew Rodney which shines more light onto the NAPP (while an awe of it as a business model, I’ve always steered clear of NAPP – mainly because it’s far too much like US commercial TV for my taste).  Scott Kelby’s own post also provides a good laugh as the initially-sycophantic “wow, what I’ve always wanted” posts quickly give way to cries of “King’s new clothes”.

In a way, to describe external image editing programs as “plug-ins” is merely another way of hankering back, in this case to what Adobe called “Photoshop[‘s] rich history of supporting these image processing plug-ins”.  But for a $160 price tag, shouldn’t you be more careful not to mislead the technically-unsophisticated photographer? When Apple pulled the same stunt with Aperture’s “plug-ins”, I proposed we should help out developers when they market false plug-ins – let’s just label them “strap-ons”….


Update – also see Jeffrey’s follow-up Scott Kelby Responds, Dazzling With His Marketing Magic and the misleading Layers in (sorry WITH) Lightroom Follow Up 🙂. A simple “sorry” would have been more honest – it wasn’t just a simple grammatical error that was so outrageous.

Blurb plug-in for Bookify

I’ll admit that I hadn’t even heard of Blurb’s Bookify and when I read their announcement of a Lightroom 3 to Bookify Plug-In I wasn’t particularly interested. Just another dumbed-down online service? Instead what I focussed on was the closing comment:

… very soon, we’ll be bringing you more exciting ways to use Lightroom and Blurb together – including integration with Blurb BookSmart®.

It’s a hint of the not-too-distant future – assuming books do survive, that is. As Lightroom becomes more and more dominant, so we’ll soon benefit from third parties like Blurb exploiting its extensibility, the SDK, to offer integrated book creation services. It’s taking some while to catch up with Aperture here, but do you really prefer a solution that depends on using software that forces you to buy one brand of computer and until recently only offered that same brand’s books? Or would you prefer the open market? It’s been a long time coming, but I look forward to what Blurb do next. My guess? A Publish service.

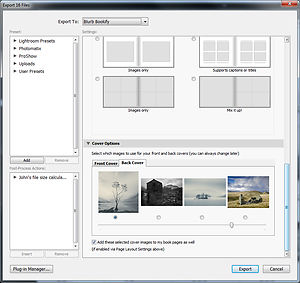
In the Export dialog you can define book types and various features such as front and back covers

Now, I did say what my first thoughts had been. But after having had a good play with the Bookify plug-in, I’m not at all sure that my “just another dumbed-down online service” is fair to it. Right now I have a pressing need to produce a simple book, and I may as well give this a try. This is what they say the plug-in can do:

  • Flow edited Lightroom images into Bookify™ (our online tool for simple photo books).
  • Choose your book’s layout and style from within Lightroom.
  • Stream photo captions automatically into your book’s text boxes.
  • Automatically capture file data for the images in your book.

The upload process went smoothly and I did like choosing some initial settings such as adding the IPTC title and description to each page. After a “Woohoo! We’ve finishing cooking up your book now” message (makes a nice change) you can then edit the book in Bookify’s Flash-driven site. You can easily change page layouts by typing into a box, or by choosing one layout style after another, but it did feel quite dumbed-down – design by trial and error – and when I decided I no longer wanted titles for each picture, I had to remove them one by one. While catering for the thicko, it’s a touch long-winded if you have more DTP experience.

The workflow also seemed unnecessarily awkward when I wanted to add extra images to the book. The plug-in only allows you to start new books, not update existing ones. This meant I then had to export the extra pictures to the desktop and upload them through Bookify’s web interface, and then add the titles and descriptions to each page. It wasn’t too big a problem though, but the Bookify plug-in really should support adding extra images to a book.

I was also a bit disappointed they hadn’t added an idiot proof way to make an image fit a double page spread. Currently I’m adding the same picture to both left and right pages, and then using the keyboard arrows to nudge each image – essentially doing the bleed by eye. The spread looks right on a large screen, but I’ll only really know when the book arrives and I keep thinking Bookify seems so well thought-out I’m surprised they haven’t made this as easy as the rest of the process. Overall, Bookify is never likely to give you anywhere near the level of control that you’d have with Blurb’s InDesign to PDF workflow, but it’s not really that much less functional than their BookSmart – which I can’t see myself using again. For simple Blurb books, I suspect Bookify is all you really need.

Some other Blurb links may be interesting:

  • Series of videos by John Paul Caponigro here
  • Lawyers may have made its title look faintly ®idiculous, but “Adobe® Lightroom® to Blurb BookSmart®” has a lot about profiling, X-Rite colour profiler, which some may find useful, and the Lightroom stuff only starts half way through

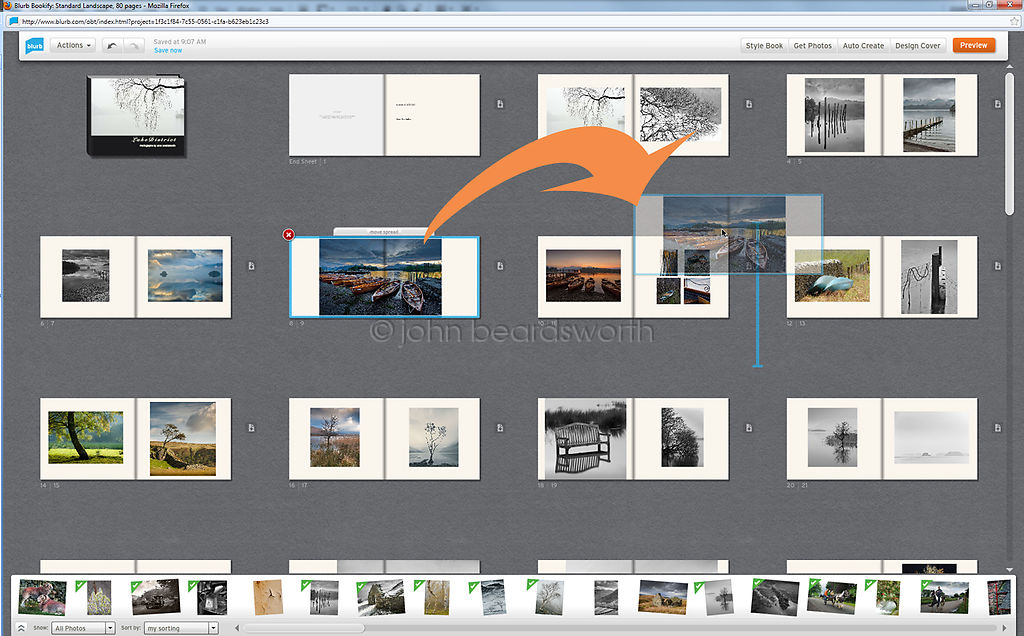
On a big screen, Bookify's great use of Flash makes it easy to change the order of pages or do other basic layout work. Now if only Lightroom's SDK allowed you to create a module with a browser....

Dropbox for catalogues, presets and preferences

I’ve yet to encounter anyone who has tried Dropbox and doesn’t like it – it solves an often-complex problem of sharing large files and yet presents itself to the user in such a readily-understandable way. It’s especially wonderful in not being limited to one operating system, so you can happily keep certain files available to Macs and PCs, and can even extend this to phones and tablets too.

Thinking just about Lightroom, one way Dropbox helped me was in testing my plug-ins. Keeping them on Dropbox makes it that much easier to check something works on PC and Mac. But you can go further:

  • Store catalogues on Dropbox – I don’t do this though it’s possible
  • Store Presets and Templates on Dropbox and use symbolic links to make Lightroom think they are where they should be

Catalogues on Dropbox?

One thing I haven’t tried was mentioned by Adobe’s Terry White at the end of 5 Ways To Take Advantage of Dropbox:

….I’m also using Dropbox to store my most frequently used Adobe Photoshop Lightroom Catalogs. This way as long as the images themselves are on my file server or in the Dropbox as well, I can go to any computer and work in Lightroom on the same files/catalogs. Although I have a nice fast Mac Pro with a 30″ display I almost never used it for retouching in the past because everything was always on my MacBook Pro. With Dropbox that problem goes away as the files are on whichever computer I want to work on and automatically sync’d when I make changes or retouch them.

I’m not sure I like this. Putting to one side that it’s not such a great idea to spread your work across a few catalogues, the method’s viability will partly depend on the speed of your own network, and on your internet connection and bandwidth. When I’m home that wouldn’t be too big a problem because my cable connection is unlimited and runs at its headline 150Mb down/20Mb up. From a purely technical point of view, a catalogue can be kept on Dropbox.

However, the human element is the big downfall.  You have to carefully monitor the Dropbox sync procedure and ensure that it has been properly completed on each machine. Otherwise, you can easily go into an older version of the catalogue that is on one computer, making Dropbox think it is the current version of the file, and overwrite more recent work done on the other.

To give an example, a while ago I was trying this workflow and one day I closed LR and left the computer. I was in a hurry and didn’t notice that this computer’s web connection was down, which meant the catalogue and recent work wasn’t synchronized to Dropbox. When I reached the other location, I looked at the Dropbox button in the system tray, saw it was green, and opened Lightroom. It was only after an hour that I realised I was working on pictures which I knew I had already adjusted. That experience only wasted a bit of time, but it could be messier.

So while in theory you can certainly use Dropbox for your catalogue, I think the human element is the biggest risk and wouldn’t generally recommend it. If you need to swap the catalogue between computers, put the catalogue on an external drive and attach it to each computer as needed.

If you really do intend to put your catalogue on Dropbox, you must deal with the risks:

    • When you stop working on one computer, you must ensure that you remember to close LR.
    • Ensure that the catalogue’s upload to Dropbox has completed, and note the file modification time.
    • Before you open the catalogue on the other computer, ensure that Dropbox shows the correct time.

This procedure is workable if you don’t swap computer too often, but becomes painful if you do keep swapping, so is putting the catalogue on Dropbox is really practical? I’m not confident it is.

Symbolic links or aliases

Another idea is to use Mac aliases or Windows symbolic links (a bit like shortcuts) and separate the catalogue from its previews, which can be huge. So for example, you would keep the catalogue itself in a Dropbox folder, but use aliases or symbolic links to store the catalogue’s previews  in a folder that is on your computer’s hard drive and doesn’t get synchronised. When you move to the other computer, your catalogue will be available as soon as Dropbox’s sync operation has completed, just having to rebuild its previews which are stored locally. As always, the originals could be on a network address.
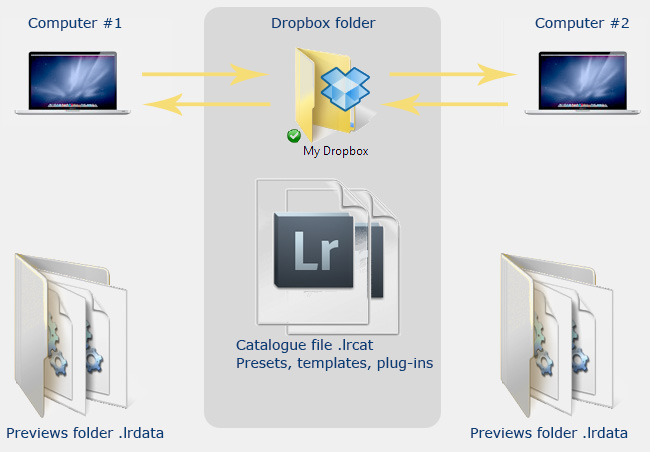
Dropbox and symbolic links or aliases let you make the catalogue and presets available to multiple computers, while no synchronising the bulky previews folder. Promising though it seems, I’ve not made it work consistently.


Your presets and templates

While I can’t recommend keeping your catalogue on Dropbox, since 2011 I have been happily using it to store Lightroom’s “application support” folders. These contain your presets and templates, plug-ins too, and keeping them on Dropbox means they’re always in sync on each computer.

To get this started, on your main computer move these folders to Dropbox and set up an alias or symbolic link to it. Then on your other computer simply set up the aliases or symbolic links.

  • On Mac these are stored in USERNAME/Library/Application Support/Adobe/Lightroom
  • In Windows 7 you’ll be looking at C:Users/USERNAME/AppData/Roaming/Adobe/Lightroom

I’ve kept the “application support folders” on Dropbox, and my Mac and PC have each been able to access the same presets, templates and plug-ins. That’s pretty convenient! There are one or two glitches:

  • On PC your preferences are stored in a Preferences folder, which would be great if I only ran PCs
  • On Mac preferences are stored in a plist file, so you can’t use the technique to share preferences between Macs (more knowledgeable Mac users may have a solution)

It’s not a true multi-user networked solution, but it’s a geeky step in the right direction!

Setting up aliases or symbolic links

How to set up Mac aliases

For Mac, see this article by Sean McCormack.

How to create PC symbolic links

I don’t particularly want to download Windows utilities such as the ones Sean or Ian Lyons mention. You never know what someone else’s utility may do, symbolic links can screw other things up, and I prefer to get my hands dirty. I prefer to use batch files such as the ones attached – Previews.txt and app support.txt (batch files zipped).

Here I’m telling Windows that the presets, templates and plug-ins for are now in my Dropbox folder

So, at your own risk:

  1. Backup these folders
  2. In Explorer, go to C:Users/USERNAME/AppData/Roaming/Adobe/Lightroom
  3. In Explorer, move (not copy) that Lightroom folder to a Dropbox folder – in my example, it’s the main Dropbox folder
  4. Edit the batch file so it points to your Dropbox folder. To get the file path, just click in the Windows Explorer address bar
  5. Save the file with a bat extension and save it on the desktop
  6. Right click the batch file and select Run as administrator – this sets up an link in C:Users/USERNAME/AppData/Roaming/Adobe that tells the PC that the subfolder Lightoom is not over on Dropbox.

How to remove PC symbolic links

  1. Backup
  2. In Explorer, move the folder from your Dropbox and put it in C:Users/USERNAME/AppData/Roaming/Adobe/Lightroom
  3. Delete the symbolic link to Dropbox that’s in C:Users/USERNAME/AppData/Roaming/Adobe/
Not the first time either

AppleScript as #lightroom Export Action http://adobe.ly/iet7L7 Feel a blog post coming on. But how many Mac users actually use AppleScript?

A smoking gun?

Although mainly a PC user, I also have a Mac laptop and do like its AppleScript and Automator scripting/automation features. I’ve little doubt that if I only used Mac I would quickly find various ways of saving myself time – maybe enough to outweigh the time spent on the learning curve. Yet I’ve always been surprised that Lightroom users who are real Mac enthusiasts – you know the type, the wide-eyed evangelists – never seem remotely interested in these tools and rarely mention them. I’ve never been able to understood why not, but for Mac-using photographers Applescript and Automator remain well off the beaten track.

Now, in “the community of Lightroom talking heads” anyone can retread step-by-step Lightroom tutorials, and many will do them better than I. My style is to come up with far more than my fair share of ingenious workflows and original insights into the program. So a couple of weeks ago an interesting twist on the topic of AppleScript and Automator popped up in a forum, and I tweeted some thoughts beginning with this.

And now, coincidentally, there appears this post Automating Your (Mac-only) Workflow. Well-written, but come on…. I’ve no problem with people picking up on ideas I’ve aired, but at least acknowledge where the spark originated.


Silver Efex Pro 2

I’ve never been one who photographs in colour and occasionally dabbles with black and white. It’s very much the other way round, and I often look at pictures I’ve left in colour and think they’re rather monochrome anyway. But I’ve never seen doing a lot of b&w work as a reason why I would want to buy Nik’s Silver Efex Pro (SEP) or any of the other dedicated black and white plug-ins that it has now overshadowed. It’s not that I felt SEP1 deficient in any way – quite the contrary. SEP1 was a very polished piece of software, produced good results quickly (even if I doubted the film simulations), and I could certainly see why people liked it so much. I simply felt its price was steep, and I’ve not feel any real need for it.

Nonetheless, I was looking forward to seeing Silver Efex Pro 2 and these seem to be the new features:

  • History Browser – good, session-only and like Photoshop except with more detail,
  • Amplify Blacks and Amplify Whites – I remain neutral about this
  • Visual Presets – thumbnails on each preset encouraged me to try them
  • Soft Contrast – no opinion
  • Fine Structure – no opinion
  • Image Borders – nice to find this integrated
  • Selective colorization – worked well once I got used to the U points
  • GPU Processing – it was perfectly quick but on a quick machine, so “no comment”

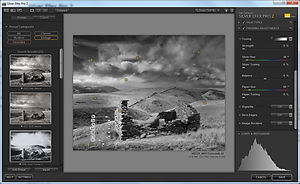
As before, it’s a very easy program to use – installing as a Photoshop, Lightroom or Aperture plug-in. You then launch SEP2 from the host program (though you can drag a TIF or JPEG onto the program icon or desktop shortcut) and it is converted to black and white with a default treatment.

On the left are the presets, both built-in and any user-created, and I liked how they are shown as thumbnails or “visual presets”. It uses a lot of space, but that isn’t a problem with a dedicated app like SEP2, and it is much better than listing presets in text-only form or than Lightroom’s combination of list and rollover image. You can have too much of a good thing though – after a day or two I realised that the preset panel was leading me to work by clicking one preset after another, before doing anything else to the image. It was a very grave case of “presetitis”, at least as severe as anything Lightroom could inflict! I wasn’t just exploring alternative treatments but felt I was working by trial and error. I felt so much happier once I had hidden the presets from view!

I’d also apply that argument to the film recipes, of course. I’ll restrict my rant to asking what’s the creative value of someone who never used a particular film stock being led to believe in a recipe that doesn’t include variations such as development methods, enlarger and paper types?

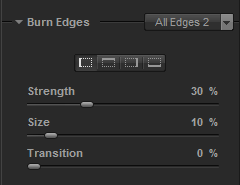
One thing I didn’t notice at first was how the edge burning could be varied on each side. It was a bit like having 4 ND grad filters around the image and was a nice touch.
The selective colour adjustment allows you to preserve the colour in parts of the image. I used to enjoy painting on b&w prints and have occasionally done it in Photoshop, if not for a while, and I’m sure this feature will be popular.  It seemed to work best for me when applying SEP2 to a Photoshop smart object – I could keep make multiple trips to SEP2 and the colour and the U-points remained editable. However, if I started from a regular layer or from Lightroom, the file would be saved as a simple TIF file, and any coloured patches would be lost if I re-opened that file in SEP2. The same happened if I added a tone and then re-edited. So smart objects would definitely be the way to go.

Have I changed my mind about Silver Efex? Not quite. It remains a very pleasant app to use, just one that costs more than I’m likely to pay for  something I don’t really need (though that didn’t stop me ordering a Lee Big Stopper recently). Overall, I liked Silver Efex Pro 2 and I would perhaps consider getting it – at least as part of the Nik suite. But I don’t do colour, do I?

Other reviews (by those who use SEP2) :

Complex File Renaming – using Search & Replace

I had an interesting email from someone who uses my Search and Replace plug-in for Lightroom:

You can download the plugin from here. In Trial mode, it can process up to 10 images at a time.

… I need to remove text (“Scan_”) from the filename for images I scanned 4-5 years ago (and are now in my LR catalog). It appears Search and Replace does not work on filenames, only on metadata. Pre-LR catalog I used a utility to do bulk file name changes on folders of files, but that will be a problem with the LR catalog. I could use the bulk filename changing tool, then delete the LR-cataloged-but-missing-image and then reimport the newly rename files. But it seems risky and I’d lose metadata for the images w/o XMP files.

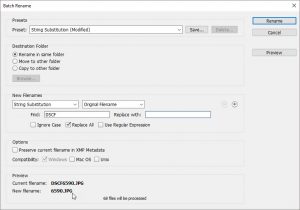
Replacing text in filenames is a common need and for example Adobe Bridge’s renaming dialog box does it with its “string substitution” option – see the bottom of this article.

But this capability has never been available in Lightroom. I suspect it is as simple as Bridge’s “string substitution” only introduced during Lightroom’s early days and it was overlooked when batch rename was designed. And sadly, this omission has never been rectified, even 13 years after I started whining to Adobe about it….

So I began my reply by saying that Search & Replace couldn’t help with file renaming because plugins can’t rename photos. In other words, “Computer says No” (Little Britain, if the reference isn’t clear!). But all of a sudden, the solution revealed itself….

The method

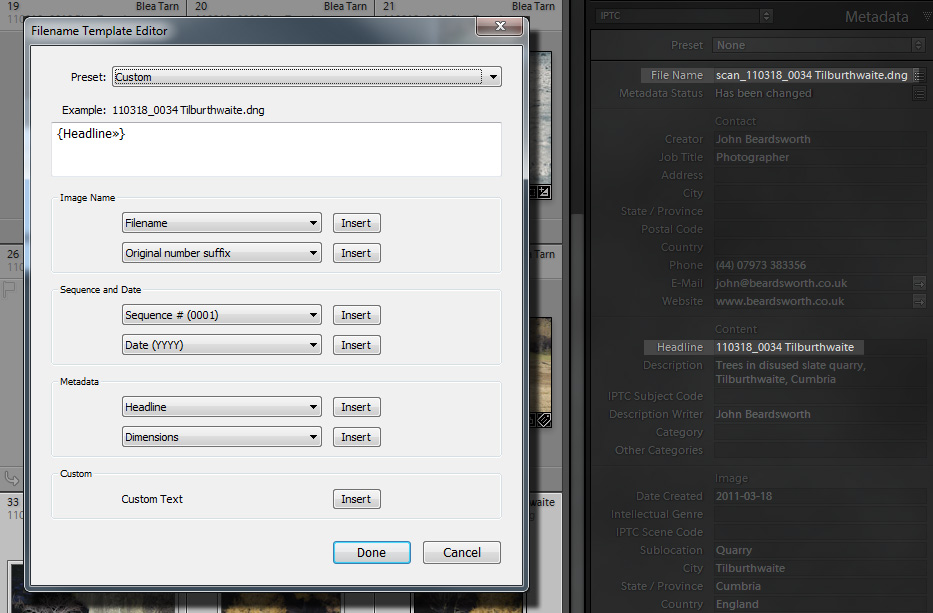
  1. Use Search & Replace’s Transfer command to copy the file name to an unused field which Lightroom’s Batch Rename dialog can access – I suggest Headline
  2. Use Search & Replace Replace tab to remove “Scan_” from Headline or whatever field you choose
  3. Finally use LR’s Rename Photos command to rename the files using the field in the renaming template

It’s a whole lot easier than I ever thought it might be!

Dialog

Using Search and Replace on an IPTC field, it’s possible to perform more complex renaming than Lightroom’s Batch Rename permits

“String Substitution” in Bridge

Warning: this method removes any pick flags, stacking, VCs , collections, history steps applied to the files:

  • In Lightroom, save the metadata back to the files – Ctrl or Cmd S
  • In Bridge, select the files and use Batch Rename
  • In its New Filenames section, select the option String Substitution
  • Next line down is where you choose what to find and what to replace it with
  • In Lightroom, synchronize the folder – this will remove the -Edit files and import the renamed versions

Lightroom – finding all images shot at a certain time of the year

Recently I’ve seen a number of Lightroom users asking how they could find all images shot at a certain time of the year.

Now, if you have your head screwed on you would have included seasons in your keywords. For instance, an image of snow might include “winter” in the keywords (unless you live at the North or South Poles) while a picture of cherry blossom might include the keyword “spring”. I’m not too keen on the idea of including the month as a keyword, though a case might be made for doing so.

But let’s say you’ve not used such keywords, but still want Lightroom to find all the pictures you’ve shot in the winter months. The best answer has been that you need to create a smart collection along the lines of “Capture Date” / “Is in the range” / “December 1st 2010 to January 31st 2011”, for example. That’s OK for one year, and then for a second year you’d add a line with similar criteria and just type over the years. By the time you get to three years it’s getting a bit boring, and then you decide to change winter to include February…. And if you also want a smart collection of photographs shot during the spring months, it’s all becoming a bit too much effort. Life is short. The particularly annoying thing is that the data is available in Lightroom’s catalogue, but it’s too difficult to access.

So version 1.29 of my Search Replace Transfer plug-in adds a custom field called “Month” and writes to it with the existing Parse + audit menu command. You just select your pictures, run the Parse + audit menu from Library > Plug-in Extras. The plug-in then runs through the pictures and updates its custom fields which can you can then query in the Filter Panel or through Smart Collections.

And a little note – the Parse + audit command is in the free part of the plug-in so it isn’t limited to 10 items per time.

Get the plug-in from Photographer’s Toolbox.

Pick flags in Lightroom

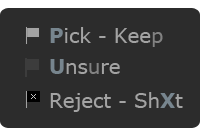
I was just helping out a newcomer to Lightroom with how to use the pick flags and the P U X shortcuts. As a reminder, I came up with this little panel end mark. Memorable enough?

The file should go in the Panel End Marks folder which you can find by right clicking in the bottom of Lightroom’s right panel.

Also see seeing stars for a similar approach to making your star ratings consistent.

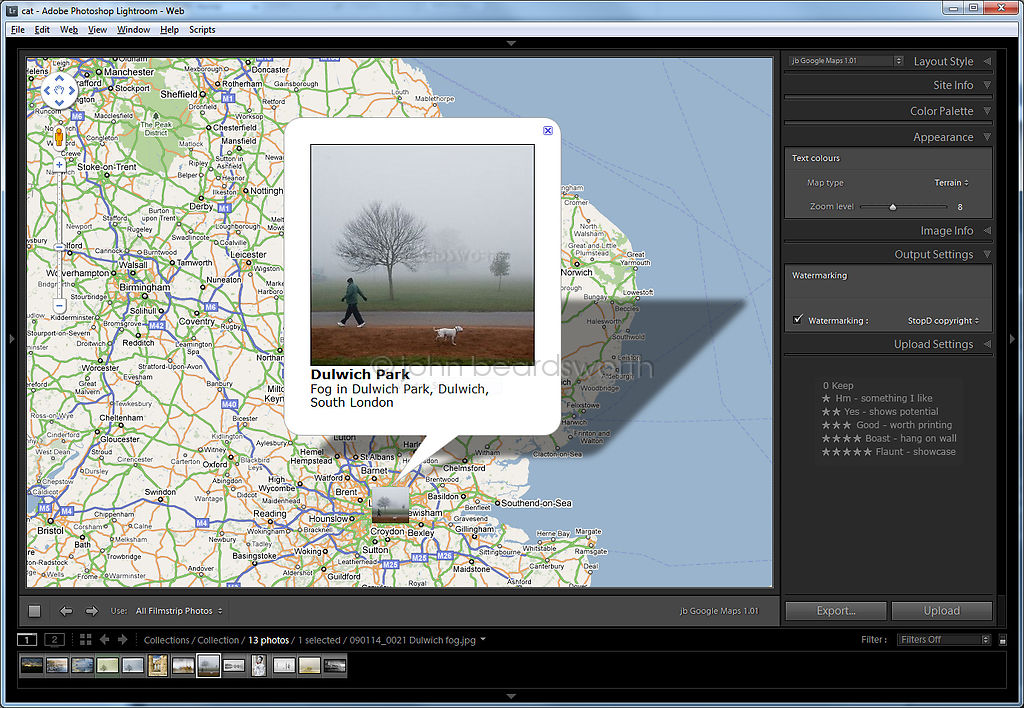
Google StreetView inside Lightroom

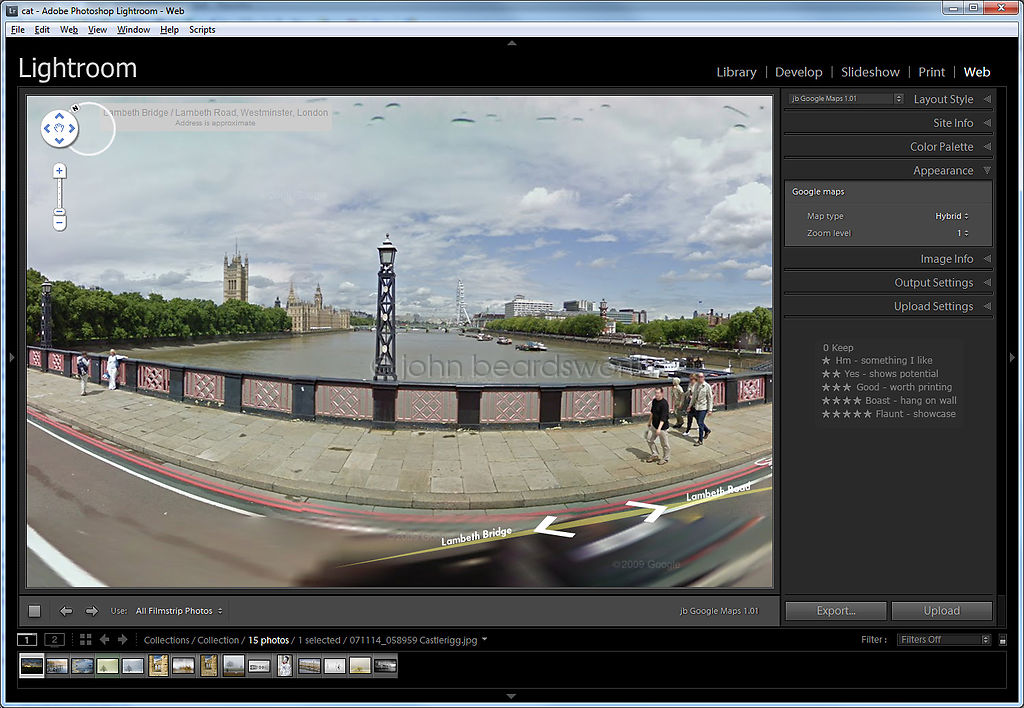
That’s exactly what you see here! It’s actually a Google maps gallery with images displayed as thumbnails on the map. They’re clickable and reveal larger images with captions, and you can also switch to StreetView inside Lightroom’s Web or in the browser .

This is just a working proof of concept, but by the end of the day….

On reflection, when Aperture 3 came out I wrote that essentially its most prominent features were the result of bolting-on a couple of cheap wins – one being Google Maps. This drew predictable criticism from McCreate, a Pravda-style site for Mac-limited apps, but unfortunately I had based my assessment of the scale of the work on my having worked with Google Maps and I had taken an educated assessment of how little work the feature needed. If a limited implementation of Google Maps can be done by someone like me – not a trained programmer – what can a team achieve? And it also makes one very sad the feature isn’t already in Lightroom, doesn’t it?

And the point is….

See this interesting article by Michael Frye on Setting the White Point in Lightroom: A Comparison:

Since I advocate using the Point Curve in Lightroom to set a white point and black point, I sometimes get asked about the difference between doing this with the point curve, and doing it with the Blacks and Exposure sliders. The first part of the answer is that there is no difference—at least none that I can see—between using the Blacks slider and moving the lower-left end of the Point Curve to the right.

But there is a difference between using the Exposure slider to set a white point and doing it with the Point Curve. When Lightroom first came out Adobe said that pushing the Exposure slider to the right was the same as setting a white point with Levels or Curves in Photoshop, and everyone seems to have taken this as gospel. Maybe Adobe said that to justify not including Levels or a real point curve in early versions of Lightroom. But it’s not the same, and it’s easy to dispel that myth, especially now that Lightroom has a real point curve:

In my view this is partly a case of wanting to work Photoshop-style with the same levels and curves tools that you’ve used for years. In terms of time effectiveness (never forget Lightroom is about workflow efficiency), I doubt there’s any difference in setting the white and black points with the sliders or dragging the curve, so I’ll take that out of the equation. But the real danger I see in this approach is of neglecting the adaptive tools – Recovery and Fill Light – which only target contiguous areas of the brightest highlights or contiguous areas of shadow tones. So these tools protect the spectral highlights and the points of purest black. By forcing the point curve to perform all your clipping recovery, you are altering all the brightest tones in the image – what makes it sparkle. Is it coincidental that Frye uses a low contrast image without much shadow? Use the point curve when it’s needed, but why work with one hand tied behind your back?

B&W from different angles

There’s an interesting comparison of doing black and white in Capture One 6, Silver Efex 1, and Lightroom 3 by Mike at The Intuitive Lens. It’s a two parter with Capture One vs Silver Efex and then both vs Lightroom.

I’m not sure it proves much, if anything, other than one if one tries to do so one can produce similar results in different products!

Leaving settings at default is a little odd, and there’s no real attempt to use the b&w conversion process to separate neighbouring colours into distinct tones – eg those in the left woman’s blouse or between the brown briefcase in the foreground and the middle person’s red sweater.

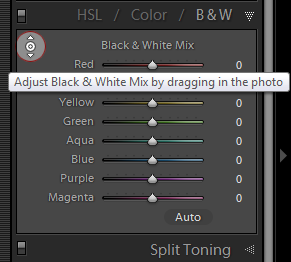
Why didn’t he use Lightroom’s targeted adjustment tool, for example? I’d argue that it alone produces better b&w images because you’re keeping your eyes on the image. But it is an interesting exercise.

Update

See discussion here and here.

My view is that it’s very hard for anyone to be at the same very high level of expertise with a number of different apps, and skilled hands can squeeze the same “objective quality” out of whichever app they decide to use. So my emphasis is less on pixel-peeping and more on the process of getting to the best expression of the picture.

That’s why I put so much emphasis on the benefits of using the targeted adjustment tool – the little nipple in the top left corner of LR’s B&W panel or in Photoshop’s B&W adjustment layer – as I find that it your keeps your eyes completely on the picture and its changing appearance.

By comparison, dragging sliders is inherently a very mechanical process, while presets usually trade on the blind faith that their authors have accurately calibrated the spectral response of film X (and factored in lens filters and developer agitation…).