Lightroom 4 Layout Overlay Options
Perhaps like most people I really hate the sound of my own voice, but some things are probably much easier to show than they are to describe in words.
So, Lightroom with a Mancunian accent arrives on YouTube….
Perhaps like most people I really hate the sound of my own voice, but some things are probably much easier to show than they are to describe in words.
So, Lightroom with a Mancunian accent arrives on YouTube….
On its 6th birthday, Lightroom’s version 4 is here – see the official announcement.
I’ve been using it for a while and actually switched over my main catalogue a few months ago (upgrading a Lightroom 3 catalogue is disabled in the public beta) and given some aspects a pretty good hammering. Others will no doubt list all the new features to exhaustion, so these are my favourites. The new Book feature is top of the list.
When Lightroom 2 was released back in mid-2008, I wrote Five for Three and listed the top 5 new features I wanted in the next version of Lightroom. Top of that list was being able to create books directly within Lightroom. It may have arrived a cycle later than I had hoped, but it’s here now and I’ve already had the chance to use it for real. It’s Blurb for now, but watch out for others to follow.
Since some of Book’s developers have previously worked on InDesign, there are some terms like kerning and leading that will mystify the uninitiated (like me) and be familiar to others. But for me one of its glories is that there are templates for double paged spreads – no longer do you need to figure out what “gutter” may mean or chop images into two carefully aligned halves.

Overall quality was good and up to the standard I’d expect from Blurb. I tried a few things – black and white (surprise!), colour (eek!), and two page spreads – and the attached PDF shows these details:
– Cover was fine. A small unevenness near the spine?
– Spine text not quite aligned
– Specifically chose no-logo!
– Image positioning correct, and colour about right
– Spreads – take care. Flow across pages not q right – physical limits of the book type?
– The more detailed images came out well. Sharpness good. Those with smooth gradients showed some banding – I noticed, but normal folk wouldn’t. Again that’s outside Adobe’s control.
– Black and white. Neutral in daylight – slight magenta cast in some artificial light. It’s an old problem with colour printing and black and white, but the tone is consistent and subtle.
So the glass was more than half full, and it’s going to be easy to tweak this book for a final version.
 Lightroom 3 introduced tethered shooting, the ability to connect your camera directly to the computer and shoot directly from Lightroom.
While that’s great for those who do a lot of product and cover shots, a big omission by comparison with Capture One was the ability to see new pictures framed in a mockup of the intended layout. For some studio-based photographers , this was a crucial reason for preferring that program over Lightroom (and its tethering features still remain the best around) while over the last few years so I had encountered more than Lightroom user with home-brewed solutions – usually attaching a sheet of overhead transparency to their monitor.
Now you can create a PNG file in Photoshop or Illustrator etc and shoot new pictures directly into the layout – it’s under View > Layout Overlay. Here I’ve defined a transparent PNG with this site’s logo and framed my composition as I shot directly into Lightroom.
While its main purpose is for tethered workflows, I suspect it may also be useful when you’re doing compositing and want to see your how your subject would look with different backgrounds. You would extract the subject from its original image in Photoshop, save out a PNG and use in Lightroom as your Layout Overlay.
Video – Lightroom 4 Layout Overlay Options
I can’t find where I may have asked for this, but having experienced it first in Microsoft Expression Media and then later in Apple Aperture, I’ve been delighted to see GPS-tagged images can now be displayed on a map within Lightroom and GPS values can be assigned by dragging and dropping.
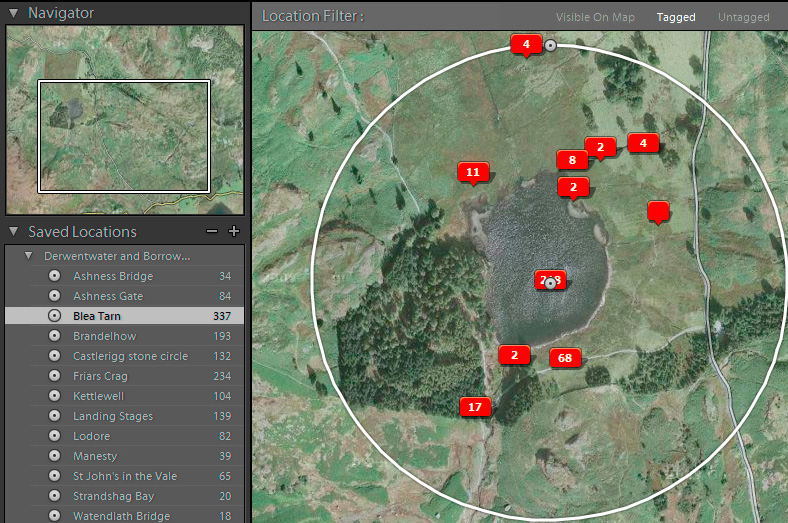
Notice the Saved Locations. It’s tempting to define lots of these as shortcuts to areas of the map – click the arrow to the right of the number count and Lightroom goes to that spot on the map. Furthermore, it is possible to assign images’ GPS co-ordinates by ticking on the left of the Saved Location.
In general though, I wouldn’t create too many – drop images onto exact locations. Instead try to think of Saved Locations as smart collections for GPS (which begs the question of why they aren’t smart collections). So they show you how many of the filmstrip’s images are within a certain distance of the Saved Location’s centre point. In this example I can see that I have 337 images taken within 300 metres of Blea Tarn.
I’ve never disguised that Lightroom’s lack of softproofing was not something that worried me. I don’t dispute its value when you do know how to do it properly but I observe far fewer photographers use it in Photoshop than some would like to think – if you don’t believe me, try asking other Lightroom experts off-the-record.
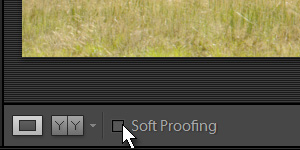
Here’s where you switch on soft proofing
But among a segment of Lightroom’s user base its absence has been a reason for not using Lightroom or for creating awkward workflows via Photoshop.
So it was the last item in my Five for Three article in 2008, though I didn’t mind it failing to make the cut for version 3. But I’m glad to say it’s here now and I’m sure those who already soft proof will be delighted.
Those who want to find it will do so, though I doubt it will cause more people to soft proof. In a way that’s sad, but it’s also because the soft proofing interface doesn’t get in your way, and that’s got to be a good thing for those who never had any interest in soft proofing. Sooner or later, it simply had to come. Now jog on.
Via by Andrew Rodney
Over the last few years I have noticed how many Lightroom users are uncertain about using the Exposure and Brightness sliders. You wouldn’t think it is too difficult, the first having the power to brighten the entire image, and the second brightening a wide range of midtones but burning out the highlights.
But I feel the problem was one of balance. Exposure tended to be overused, and any highlight problems corrected with the recovery slider, and I can’t remember how many times I’ve looked over someone’s shoulder and asked why they never seem to use Brightness. There’s more to the changes, but combining Exposure and Brightness is a good move – you’re effectively controlling overall image brightness with a single slider.

See Lightroom 4 beta resources, Sean’s fast-growing list, and the official beta forum.
Flags are now global, not local. Previously you could create a dumb collection, and mark pictures with the Pick flag (P), Reject (X) and unflag them with U. It confused some people when those flags weren’t visible when they looked at the pictures in their original folder or in another collection. The idea was that you might want to flag images in different ways in different circumstances, so if you imagine a wedding you might have the same photos in a For Album collection, also in a For DVD, and use flags to shortlist pictures separately. This “local” nature cut both ways – confusing some, enabling others – and my own attitudes have changed over time from initial dislike to finding it a useful feature. But with LR4, flags are now as global as star ratings and coloured labels, and if you’ve been using them locally you’re simply going to have to change your working practices.
For myself, on balance, I would have preferred flags to stay as they were, but I do mostly use them in a way that won’t be impacted by the change and accept that it will reduce confusion. If you do find the loss of local flags breaks your way of working, then I think you may want to look at the new possibility to stack photos within collections.
Personally, I have never been a big fan of stacking. In general, I feel it’s a great way to forget pictures exist and fail to mark them up with copyright and other metadata. So I’ve restrict my use of stacks to grouping the component original frames of panoramas, HDRs etc, and don’t really like the thought of extending that use any further. But in collections, now flags affect the entire catalogue, the new ability to stack items within collections may be the way to pick and reject images.
Being a bit cynical, it should help sales of my Syncomatic plug-in.
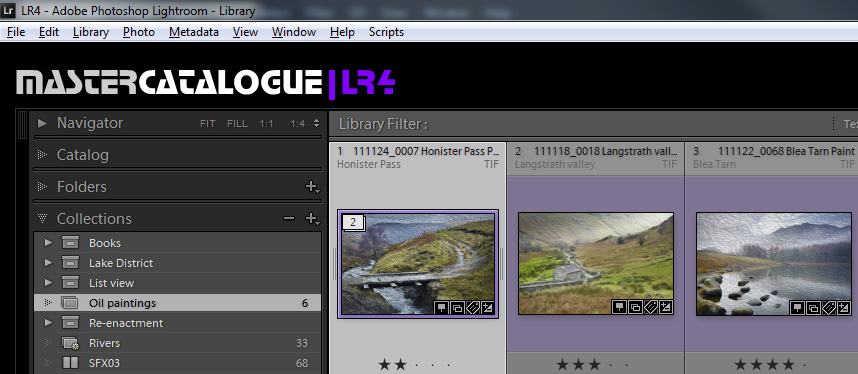
Previously you could only stack images within folders. You can now create stacks in collections too.
Barry Pearson writes about Seven years of writing about Digital Negative Format and other tales of the life and advantages of the DNG format:
When Adobe launched DNG on 27 September 2004, it was obvious to me that this was addressing a significant need. I knew from my career in helping to develop complicated multi-vendor computing systems that it is very important to structure a system into components linked by documented common interfaces.
I spent about 2 weeks examining the available documentation about DNG, including the specification, before concluding that it was a credible proposal. On 10 October 2004 I began to use DNG for all my raw images.
I had been reading and contributing to newsgroups for many years. Misleading and/or inaccurate statements about DNG began to be posted about 3 October 2004. (This has been a continuing trend all over the web).
I wasn’t that early an adopter, but almost. For me it was the release of Photoshop CS2 that made me switch to DNG, so that would make it April 2005, and high on my list were (and remain) a preference for embedded metadata over sidecars and for having an embedded preview. I still keep my raw files, somewhere, but isn’t it amazing that in 2012 a major camera company can release a professional camera without even offering as an option a publicly-documented raw file format?
David Marx’s Professional-Grade Backup Plans is worth reading.
My one point of minor difference is that people spend too much time thinking about their backups, making sure everything is backed up – but don’t spend time ensuring they know how to use their backup software’s restore features.
Too often people only try to figure out how to restore data when they’ve just experienced a catastrophe. Do a dry run.
There’s been no change to LR’s handling of custom XMP since version 1 – I’d characterise it as “preserving” custom XMP data.
So LR does read the data from imported files and stores it in a database field. It never displays the information and it isn’t editable even through the SDK. But at least Lightroom doesn’t do any damage. When you save metadata back to the original files (sidecars or directly into the file) it does not overwrite any custom XMP it encounters, and it does write the custom XMP to any exported files.
It is possible to use a plug-in that calls an external library (exiftools) to read and write custom XMP. I have one working for myself, but I judged the area’s complexity and potential for damage to be so great that I’ve chosen not to develop it for wider use. I’d make far too many enemies!
 Does the order of steps in the History panel make any difference to the end result?
The answer is an emphatic No. Lightroom edits do not build on one another – the current slider values in the right hand panel are all that matters.
If you don’t quite believe this, save the edits back to xmp and remove the image from the catalogue. Reimport it and there’ll be no History – but the image will look identical to before.
The History panel is more like a log of what you’ve done – an audit trail – and I’ve long thought Adobe could have used a different term, like “log”, to clearly distinguish it from Photoshop’s History feature, where the exact order of work does often matter.
Of course, it is not merely a log. One nice touch is when you’re in Before/After view (Y) you can drag history steps into the Before view.
What’s your workflow to Nik software?
If you own Lightroom and Photoshop, Photoshop “smart objects” are the best way to use Nik apps.
The workflow is easy. Do all your corrections in LR then select the image, right click and choose Edit In > Open as Smart Object in Photoshop. Then in Photoshop select the smart object in the Layers Palette (F7), invoke Silver Efex, and afterwards save as a TIF.
Why is this?
Any downsides?
Unless you’ve a good reason, I would always choose Open as Smart Object. Good reasons might be you’re running out of hard drive space, or you have an earlier version of Photoshop than your version of Lightroom.
OK, now why? I tend to assume there’s a fair chance you’ll want to fine tune the raw conversion at some stage in the future. For example, a new version of Camera Raw may have better noise reduction and you may want to rework the picture. Alternatively, you may have overlooked some dust spots and prefer to correct them at the raw level rather than with a retouching layer, or you might notice a lens aberration of some kind. Smart Objects let you do this.
Secondly smart objects allow you to adopt some very effective ways to work. For example, filters are applied as smart filters which unlike regular filters are non-destructive, so you can fine tune them long afterwards – so my workflow to Silver Efex is LR, Smart Object in Photoshop, then Silver Efex. Cropping or transform operations can be done non-destructively with smart objects too. If I do need to do some pixel level cloning, I’ll simply copy from the smart object layer into a regular pixel layer. So there’s no real downside.
It might, but I wouldn’t bet on it. I know “modal” is a loaded word in Mac-land, but these are “modules” and more akin to the workspaces you see in Photoshop than they are to nasty unMaclike modality. They’re dedicated to tasks like adjusting or organising, and help you focus on the task in hand rather than flipping between adjusting images and entering metadata. The key to getting over the modal hangup is to learn just a few keyboard shortcuts – E G D R Q W . There are lots more, but those combine important functions with moving between workspaces.
If you save metadata back to a DNG, doesn’t it mean that every time a change is made the whole large file needs to be backed up?
Not really. It obviously makes no sense to keep backing up big DNG files after every change, but that’s a straw man argument against the format. Instead you simply backup the DNGs upon their creation, and routinely backup your catalogue. If you were to hit a catastrophe, you can reconstruct the exact state of your work by restoring these virgin DNGs and your catalogue. Sidecars don’t contain all your Lightroom work.
Activate the Spot Healing brush and then in the toolbar below the image choose “Auto”. This means that when the cursor is over the image, the circles will display. When you move the cursor out of the image area, they won’t.
Lightroom’s Develop History panel is a log of all the work done on an image but it’s never written to xmp because:
Had Adobe included history, there would have been loud demands to make it optional, perhaps on an individual image basis, and probably lots of other inconsistencies too. It’s really not worth the development effort.
QWhy should I use keywords and not folders for organization?
AOne problem here is what you mean by “organize” – use the word “categorize” or “group” instead.
Of course folders should be organized, in the sense of not being a mess, but it’s best think of folders purely in terms of ensuring the physical safekeeping of your pictures – best use of drive space, certainty of reliable backup, ease and certainty of restoring after a catastrophe.
Keywords and not folders should be used to categorize and group your pictures.
Q: Can I avoid using Lightroom’s backup routine and have my backup software do it?
A The answer is yes, you can, but….
So it’s generally best to let Lightroom make its backups to another drive, and then point your backup software at this location.
There’s a funny bug in Lightroom on Windows when you try and select a folder or drive:
When I try to export a selection of images from LR using Specific Folder (or choose folder later) the only available location that shows up in the hierarchy is my Desktop. No other folders/drives are visible. I had this problem once before and managed to resolve it but don’t recall now what I did. I’ve tried shutting down LR and restarting. Rebooting the computer and restoring the default export presets. If I select Export as Catalogue, then my entire folder/drive hierarchy is visible. Using LR 3.5 on Win7 Pro 64.
It is usually triggered when a lot of files are on the Desktop, and you can try this. In the folder dialog, at the bottom you can type “D:” or whatever, and doing so once usually resolves the bug.
See this Adobe knowledge base article.
How do you copy adjustments from one image to others?
There are three main methods:
How do you manually type in multiple keywords so they are added to an existing keyword hierarchy rather than being concatenated into a new and unwanted keyword? Is it some sort of delimiter character?
Use either the pipe “|” or the greater than “>” symbol, depending on which way round you want to type:
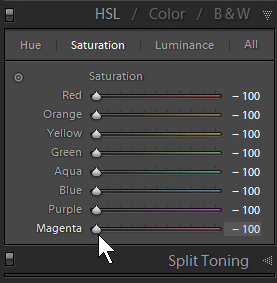 Back in the days of Lightroom 1.1, the B&W panel had a big defect – it disabled the Luminance noise slider – so Martin Evening and I (among others) recommended using the HSL panel. This meant setting all the colours’ Saturation values to -100% and then dragging the Luminance sliders, white balance, and other colour sliders.
This method was only ever a workaround to avoid noise – Adobe soon fixed the problem and made the HSL workaround obsolete. Yet people still use it, even recommend it.
Why you shouldn’t use it:
Nowadays the HSL method’s value in B&W is when you want to leave 1-2 colours in a mostly-B&W image.
What is the best way to make pictures black and white?
Go to the B&W panel in Develop’s right hand side and activate the targeted adjustment tool. That’s the little button at the top left of the B&W panel. It makes the cursor look like a pair of arrows which you can drag on the image itself. As you drag, LR moves the sliders for you.
Drag up and you lighten how that area appears in greyscale, downward darkens it. The important thing about this method is that it means you keep your eye on the picture’s changing appearance all the time you are adjusting it. That makes it much better than guessing which slider you should drag, and continually moving your eyes between the picture and the sliders. You inevitably produce a better black and white version, and faster too.