Capture Time to Exif – released

Capture Time to Exif is essentially an in-Lightroom interface for Exiftool, Phil Harvey’s highly-respected “platform-independent Perl library plus command-line application for reading, writing and editing meta information in a wide variety of files”.

With Capture Time to Exif you can:

  • Update the Date Time Original EXIF field of scanned images. Lightroom’s filter panel and smart collections can then find the images by searching for when the pictures were originally taken rather than when they were digitised.
  • Write other EXIF and IPTC information such as the camera model and maker. You can enter whatever Exiftool command line arguments you choose.
  • Store frequently-used command line arguments as presets.
  • Write directly to TIF, PSD, JPEG, and DNG file formats
    • Writing to proprietary raw formats is disabled.
  • Generate a log file which can be run as a batch file in Shell/Terminal
    • Use this method if you really want to write to proprietary raw formats.

Capture Time to Exif is for Lightroom 3 on PC or Mac, and is available from Photographer’s Toolbox. The trial version is limited to 10 images at a time but is fully functional.

Update on the 20 minute wow

I’ve been asked – a little mischievously – why in yesterday’s 20 minute wow I don’t say more about Slideshow, Web and Print. A single word each? That good then?

Well, quite the contrary. I am not trying to pack every feature into a short presentation. The audience – existing Lightroom users and those questioning their current working practices – already know and take for granted that they can create impressive slideshows, web galleries, and prints. They don’t need showing exactly how you add keywords or adjust image brightness. Such features slip into the presentation “en passant”.

Instead it’s a 20 minute wow – bullet points to highlight great tools people may have overlooked or forgotten, and to distinguish Lightroom from Photoshop and other programs they may know.

So my emphasis on Lightroom for pictures in the plural, and a quick mention of Folder panel’s existence is all that’s needed to wake any Aperture users. AutoSync also touches those listeners, but it’s mainly there to show the huge productivity gains it offers and also because I’d also say most other Lightroom talking heads are too often inclined to dumb things down and advise against its use. I advocate it. It’s a great feature and to my mind it should have been the default behaviour. Similarly, people forget the targeted adjustment tool is that little grey spot in the panel corner, and so never appreciate how such an innovative tool lets you keep your eyes firmly on the image ‘s changing appearance, not on sliders, and how that inevitably results in a final image that better expresses its qualities. Split Screen view is almost unique to Lightroom, immediately notable, and History isn’t just the same glorified Undo that is familiar to Photoshop users but provides a way to benchmark your fine tuning by dragging and dropping steps to the Before side of the screen. In short, if you’re not given much time to convince, would you show off things they know Lightroom can do?

20 minute wow (as Orwell might have put it)

Someone, somewhere asked a good question about Lightroom. How would you wow a mixed group of existing users and other photographers when you’re allowed just 20 minutes? 20 minutes? At most? Without anyone asking you something? And let’s say we’re not dealing with thickos, but potential “power users”, or those who think they already are so. Well, and I bet someone* rips this off, it’s got to be bullet points :

  • First I run through Library
    • Remind people the raison d’etre of this kind of program is to manage large numbers of pictures, not just post processing
    • But metadata and organisation quickly send most people to sleep, so
      • Straight down the left panel. Folders show you always know where your pictures are (any Aperture users watching?)
      • Slide briefly across the bottom filmstrip (F6, drop down list of recent sources)
      • Up the right panel in a couple of parkour leaps. Keywording is there, templates too.
      • That’s all they want to know, for now. Move on.
  • Straight to Develop and straight to switching on Auto Sync mode
    • Drag a few sliders from Basic panel and (double click filmstrip’s top line) watch ’em all change
    • Hold down the Alt/Opt key and blow those highlights
    • Double click a slider label to reset it, then Shift double click it
    • Stress again that Lightroom’s raison d’etre is handling pictures, plural, while Photoshop is for the singular.
    • Auto Sync is also the fastest way to work, and much faster than using Sync or (any Aperture users?) Aperture’s Sync-equivalent “lift and stamp”
  • Dust spotting while in Auto Sync mode is next
    • 20 or 30 small aperture shots with nice blue skies
    • But – careless me – one picture shouldn’t have been selected and the spot correction goes wrong.
    • You’ve got to keep your head screwed on with Auto Sync (if you can’t, don’t use it)
    • Work in Auto Sync all the time, or never – don’t keep switching.

Multiple items selected in Auto Sync mode - all images corrected with one click

  • Targeted adjustment tool
    • Lightroom’s subdued UI means many existing users forget it’s there
    • Show how your eyes stay on the image and how it is changing as you work. You’re not even looking at the sliders (hide the right panel)
    • We’re now talking quality, with an L (a cue to cycle through Lights Out)
    • V and into black and white, quick drag (on image area, not dress style)
  • Hit Y to show Before / After split screen
    • Stress the fine tuning
    • Shift Y, Z, Z, Shift Y
    • Drag steps from History or Snapshots into the Before area
  • Local adjustment brush
    • You don’t need to do that in Photoshop any more
    • Auto Mask
    • O – and remember to say keyboard shortcuts are shown in Help – shift O – O again
  • Develop Presets
    • I bet that surprises some folk reading this!
    • Mine include one per profile (from the Calibration panel)
  • Slideshow, Web, Print
    • Three words, three clicks
    • Show Print’s templates, contact sheets

In 20 minutes that’s about as much as I can pack in. And if that doesn’t leave their heads spinning….

Also see: update / rationale.

* no-one specifically in mind

SiteMaker as a single gallery

Here’s another preview of my SiteMaker web gallery showing its huge flexibility.
May I, as the saying goes, draw your attention to:

  1. Here it’s a single “contact sheet” gallery. SiteMaker can be either for a complete photo site or for a proofs gallery of a single set of images – or both
  2. All the thumbnails and their descriptions are shown in this case, but you can choose between 1 and 9 columns and can also switch off the titles and descriptions
  3. There’s only the Contact menu – you can change the text or hide it altogether with a single click
  4. The font is set by choosing from a drop down box – no need to type in the exact name of a web-safe font family

New Lightroom plug-in – CaptureTime to Exif

CaptureTime to Exif is my latest Lightroom 3 plug-in. Essentially it’s an in-Lightroom interface for Exiftool:

  1. Initially it was for Lightroom users whose catalogue contains scanned images and who wanted to make the scans’ Date Time Original EXIF field correspond to when the pictures were originally taken rather than when they were scanned. But people said they wanted to add the camera model, or the aperture details from their tatty old notebooks….
  2. So the plug-in also lets you write other EXIF and IPTC information. One idea was to add extra boxes for specific fields, but I could never please everyone – not without a lot of work. I’m also hesitant to make writing EXIF so easy that it’ll attract people who should be kept away from it for their own good, and I reckon those who know about such stuff would appreciate a “bare back” style. So I’ve chosen to add a simple box for you to enter your own Exiftool arguments, whatever you want, at your own risk.
  3. You can save complicated command line arguments as presets.
  4. There’s a preview of the command line which can be copied to a batch file and tested in Shell/Terminal. Add the -k option and the Exiftool window will remain open, letting you track down any errors in the command line.
  5. The plug-in will write directly to TIF, PSD, JPEG, and DNG file formats, but I have disabled the ability to write to proprietary raw formats.
  6. If you really want to write to proprietary raw formats, the plug-in uses Lightroom’s log feature to generate a batch file which you can quickly edit and run in Shell/Terminal.
  7. One little touch is the “incremental time stamp” which adds a second to each image in the batch – so later you can sort images by capture time even if the file names don’t help.

Capture Time to Exif will soon be on Photographers Toolbox, but for now you can try it here. It’s important to begin by using Ctrl/CmdS to save any Lightroom metadata back to the files, and after running the plug-in Library > Read Metadata will update the catalogue.

Of course, if it all sounds like mumbo jumbo, then the plug-in won’t be for you and you can happily leave command lines well alone!

SiteMaker for Lightroom

SiteMaker is the name of a new and very-soon-to-be-unleashed web gallery for Lightroom 3 which aims to create a complete web site within Lightroom.

The front page is designed so you can highlight three key groups of images – for example “Latest work”, “Landscape portfolio”, “Black and white portraits”. So the top part of the site has three full width images which change as the visitor moves the cursor over the related explanation panels.

Additionally, further galleries of pictures can be displayed in a grid that runs below this full width area. So the front page both highlights your latest and greatest work, and provides the visitor with immediate access to all your pictures.

Secondly, people often want to add extra pages to a site – an “About Me” or contact page, for instance. So this is requirement is also built into SiteMaker. You can define up to three such pages, adding text by simply typing into boxes in Lightroom’s Site Info panel. For even more flexibility you are also able to add raw HTML, if you know how.

As well as the key features of splitting a single Web Export into multiple galleries and adding custom content pages, SiteMaker provides a huge range of configuration options. For example:

  • Full control over colours of text and sections of the site
  • Add background images to the page, header and footer
  • Control rollover and transparency effects
  • Enter titles and descriptions for the galleries
  • Change the number of columns in each gallery
  • Position the identity plate anywhere
  • Change the menu style and position
  • Round the corners of the web site
  • Show star ratings to point clients to your best pictures
  • Google Analytics built-in
  • Installed via Lightroom’s plug-in manager for easier updating

It’s going to come in a number of versions too. SiteMakerPublisher will let you change web site contents through Library’s Publish, while SiteMakerSSP will connect the site to the SlideShowPro Director content management system.

See it in action here. What do you think?

With kind permission

With kind permission, a letter of thanks:

Dear Mr Beardsworth

I write to advice that I shall be lodging a formal complaint with Adobe about Lightroom [gurus] in general and you in particular.  You are all a load of shysters.  With mal-intent you insert stealth bombs into Lightroom that no user could possibly detect, simply in order to gain cheap self-gratification by smugly pointing out what, with hindsight, are very obvious and simple resolutions to users’ issues.  Your only possible motivation in doing this can be to demonstrate what dorks Lightroom users are and how you lot are all clever-dicks!

Seriously, I got your message at lunchtime but all my hard drives were located at home.  I was pretty sure that your resolution would be a case of hope over reality and once I arrived home had a 30 minute window to eat before going to Kingston Camera Club (yes I did get a “10” since you ask!)  I forsook dinner to try your theory and b****r me it worked!!  I typed P: as you suggested and suddenly My Computer and all my external hard drives magically appeared!

You lot really are b*******s in humiliating me in this way but I very begrudgingly thank you very much for resolving an issue that had been bugging me for some considerable time!  It was good of you to keep persevering rather than just close the matter.  Thanks again.

Regards

Duncan

See Duncan’s work at www.duncangrove.com or blog www.duncangroveblog.com.

Update: It appears that Duncan has recently been awarded a Fellowship of The Royal Photographic Society, the most august and longest established organisation of its kind in the world.  Fellowship (FRPS) is awarded for exceptional standards of excellence. It is the Society’s highest Distinction and recognises original work and outstanding ability in a specialised field. His Fellowship Panel of twenty Wimbledon tennis images can be seen at www.duncangrove.com/frps-panel.

OpenDirectly released

I’ve just (finally) released Open Directly, my plug-in for Lightroom 2 or 3 that opens images directly in another program. The other program may be another raw converter, or it can be any program the user chooses. In either case, the plug-in simply sends the original file and invokes the other program.

Read more here

Keywording

A particularly well-rounded set of thoughts on keywording in Lightroom from Chuq Von Rospach here:

An important point  — when you design a structure like this, how well it’ll work for you depends on where your hassle factor hits. Are you more annoyed by looking through long lists of things? If so, design a hierarchy with more sub items and fewer items in each sub-area. If traversing the tree bothers you more, use longer lists and fewer sub-items. You can adjust this to your tastes as you work with it.

[…]

Define some standards and then stick to them. Capitalization, tense, punctuation and the like matters. If you aren’t consistent here, your work will come across as unprofessional and sloppy — even if people looking at your photos only notice it sub-consciously. In my keywords, I standardized on using the plural form (“Birds” instead of “Bird”) unless that was clearly inappropriate, and I lean towards a third person form, present tense and I always strive to use an active voice instead of passive. (Passive Voice writing is to be hated in all serious writing).

Getting all of the details right is — frankly — a pain. But once you get them right, they’ll stay that way with minimal work, and it gives a polish and professionalism to your work that leaves a better impression.

It’s worth reading Chuq’s thoughts in full because they are well-written and include some “theoretical” angles while not forgetting the practical, real world issues. The first paragraph I’ve quoted rings particularly true here – it’s why I use one long list.

Sweet spot

Not sure who is behind Totally Sweet Photos but he (maybe Tom) or she describes a A Hyper-Organized, Smart Collection-based Lightroom Workflow:

This seems like an incredibly complicated workflow, however since the majority of the tools involved are self-updating smart collections I put forth virtually no effort in order to keep track of thousands of images. In fact, in the past I have managed lesser amounts of photos with fewer steps in what were much more complicated and time-consuming workflows. Thanks to automation, all I really do now is work on my photos and trust Lightroom to keep the books straight.

Good to see my workflow scribblings still hits a sweet spot and provokes people into doing their own thing.

Syncomatic 1.23 now syncs into stacks

Version 1.23 of my Lightroom plug-in Syncomatic is now available via Photographers Toolbox. The new feature is that now, as well as handling files with matching names, it can now synchronise metadata and adjustments within stacks

When you add metadata like the title or keywords to a stack, Lightroom only updates the picture on the top of the stack – items lower down the stack are not updated. So if you do want all members of the stack to share similar metadata, you first have to expand the stack and select all the items. Then after adding the metadata, you would collapse the stack again. For some users, that is OK because they will only keep the best image and don’t want to annotate the rejects. But for others it’s pretty inefficient, for instance stock photographers or those who use stacks to gather frames intended for panorama stitching. For them the stacks-metadata problem is often a reason for not using the stacking feature.

Sync Stacks is intended to overcome that problem. It adds a menu command and:

  1. Loops through the selected pictures
  2. Finds images that are at the top of their stacks
  3. Copies their metadata to the rest of the stack

“Read more”…

Syncomatic plug-in – now syncs adjustments too

I’ve just released a new version of my Syncomatic plug-in.

Syncomatic’s original purpose was to tidy up metadata when you are faced with sets of pictures whose names match but whose metadata is out of sync. For instance you may have lots of TIFs or JPEGs which have been output from your raw files, but you then added keywords to the raw files. How do you then make 1234-edit.tif have the same keywords and other metadata as the original 1234.nef, make 1235-edit.tif the same as 1235.nef and so on? Syncomatic does that job.

It now does the same with adjustments (at least as many as it can).

Why would one want to do that? Well, for example, I was contacted by someone who had taken 15,000 pictures in a very short period, and sheer pressure of work had led him to switch his camera to Raw+JPEG and import only the JPEGs. He’d then added ratings, captioned and keyworded the JPEGs, done some quick adjustments, and submitted modified JPEGs to his clients. Now he was home and wanted to import his raw files and prepare stock and portfolio quality images from them. That was where he hit a wall. He could restore the raw files into the same folder as the JPEGs, and then synchronise the Lightroom folder – but Lightroom hides the JPEG and brings in the raw files without any IPTC metadata or adjustments. Even if one had saved the metadata back to the JPEGs, it wouldn’t really treat them like sidecars. The other approach for RAW+JPEG is to change the catalogue option so it imports separate files, but then there was the problem of copying the metadata and adjustments from each JPEG to its corresponding raw file. That’s why I updated Syncomatic.

Another possible application is when you have a new camera which has a raw file type which Lightroom doesn’t yet support. What you might do – after filing a complaint with the camera maker and demanding they offer a DNG option – is shoot Raw+JPEG, import the JPEG files, and add your metadata and adjustments. When Lightroom is updated, you can import the raw files and use Syncomatic to update them. I’m not sure if that will work in practice, but I suspect so.

Now, there are some limitations – but not many. Essentially I’m using the develop preset mechanism, so Syncomatic can only apply adjustments that you can save in a preset. Above all, that means cropping can’t be synchronised. But it does pretty well everything else, which isn’t too shabby.

More about the pen’s eraser end

I really wasn’t sure whether yesterday’s how to make the Intuos pen’s eraser erase Lightroom’s local adjustments was a discovery of the magnitude of Columbus reaching the New World or belonged in the same “so what?” league of interest as Britain’s red tops revealing that another highly-paid footballer can’t keep it in his pants and another Conservative MP is a closet gay.

Doubting the tip’s value so much, that was where my thought process stopped, and it was only this morning as I put my feet down on the bedroom floor (wood not a shagpile) that another idea clunked into view. Now the pen’s eraser end is the Alt/Option modifier, you can use it with all sorts of other Alt/Option functions in Lightroom

Musketeer on the ruins of Basing House, twice besieged by the Parliamentary army during the English Civil War and destroyed after it was stormed in 1645

The obvious use is here, where I’m dragging the Blacks slider. Holding down Alt/Option – or using the pen’s eraser – displays the clipping.

Another is in the Detail panel, where I’m dragging the Masking slider with the pen’s eraser. Just as if I had held the modifier key, Lightroom shows which image areas will be affected by my sharpening:

No doubt someone somewhere has an anally-exhaustive compilation of all the Alt/Option modifiers ( here are a few ), but in general it’s best to keep it simple. Just keep in your mind that the modifier key often does surprisingly useful things with Adobe products and simply get into the routine of holding down the Alt/Option key – or swivelling the pen to its eraser end – and discover them for yourself.

But there is one question I couldn’t readily answer. What should I do with the hand that should have been pressing the Alt/Option key?

As good as a mouse?

A bit late, but see this year-old guest appearance on Scott Kelby’s blog by Wes Maggio, an Application Specialist for Wacom where he talks about the pen/tablet combo and its role with Photoshop and Lightroom.

Still, everyone’s workflow is a little bit unique. At the end of the day, if you find that your particular workflow relies entirely on Lightroom you have to ask yourself whether a tablet is a worthwhile investment.

If you find that part of your process involves making local adjustments, the case for a tablet begins to be made. If you ever take an image into Photoshop to composite, to clone out unwanted elements, or perform some other complex enhancements, then the argument becomes even stronger. When you consider all of the other benefits that a tablet affords (i.e. ExpressKeys), I believe that you have a most compelling case.

I have never really been a graphics tablet user. I’ve owned one for more years than I care to know, but somehow I’ve never become used to picking it up the instant I start Photoshop or Lightroom. Friends use them, and swear by them, but mine has remained stubbornly out of reach and gathering dust, while you can almost read the finest detail of my palm etched into the once-silvery grey skin of my lovely big trackball mouse.

While never shy of mocking herd instincts like the ludicrous “you’re a photographer so you must be a Mac user”, I’ve never been so dismissive of the idea that a pen tablet might be a better way to work with pictures. But for me it was like Guinness, which I used to try every other year, just to see if I’d changed my mind. I’d keep trying my tablet yet be unable to prevent myself switching back to the mouse and keyboard shortcuts before the job was done (though not with the same disgust with which I failed to finish my pint of the black stuff).

Then at a trade show earlier in the year we were provided with Wacom Intuos4 tablets. It was an ideal opportunity and so for 5 days I tried to force myself to work that way. Without really exploiting them, I could sense the possibilities of the express keys and the iPod-style touch ring, and didn’t find the pen totally alien. But from the number of times I was asked “do I need a pen tablet for Photoshop/Lightroom?”, it was obvious that I’m far from alone in remaining both doubtful and curious about the tablet’s value. No Damascene conversion occurred by the end of the show (you don’t get those in Birmingham anyway) but at least I’d given it a try.

Six months on, no doubt inspired by the minor miracle of my building a PC, I decided to have another go and last week on my birthday a shiny black Intuos4 turned up at my door. I hope I’m already brewing one or two Lightroom-related tips, particularly in the use of those express keys, but one thing was frustrating me – erasing Lightroom’s local adjustments. Surely you’re supposed to be able to reverse the pen, and use the eraser end to erase. Sounds reasonable?

I should say that I don’t know if this so obvious it merely shows my lack of experience with the tablet, but the solution seems to be to go into the Tablet Properties and customise the tablet’s behaviour. It’s only a couple of steps. First, add Lightroom as an application, meaning it will have custom behaviours. Then you go to the Erase tab and switch the pen’s default behaviour from “Erase”. Instead it should be “Modifier” and the Alt /Option key. In other words, that’s the same as when you use the adjustment brush with a mouse….

Lightroom, Photoshop and timelapses

There’s an excellent couple of movies by Julianne Kost on using Lightroom and particularly Photoshop for timelapse movies .

Part 1 is the relatively obvious Lightroom work, but the much more interesting part 2 shows Photoshop (Extended) assembling the movie, adding lens blurs in a batch, and – the bit I didn’t know – including sound.

Maybe it’s not deliberate, but an odd detail is that she’s not using an Apple monitor but an HP instead. I wonder if Adobe no longer want to give  Apple free advertising? That would be welcome. The HP is pretty ugly though, so maybe they could have just covered up the illuminated Apple with their own, or just the Flash logo?

Via

Whatever you want

Lightroom’s SDK forum, never the busiest or most informative place on the net, has become a bit of a no-go zone lately as one particularly pungent forum member (let’s call him Borat) seems to feel the need to advertise his opinion on every topic. A period of  silence followed by modesty would probably make everyone, me included, appreciate Borat’s contributions for whatever they may be worth….

Despite this vuvuzela noise drowning any signals from the forum, I’d noticed a John Ellis posting there. I was curious because he seemed to know his way round Lua but I hadn’t heard of anything that he’d released – until yesterday when he announced his Any File plug-in:

Any File lets you import any type of file into a Lightroom 3 catalog and manage it just like a photo — PDFs, documents, spreadsheets, audio, etc. Typical uses include managing releases, invoices, notes, scans of old documents, audio tracks for slide shows, and avoiding all of the LR 3 limitations on video formats and video metadata.

I’d been wondering if anyone would do something like this. Frankly, it shouldn’t be necessary – Lightroom itself should allow the photographer to decide what type of files to catalogue, shouldn’t it?

Syncomatic 1.21: -edit and other suffixes

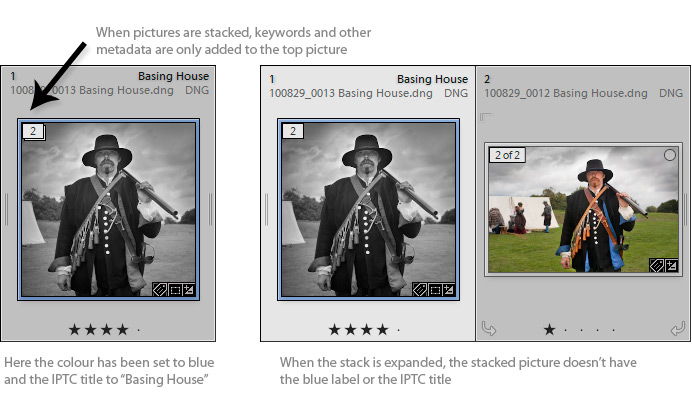
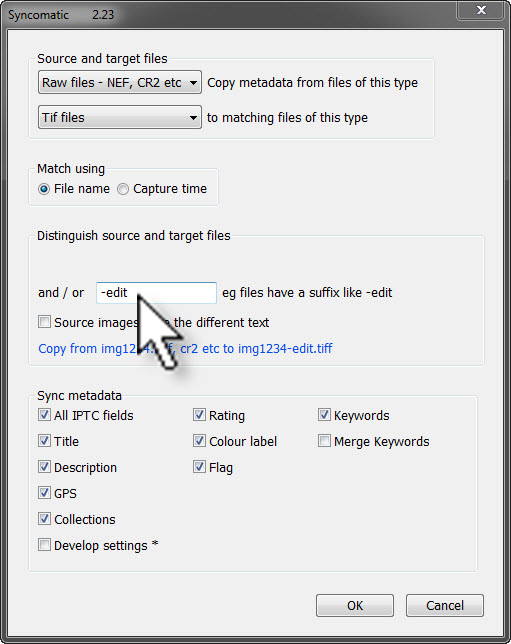
Syncomatic’s original idea was to sync the metadata of files where their names are the same but they have different file types – for example, from 123.cr2 to 123.tif.

However, by default Lightroom adds -edit to the file suffix when it sends a file to Photoshop and plenty of photographers identify different versions of a picture by adding other suffixes to the file name. For example:

  • The original 100703_0123 Jones wedding.nef, 100703_0124 Jones wedding.nef, 100703_0125 Jones wedding.nef…
  • A version with Photoshop layers 100703_0123 Jones wedding Layered.nef …
  • A black and white version 100703_0123 Jones wedding BW.jpg …

Syncomatic 1.21 is released today at Photographer’s Toolbox and now handles these suffixes.

Syncomatic available now via Photographer’s Toolbox

Tim Armes’s Lightroom plug-in site, Photographer’s Toolbox now has a blog to announce new plug-ins from Tim, me, and from Matt Dawson. There’s also a Twitter feed for quick announcements.

My latest plug-in Syncomatic is uploaded and available. Syncomatic is not a plug-in everyone will need but is designed for circumstances where you need to copy the metadata between two groups of files and can use the filenames to match up pairs of images. So imagine you have lots of raw files with metadata, and TIFs or JPEGs whose metadata should match the raw files from which they were created. Syncomatic simply runs through the two groups of pictures and makes the metadata of 1234.jpg the same as 1234.raw, makes 6789.jpg match 6789.raw….

Dossier de Presse

Dossier de Presse is a Lightroom-WordPres plug-in from Luc Renambot:

I’m using WordPress with the NextGEN gallery plugin and I used to export my images to disk and then create a gallery and upload the images. They are (better) plugins to upload to WordPress, but I couldn’t find one that supported NextGEN gallery plugin. So I wrote my first Lightroom plugin, “Dossier de Presse“.

It allows you to export pictures directly to your WordPress blog. It supports NextGEN gallery and WordPress Media library. You can optionally create a post including the exported photos (the post is left in draft mode, so you can edit it later).

Locktastic available

Locktastic is now available through Photographer’s Toolbox. This simple plug-in for Lightroom 2 or 3 is designed for photographers who lock or tag files while shooting events, and once they’re in Lightroom it marks those thumbnails with the red label.