Another gallery – Swiss re-enactors

Swiss Medieval re-enactorsAdded another SSP for Lightroom-generated gallery of photos of Swiss Medieval re-enactors. Some of the shots were outdoors but those which worked best were taken in Chillon castle's great hall at lunchtime. The wonderful directional light, low December sun bouncing in off the lake, had immediately had me thinking of the Dutch painters of the 17th century, but I was also very aware of how scenes of ordinary people in their daily lives - not typical subject material for 15th century painters.

Now I've just got to figure out how 21st century drop down menus can co-exist with 20th century Flash. The problem affects you if your existing site uses DHTML menus, such as Dreamweaver CS3's Spry menus used here. The menus appear to display behind the SSP movie in Windows browsers, and apparently it's all because of a well-known problem of Flash and DHTML. I've logged the issue with SSP's developer and think I may have found a bug. The real solution may include going back to work on my Flash site, of course.

As it may be the last post before I vanish to the Lake District for a few days, I'll add a Happy Christmas to anyone reading this blog.

New gallery

Getting my Flash-based site up and running is taking me more time than I'd hoped. Now there's a surprise. Actually, that's not quite fair - within about 3 or 4 days I had written something decent, but I am being a bit ambitious and would like to integrate this site's text-based content into the new Flash site. While Flash will read and display external HTML files, format them with CSS, and read the database powering this blog, its text rendering could be a lot better and scrolling text could also be more elegant. So I've been proceeding at a slower pace, and picking up more Flash skills on the way. There's no rush, and there have been other things to do.

The new site will display images via a SlideShowPro component and in the last month SSP for Lightroom has been launched and is a real snip at $25, or just $10 for those of us who already have the Flash component. It is rather slow on a Windows box, but the developer is investigating the issue and I'm sure it'll be fixed before too long.

To test SSP for Lightroom, I've used it to add a new gallery to the site. Putney Debates is a set of pictures I took back in October when a Sealed Knot regiment helped open a permanent exhibition at the SW London church where the debates took place back in 1647 (read more). I wanted to display the movie within my current site's HTML and, since the SSP documentation was as clear as I'd expected, it was a trivial task, just minutes, to adjust the HTML. So SSP for Lightroom walks away with a golden “Beardy”.

Lightroom and the Camera Raw Cache

Lightroom 1.3's exploitation of the Camera Raw Cache is very new and I haven't had time to experiment or reflect on it, so for now I'll just point to this thread Lightroom 1.3 creates CameraRaw Cache and quote a couple of posts from Thomas Knoll:

It speeds reopening files in the develop module. It speeds rebuilding the library previews after a settings change.

You are not seeing any benefit to the cache because is too small by default and is “thrashing” in with your usage pattern. If you have the disk space to spare, increasing the cache size to 10GB or more would help a lot. The goal is be able to fit cache file all the files your are “actively working on” into the cache. For example, if you import and process about 500 photos in a typlical shoot, you really want the cache to be able to hold at least 500 most recently accessed photos for the cache to provide significant benefit.

For Camera Raw, it uses stores 1024 pixel (long side) images in the cache, so the cache will hold about 200 or so images, which for most users is smaller than the average shoot. Lightroom 1.3 is storing the “standard size” image in the cache, which by default 1440 pixels on the long side (and can be higher--set the catalog settings dialog), so far fewer can fit in the default 1GB cache size, so Lightroom is more likely to thrash than Camera Raw with the default parameters.

The lost post – more about stack types


Now what were the points I made yesterday? Well, this is an HDR image showing the Castelrigg stone circle near Keswick, Cumbria.

Preparing it made me check how many frames I shot in the Lake District were intended for multiframe applications, in particular for HDR and panorama. The answer - 20% - was surprisingly high but illustrates how easy I think it now is to do this.

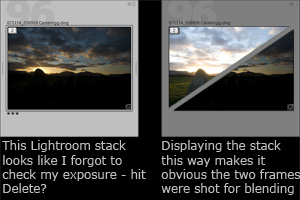
It also illustrates my point about the need for types of stacks if this feature is to help us with the multiframe work as well as best-of-burst identification. Looking for a picture in Lightroom's Library grid, I only knew the stack was intended as HDR because it was incredibly underexposed (said without irony - I would have deleted it earlier if the underexposure had been accidental).

A month of lakes


Got back from the Lake District last night. I was staying in the village of Rosthwaite where my brother and his wife have bought a holiday house and it’s great to report that this little country still has places with no internet, no mobile phone coverage, and almost no radio reception. So nothing else to do except go walking and snapping – this is Derwentwater from Friars Crag, Keswick and is stitched in Photoshop CS3 from 9 originals. But before I disappear to Lausanne for a couple of weeks, another rant….

Improved stitching is one of the top reasons I offer when people ask about upgrading to CS3 (the other is the black and white adjustment) and I’ve certainly been doing many more panoramas in the last year. But managing all these component images is going to need some work. One way is to use Lightroom’s stacking feature – I’d put the stitched image at the top of the stack. But I file my derivatives separately from the original raw files, and stacking is only really helpful once you’ve actually stitched the final masterpiece. Before that point, the stack will only be represented by one of the panorama’s component shots, and there’s also the danger of accidentally deleting one of these badly-composed components. The same argument applies to other multi frame techniques like HDR or the newer idea of registering multiple frames and using median blending to eliminate anything moving through the scene. As these methods become more popular, we’re going to need more help grouping, representing, and protecting the component images.

Right now, what I do is use a custom field in iView and record the first file’s name against each component and the derivative. I can cope, but I’d like to see better.

What I’d love to see is Lightroom, xMedia, Aperture etc introduce “stack types”. Currently we only have the “best of” method which you see in Lightroom and Aperture and where one image is chosen as the best or representative thumbnail. I’d also like to see “strip” where the representative thumbnail is a line of small thumbnails, showing you that this stack is a series of components for a panorama. Another would be “grid”, for stitches in more than one direction. “Blend” would be another type, where the thumbnail might have a gap across the middle to indicate the components are part of an HDR. I’m even less sure about the representative thumbnail for register blends, but by now I hope you see the direction I’d like software to follow – make the stack’s representative thumbnail indicate what type of usage is intended for the component images.

As well as grouping and representing, another need is adding a greater level of protection against deletion. This is less relevant for “best of” stacks, but for other stack types the user should be warned before a component is deleted. After all, a panorama without one of the component frames would be a rather toothless creature, don’t you think?

One or many Lightroom catalogues

[Updated January 2011]
Lightroom makes it easy to create and work with more than one catalogue, and it’s making some people think that’s how they should work. It’s an idea that I’ve seen touted in blog posts and user-to-user forums, and I’ve been asked about it on too many occasions to mention. Unfortunately it wasn’t true back in 2007 when I originally wrote this post, and we’re now 4 years on and have the benefits of more powerful computers and Lightroom 3’s improved handling of large catalogues.

As I put it in my book:

Another way to think of Lightroom is as a centralized inventory system managing a warehouse – you no longer need to look through each pallet or bin to find the parts. And as your business grows, and you rent the neighbouring warehouses too, you still only need one system to keep control of your work.

That was a key quote.

First, let’s clarify exactly what I am talking about. I am not referring to a catalogue used when you’re travelling and only have the laptop. On such occasions you can’t have a master catalogue with you and may well need a secondary catalogue. What I am referring to is your routine way of working, and to the idea that you can control your picture collection by using more than one catalogue.

The trouble is that those who are actually advocating multiple catalogues (eg another one popped up just today at O’Reilly’s blog and has a particularly rich selection of dumb ideas) never reflect too deeply on their underlying reasons for fragmenting control of their work. Read between the lines and there are essentially two strands to their arguments:

  • It’s a workaround for performance problems they’ve experienced – or more likely fear they may experience – with large catalogues
  • They’re working “Bridge-style” and don’t really think about DAM

Looking first at the “necessity” argument, if it is incontrovertibly true that the big catalogue is degrading performance, then I would concede that you may have no alternative. But as we’ll see, that is a very big “if”. Just don’t believe or advocate that such workarounds are good practice.

But is it necessary anyway? One curious detail is that these experts state that you need to split catalogues when they reach 10000, 20000, 50000, or 100000 images. Isn’t it a little suspicious that these recommendations rarely coincide, and are always nice round numbers? It’s no surprise though – the numbers are little more than voodoo. It is not yet possible to provide firm guidelines for when a Lightroom catalogue might contain too many images and run up against performance limits. In fact, Adobe don’t give any maximum number, and Lightroom 3 includes a variety of tweaks specifically designed to improve the performance in this area. My own biggest test catalogue contains 105000 images and ran OK on a 6 year old PC (until it was recently replaced), while I regularly work with a photographer whose 350,000 image catalogue was again not on the latest bleeding edge hardware. In my previous life I’ve a lot more enterprise-level database experience (SQL Server and Oracle) than most photographers, and I’ve never seen anything that makes me question Lightroom’s less-fancy database engine. And, believe me, I do dig around and abuse it. Frankly 75000, for example, is not a big number in database terms – add a couple of zeroes before I start getting concerned.

Obviously, as a program that covers raw image processing and DAM, Lightroom places strains on many aspects of your computer and peripherals. Many factors other than the simple number of records in the database could degrade a system’s performance – for example, a graphics driver problem or speed of accessing storage devices. In performance terms, you may not actually gain much if anything from splitting it up into smaller catalogues.

But let’s say performance limits did indeed make you want to break your work up into multiple catalogues. There’s plenty to lose. For one thing, there is no better way to let some of your pictures slip through the cracks when you forget to import one folder, or when you add more images to a folder and forget to update the Lightroom catalogue covering those folders. As well as omitting items, you can easily duplicate them. Images may end up recorded in more than one catalogue, with adjustments and their descriptive metadata diverging, keyword spellings too, singular here, plural there. And unless your search needs are very primitive, you’re going to have to repeat searches in each catalogue file. So there’s a time cost. Frankly, while you may think you are smart enough to cope with such a “system”, few of us are, not for long anyway.

So multiple catalogues need to be used sparingly, if at all, and need to be tied to physical locations that you can control without thinking – one for the Raid, one for each drive etc – and not to how you analyse your work at a certain point in time. I do use them, after shooting a wedding or event, or when travelling. I like to have a temporary catalogue, usually on the Mac laptop so I can run through pictures while watching United winning on the telly. But once I’ve decided which images to keep, I’ll copy it over to the main PC and import the catalogue into my main one. So the multiple catalogues are for convenience and portability and are temporary residences, like brief affairs after which you always go back to your true love – you never forget who’s really the boss.

I might budge from this hard “one ring” line if divisions are enforced externally. Say you moonlighted as a wedding shooter and wanted no risk of your regular employer seeing the personal work. Or if you don’t want client A to see client B pictures, use a temporary catalogue in front of clients. Another strong reason might be if you shot something you didn’t want the kids to see.

And let’s not forget the other main reason for advocating multiple catalogues is that some people work “Bridge-style”. They archive the job catalogue after finishing the work, or in some cases they delete it and start afresh on the next job. Some wedding and event photographers can work this way – after all, they may be right in thinking that if they ever need to find some pictures, they’ll look up the client or date in their desk diary and then find the archived catalogue. Of course, they also have portfolio catalogues, others for jobs shot over a period that don’t really fit the date structure, others by client, others for images that they might keep needing, another for personal photos…. In other words they are not using a chunk of Lightroom’s capabilities and maybe they “don’t need DAM”. Maybe they don’t, but let’s be clear that this is their true reasoning and acknowledge that their systems are little better than amateur.

I started off with the analogy of a warehouse. Another is with a book. Does a book have an index for each chapter or one for the whole body of work?

GPS data, raw files, and Lightroom


In Lightroom Journal, Adobe developer Eric Scouten shows a Mac-limited application that accesses a GPS device's log file and writes the metadata to raw files.

That's a coincidence. I've had a Garmin Foretrex 101 for a month or two and had previously failed to get it to talk to my D200 (method here and using the GXGND2 cable), but I'm off to the Lake District next week and for two weeks in Switzerland soon afterwards, so a couple of days ago I had another go at setting them up. And of course, the solution was as high tech as pushing in a cable a little bit harder - doh - and so yesterday morning I tried it out in Nunhead cemetery. It wrote stunningly-precise locations directly into my raw files' EXIF, but at the end of my walk the unit must have powered down and a couple of pictures had no coordinates.

I don't plan to get anal about GPS, and I don't want to buy Garmin's serial connector (!) to connect the device to my PC or their serial-USB converter for my Mac laptop. But I am curious enough to have spent a chunk of yesterday evening investigating how to complete the missing info from a log file. After all, surely one could write the track log, which is just xml, in Notepad? Not quite finished yet, but I was using ImageIngesterPro - specifically its forthcoming 2.3 which is in late beta. IIP does a whole lot more than write GPS (via exiftool) and the application is cross platform.

Apart from Eric's post, I recently read two articles about drag and drop from Lightroom, which Adobe haven't implemented on Windows. It might be a good idea for Adobe and other Lightroom writers to take a self-denying ordinance not to write about platform-limited solutions, or at the very least to complain rather than apologise (feebly) for doing so. Adobe should be providing an identical experience for most of their users, not just those on the Mac, so if a feature doesn't work on both platforms, shouldn't they disable it on both? That would put the pressure on, don't you think?

DNG from Aperture

Although some developers of raw converters might have you think otherwise, the DNG format isn't just for Adobe. Photographer and Aperture user Micah Walters has written a DNG Export Plugin for Aperture which uses the Adobe DNG Converter's command line interface to generate DNGs from raw file.

Right now it creates a bare DNG with no metadata, but wouldn't it be neat if you could write metadata into the freshly-minted DNG? For example, one might create an xmp sidecar file from Aperture metadata, use it to get the metadata into the DNG, and kill it afterwards. I'm just thinking of IPTC initially, but one might even pass Aperture's adjustment details to the DNG. On the one hand this might allow you to create the DNG with approximate ACR adjustments, starting with some of the most important like exposure or white balance. But it might also be a way of backing up Aperture adjustments into the DNG, and a subsequent plugin might read those adjustments back into the library. The DNG would carry adjustment values for both Lightroom and Aperture. You may say I'm a dreamer….

Cross, don’t cross

Scripting is on David Miller’s Lightroom 2 wishlist:

…Photoshop, Illustrator, and others support a variety of scripting languages: JavaScript (supported on both Mac and Windows), AppleScript (only on the Mac), and Visual Basic (only on Windows).

However, Lightroom follows a different path; its interface & application logic is built using an embedded programming language called Lua, rather than using Adobe’s existing toolkit & libraries (which explains a lot regarding why Lightroom looks and behaves so differently from its cousins in the Creative Suite). Those who have cobbled together enough JavaScript to automate other Adobe applications (or just about any web browser) would do well to start brushing up on Lua in preparation for the introduction of scripting support in Lightroom (whenever that happens to be). The good news is that a strong grasp on the fundamentals of JavaScript (or any other scripting or “full-fledged programming” language, for that matter) will definitely go a long way when adding a new language to your toolbelt.

While it’s true that users will not have too big a jump from JS to Lua, it’s also important to make it clear that Lua-only scripting would be too Adobe-centric.

While Photoshop is more for custom editing of individual images and interaction with other programs is limited, a bulk processing program with DAM aspirations will interact with a far wider range of non-Adobe business software. And that means dealing with their native languages. For example, one might want to use AppleScript to migrate metadata from a legacy Filemaker database (or Aperture!), or use VB to pass filenames and editing details to an invoicing template in Word or update a job costing database. We simply can’t assume LR controls that interaction. So what it then needs is a triangle of platform-specific languages, similar to Photoshop’s JS+VB+AS, but Lua+VB+AS.

A secondary but still important issue is that users will want to exploit their AS or VB skills and re-use existing code, not learn a new language so their creation runs across platforms. For many a PC coder, the Mac is irrelevant (and vice versa).

SlideShowPro for Lightroom

News that the excellent SlideShowPro Flash gallery is coming to Lightroom:

With that, there will be two versions of the plugin - a “complete” version that ships with everything a new customer (without Flash or SlideShowPro) needs, and an “incomplete” version designed for existing users of SlideShowPro. For the “incomplete” version, you simply publish a SWF containing the component and add it to the SlideShowPro for Lightroom's plugin folder. Your “incomplete” version will then be “complete,” and ready to go.

Both versions will be purchasable, with “incomplete” obviously costing less than “complete,” but we haven't figured out exact pricing yet. Expect more information on that, including screenshots, in the near future!

It'll be interesting to see how well it's done and how much the “incomplete” version costs. Such a gallery engine can already be written by any SSP owner who has the right knowledge. As I've adapted SSP for iView, I'm rather surprised some third party hasn't released one already.

Lightroom v Aperture

John Nack reports a comparison of Lightroom and Aperture pro market shares:

InfoTrends recently surveyed 1,026 professional photographers in North America to determine which software they used for raw file processing. Here's what folks reported:

  • 66.5% using the Photoshop Camera Raw plug-in
  • 23.6% using Lightroom
  • 5.5% using Aperture

To be fair to Aperture, it might be helpful to remove Windows users from the equation for a moment. Even after doing so, Lightroom's usage among Mac-based pros is still nearly double that of Aperture (26.6% vs. 14.3%).

Hold on, to be fair - include Windows users. To skew the story, then exclude them.

Lightroom forums

With the continuing changeover problems at Adobe's Lightroom forum, there's an alternative at Lightroom Forums, set up by Ian Farlow aka ifonline. Most of the usual suspects have already turned up!

A bridge too far?

Martin Evening shows a few ways to make Bridge a front end for Lightroom. This includes using the favourites feature in Bridge and Lightroom's watched folder, and as he concludes:

You can use Bridge as a preview browser to inspect folders before proceeding to import them. This can easily save you lots of time since you won't have to go through the Import Photos dialog to preview the images before you import them. Bridge will offer you a much faster route for browsing the photos beforehand.

I kept thinking this article seemed an admission of defeat. Is there so much wrong with Lightroom's initial comparison and editing that photographers no longer want to turn their backs on the unloved Bridge?

Taming Apache

Installed Skype last week and coincidentally noticed my desktop PC's Apache installation was broken just when I wanted to test a malfunction Lightroom Flash web site. But by the time I connected the two events (I should have just switched off Skype's Port 80 access), it was too late and I had completely screwed up my Apache/PHP testing environment. After flapping around reinstalling incompatible versions, Core PHP was a perfect guide to getting PHP and Apache running on XP.

Clean keywords

At Lightroom Journal, the LR developers blog, Eric Scouten advocates a superficially-attractive way of misusing the keywords to help manage workflow:

Before I start actually applying those keywords, however, I also create the extra keyword to track my keywording progress. I like to organize these under another keyword category I call “worklists”. (This is just an organizational tactic I like; adapt it to suit your taste.) What is important here is to give your worklist keywords a tag phrase that is unlikely to occur anywhere else in your metadata.

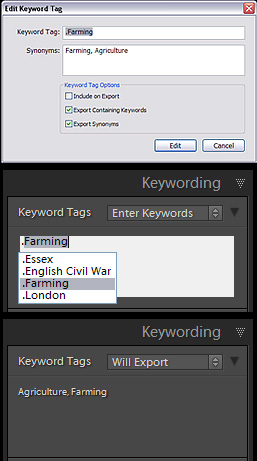
Eric’s tangling up a couple of things here. One is polluting the keywords list with terms to help control workflow. If you really want to do this, make sure you do follow his advice to use a tag that is easy to find – you don’t want these false keywords to get into files that you send out to clients. And he also points out the need to make sure you set each keyword so it won’t export – “each” being important here because you need to untick the children as well as the parents. That’s a lot of extra detail to remember and get right – and lots of time to sort out when it goes wrong.

But let’s not pretend it’s anything more than an unpleasant workaround. The fact is that keywords are meant to describe image content, and sooner or later you’ll run into trouble if you abuse them to manage your metadata-entry work. The program needs to provide smarter ways to control workflow – for instance, letting you save your own selection criteria such as “keywords is empty OR count of Develop settings less than 2 AND capture date in the last 7 days”? It’s great that “smart collections” are promised for version 2, by Eric himself in a recent podcast. But for now, don’t pollute your keywords – use collections and labels to control your workflow.

The second thing Eric’s doing is more valuable, and that’s drawing attention to a way to enter shortcuts when your keyword lists become very long. This isn’t a technique I use a lot, but you can set up frequently-used words like this:

  • add your keyword but prefixed with an otherwise-meaningless first character – here I entered “.farming”
  • switch off that new keyword’s export setting
  • add the real keyword as a synonym – here I’ve added “farming” as well as “agriculture”

As you see in the Enter Keywords screenshot, typing “.f” is enough to go straight to “.farming”, and the Will Export view shows that only its synonyms are applied upon export (but test this, as I’ve seen a bug in exporting synonyms!).

A Lightroom upres preset (updated)

The original post caused a bit of confusion because I didn't mention it affected dimensions like 8.5″which are not whole numbers. I've italicised my extra text.

In London it's the rule that you wait ages for your bus, and just as the rain stops they come along in pairs, or threes, one after the other. Well, three times this week I'm been asked how to do an upres in Lightroom so I thought I'd post a quick explanation and a preset.

All you need to do is exploit the Constrain Size settings in the Export dialog. Tick Constrain Size, and set both limits to the size you want - setting both is to allow for a mixed export of portrait or landscape orientation images.

Unfortunately because of (what must be) a bug you can't directly specify the physical size in inches or centimetres if it isn't a whole number - you have to work out the exact number of pixels. So for example I wanted to resize to A4 paper at 300dpi - 29.7cm which the dialog box rounds up to 30. That's 3508 pixels (rather than resort to Excel, I simply created a new A4 document in Photoshop).

Once you've worked out the settings, save them as a preset such as my A4 TIF to Photoshop template. On Windows this goes in C:Documents and SettingsUSERNAMEApplication DataAdobeLightroomExport Presets, while on Mac they're in LibraryApplication SupportAdobeLightroomExport Presets. Create the Export Presets folder if it doesn't exist.

If you're interested - I feel I should be but confess I'm not - Lightroom perform the interpolation using the Lanczos kernel method (please come back after you've proved the equation). That's the same resampling technique as in Adobe Camera Raw. It seems more worthwhile to ask whether it's better to do the resizing in Lightroom rather than in Photoshop, and I'm undecided on the matter. If anything, I'd prefer the latter because you can see the results and immediately reverse the operation.

Metadata field lists

A badge of any “professional” program is that it is highly customizable. In my book that includes things like scripting, and any database-driven app simply must let the user save queries – again that should be there from day one. Software developers like Adobe can never anticipate the range of users’ needs, so they should always provide the tools for others to fill in the gaps. Let’s hope both of these basic features aren’t too far down the Lightroom feature priority list.

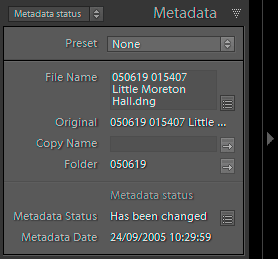
The metadata panel is one area that you can customize right now, adding your own new layouts or “metadata field lists” to display different fields which you find more helpful.

I’ve recently written one to show the location fields in the order in which I like to enter them – country, state, city and finally zooming in on the location field. So here’s my “Location reversed” layout. Another data entry template was written for a friend/client whose workload means he only enters a big caption and his copyright information, hence my “Big caption and copyright”. A third one is more for reviewing the status of pictures – my “Metadata status”.

To use these templates, right click the links and save the files to the correct place in the Lightroom support folders.

  • On Windows that’s in C:\Documents and Settings\USERNAME\Application Data\Adobe\Lightroom\Metadata Field Lists
  • On Mac they’re in Library/Application Support/Adobe/Lightroom/Metadata Field Lists. Create the Metadata Field Lists folder if it doesn’t exist.
  • Alternatively, get to the folder by going into LR’s Preferences, Presets, Show All Other LR Presets button

Make your own

These lrtemplate files ar
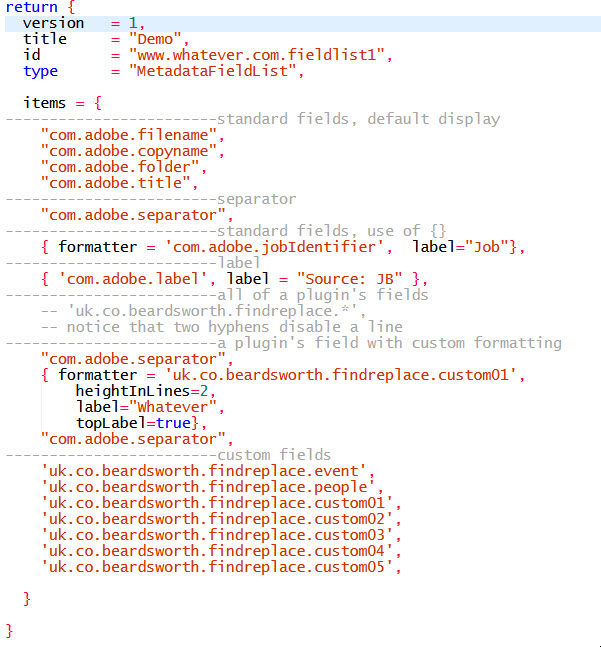
e simply plain text files, but with a .lrtemplate file extension, eg Location reversed.lrtemplate.

So they can be edited in Notepad or TextEdit and it’s dead easy to make your own.

Once you understand the syntax, you can often guess at how the fields are named, so the IPTC title is coded as “com.adobe.title”, as you see on the right.

To see the field names, a good tip is that you can save a Metadata Preset and examine it by opening it in a text editor.

Fields from plugins can be specified by including the plugin’s ID, so for example “uk.co.beardsworth.findreplace..custom01” refers to a field in my Search and Replace plugin. As shown in the example, you can also use * as a wild card listing all the plugin’s fields.

You’ve got a few formatting options, such as separators and different field names.

There’s a plugin for that

It’s worth adding that this feature is undocumented by Adobe, but it has not changed since 2007 when this post was first written.

Credit for finding it belongs to Jeffrey Friedl and his online Metadata Viewer Preset Builder lets you create these layouts.

Personally, I use Notepad. It’s funny, but for all the importance I attach to scripting with DAM, it actually seems more professional to customize a program with nothing fancier than a text editor.

Data migration

pdf fileIn my former life I did a lot of data migration, moving finance and other business information between old and new systems. Moving metadata between cataloguing systems isn't very much different and I've moved quite a number of photographers' metadata into iView (now Expression Media) using an Excel application as a bridge (from there it's an easy enough jump to Lightroom or Aperture).

I've now packaged this Excel spreadsheet up as a more generic tool that clients can use to run their own data migration. While it is for Windows users, there's an alternative route for Mac users. For more info, read this pdf file. According to the client who used the initial version to update 50000 items, “does the job beautifully“.

Lightroom camera defaults

Ian Lyons has written a tutorial on changing Lightroom's camera defaults:

Whilst I briefly mentioned the new “Set Develop Settings” command in my review of Lightroom 1.1 I didn't think it was necessary to go into detail. Little did I realise that some two months after 1.1 was launched that many Lightroom users would still persist in creating and applying Preset develop settings customised for their particular camera etc. Don't get me wrong, presets still have their uses, but having to filter images according to Model, Serial Number or ISO before in order that the appropriate develop preset can be applied is both time consuming and in many instances unnecessary. My guess is that users either don't realise that Lightroom is already capable of automating much of this work or don't understand how/when to use this feature.

Right now, you can only change the default for a particular camera / serial number / ISO combination. That's useful enough, but just imagine when you can change the default for a particular lens. One of my three most frequently-used lenses is getting on a bit and has less contrast than the others, so I always seem to pump up the Blacks slider for shots taken with it. Trapping a camera / serial / lens combination is a bit more complicated, but it'll come. And probably sooner than I change that lens.

Lightroom and multiple frame techniques

One of the best things about Photoshop CS3 is the improvements in stitching, and Lightroom’s product manager Tom Hogarty is one of those who is shooting more panoramas. Asked in this interview what he’d most like to see in 2.0, he says:

That’s a good question. Let me think about that for a minute. For my own work, I’d like to see it go beyond the 10,000 pixel limit per side because I have been using Photoshop CS3 quite a bit lately and using the auto align and auto blend features to make ridiculously good panoramic images on the fly. I want to bring those back into Lightroom so I can print them and I think the hundred million pixel limit we have for image files is frustrating for a lot of people. With the new panoramic tools in CS3, that limitation is getting a bit more pressure now.

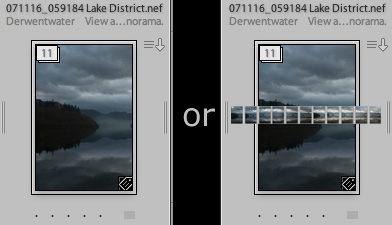
The follow up question asks about future plans for doing the stitching in Lightroom. That’s fair enough, but as usual the focus is on the image processing – and the management side needs work too.

These comments don’t just apply to Lightroom but to DAM in general. And I’m widening the issue beyond panoramas and embracing other multiple frame techniques (MFT). MFT includes all types of frames that we now shoot for later assembly into a single image – images shot for high dynamic range (HDR) blending, for elimination of moving objects by registration (Photoshop’s smart object stack blending modes), noise reduction, simulated multiple exposure. We are on the verge of an explosion in this type of work, and managing these pictures is going to get painful – if it isn’t so already.

Right now I manage such sequences of images by entering the first frame’s file number in an iView custom field. So the 13 frames of a panorama, or both frames of one of my infrared sandwiches, share this code which is also recorded against the final stitched image. This makes it easy to find the originals or any derivatives, for example if I need to repeat or revise the final composite. It works, partly because I am very thorough with such things. But even then, more than once I have deleted a badly-composed shot, only to realize (not too late) that it was intended to be the middle frame of a panorama.

Stacks are a very promising way to control MFT frames. But Lightroom, like all other programs with this feature, uses a “best of burst” approach, stacking a sequence of frames and showing the best one on top. But a “best of burst” view doesn’t represent the variety of MFT – panorama stitching, HDR blending, noise reduction, smart object stacking in Photoshop CS3. You can obviously put the frames into a conventional stack, but which is the best image in a panorama or the correctly exposed frame for HDR? Obviously once you’ve done the stitching or blending you might use the PSD/TIF, but that’s no use when you’re doing your initial evaluation / organisation, or when you have filtered the library to show only the originals.

Conventional “best of burst” stacks simply don’t give any visual clues for these types of multi frame photography, and there is a huge risk of the user discarding individual frames. So we need 2 things – a meaningful way to visually represent different reasons for stacking,and protection for the individual members of stacks.

Thinking of Lightroom, the first part of the solution leaves the underlying mechanism as it is now, but users would have to choose a “stacking type”. One might be “best of burst”, so exactly as now, but choose “panorama” and the thumbnail would be shown as a strip of tiny thumbnails, and “blend” would give the thumbnail a more 3d stacked appearance. Now the user can see exactly what type of images are present in the stack.

Secondly, once an image is marked as part of a stack, it should be protected. I’d even like to see it made read only, but as a minimum the the user should be prompted if he/she tries to do anything dangerous to an image that belongs to a stack. The next time you plan to stitch that panorama and discover that the middle frame is missing – and you may have emptied the trash – you’ll appreciate these features.