Integrating with InDesign

Published Folders can group related images and make it easier to find pictures when you’re in InDesign.
If you want to create a book in InDesign using raw files adjusted in Lightroom, the way I recommend it to use a Publish service to create and maintain a folder of TIFs which you then use for the InDesign project:
- In Publish Services, click the + to add a new service.
- Select the Hard Drive option.
- Choose a folder such as “my ID book 30x30cm images” (you won’t be able to change this folder so choose its location carefully).
- Choose 16 bit TIF as the file type.
- Set the size to match the dimensions required for the book. Yes, this means that if you want to use multiple sizes, you’ll need multiple hard drive services.
- Sharpening is up to you. I’d go for standard.
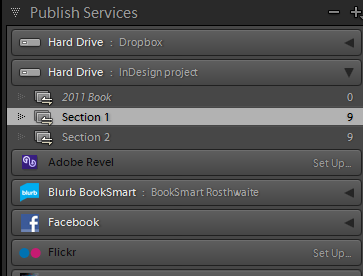
- Save the Publish Service – here I called mine “inDesign Project”
- Add the pictures you want. As well as raw files and other originals, include PSDs or TIFs if you want. This allows you to mix raw files which you were able to fully adjust in Lightroom and other pictures which needed a bit of Photoshop work.
- Put the pictures in collections or “Published Folders” if you want. Here for example I’ve created collections called “Section 1” and “Section 2”. When they are published these collections will become subfolders in Explorer or Finder, which can make life easier when adding pictures to the InDesign layout.
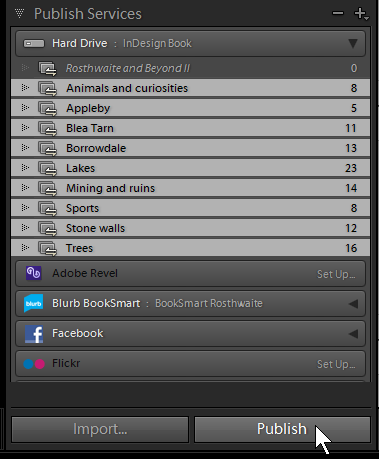
- Now press the Publish button – this creates the output folders and creates the TIFs.

Instead of publishing each Published Folder separately, notice that you can select multiple Published Folders and publish them simultaneously by clicking the Publish button at the bottom of the panel.
At this point you have a folder of TIFs and it is these files you add to the InDesign book.
- Place the pictures in InDesign – you could pull them from the output folder using Mini Bridge (inside InDesign)
- Captions should be automatically added – see here, this video
- In InDesign pictures will be at actual size – if you resize them in InDesign some quality/sharpening impact?
- If you need to edit a picture, go back to LR, adjust, then to Publish and hit Republish, In InDesign, refresh the link in Links panel
- If you want to add another picture, go back to LR and add it to the Publish collection and hit Republish
So why is this method better than using an Export from Lightroom? One advantage is that it gathers everything into one place, in Lightroom and in your output folder. It’s ideal when you go back and forth between InDesign and Lightroom as it takes care of any republishing you may have to do – with Export it’s too easy to be inconsistent and export changed files with different filenames, for example. It works less well if your intended book design includes a variety of image sizes.
If you’re sending the book to Blurb, notice that there’s a new Blurb Plug-in for Adobe InDesign which automates the creation of the pages and the covers, and allows you to upload the book from within InDesign. See this video too.