Competition

It's not a secret that I find Lightroom the best application for reviewing, adjusting and applying initial metadata - I'd pretty well finished processing last weekend's 2,100+ raw files by Wednesday morning. Equally obviously, it's not the only program that aspires to manage and process large numbers of pictures. I'm immediately referring to the Mac-limited Aperture, but it's interesting to see others moving into this database+processing arena. There are hints of a SmartFlow from Microsoft, and Robert Edwards pointed out some of the features that are going to be in Bibble 5. Click one screen grab and you'll see the cataloguing system, click the other and there's local adjustment within the application (ie not via some pixel rendering plugin or Photoshop).

I can't shake off the feeling that right now there's no Manchester United that wins the DAM+P market with style - man, yesterday was so tense - but just a bunch of functional Chelseas (without the kleptocratic funding of course). Eventually a winner will emerge, but let's hope that there's plenty of competition between at least four teams.

What’s going on?

Mary Jo Foley speculates about Lightroom designer Mark Hamburg's departure to Microsoft:

What?s Microsoft want with Adobe Photoshop guru Mark Hamburg, who recently joined the Redmond juggernaut?

Hamburg a programmer who has been part of the Adobe Photoshop team since version 2.0 and helped lead the Photoshop Lightroom one, is now a Softie, as News.com?s Stephen Shankland reported on April 28.

The official word from Microsoft is Hamburg will be working on unnamed ?user experience? efforts. My bet is Hamburg will be instrumental in helping Microsoft bring to market its Photoshop Lightroom competitor, which is codenamed ?SmartFlow.?

Aperture to Lightroom (update)

Last year I posted a note on how to move master pictures from Aperture to Lightroom and transfer any metadata that you had entered. Essentially you used the Export Masters command and told Aperture to put the metadata in XMP sidecars. This worked fine for raw files, but not for originals whose file formats were publicly documented such as DNGs, TIFs or JPEGs. Adobe (rightly) expects metadata to be embedded in the file and not in a sidecar, so Lightroom or Photoshop wouldn't read any Aperture captions or keywords in those files. There was a workaround, but it required you to keep your head screwed on.


No longer. I've just had it pointed out that Aperture 2.1's Export Masters command now has an extra option - writing the metadata to the file. So you could just select all the files, and choose that option. It embeds the metadata in raw files too, which you may or may not like. (If not, run Export Masters twice with the sidecar option for raw files and the embedded option for the rest).

It strikes me as odd that they should give priority to this feature. Apart from being limited to the Mac, Aperture still doesn't read xmp sidecars upon import, so there can be two barriers to moving to Aperture. But yet they now make it easier to move your pictures and metadata away from Aperture and to Lightroom. An odd commercial decision, but maybe I should learn to “Think different” ?

Lightroom 2


What is it about the last couple of weeks? OK, I got good news about the lump - it is edible - but then my internet connection fails, another chunk of time goes down the drain, and I'm forced to go down to the pub and use its wifi…. It does 2 of its own beers and right now the whole place smells of brewing. Oh well, maybe it's not so bad to lose my home internet.

Anyway, with Lightroom 2 out in beta, I thought I'd make a small - pint-sized - post about an easily-overlooked but nice little change to Clarity in Lightroom 2 Beta. You can still use Clarity as before to add punch to the picture by dragging this slider to the right, but you can now drag the slider to the left too. These minus values make the image softer, while preserving edge detail. Combine this effect with the new Post Crop setting in Vignettes - increasing the vignetting - and you can produce some soft, romantic looks.

If you like the effect, here's my soft vignette template for LR2.

Shush

Take a look at Jeff Schewe's teasing post in a thread about Aperture 2.1 and its dodge and burn utility:

what are you gonna be doing next Wed, April 2nd? (I actually already know what you'll be doing but I can't really tell ya)

Rendering out the raw file to run a Photoshop type plug-in on the gamma encoded file (making a tiff) is NOT the way I want to be dealing with raw files. Dodge/Burn, and optimal output sharpening can/should/will all be done right in the raw workflow. That would be the Lightroom way…

iDrive

What a lousy week. Sunday's high - United going 5 points clear against the Scousers - was sorely dented the following afternoon when a Mac user drove his Volvo into the side of my car, which had been parked in front of the house. As if I've not said some nice things about Aperture recently! Another whole day then went down the drain trying to unblock a panicking friend's email before finding that it wasn't the free antivirus or firewall that someone had installed, or some problem at the recipient's end, but her ISP blocking an innocuous letter combination in a single plain text, attachment-free message. It was one of those weeks when you never even start one of the things you'd planned to finish.

But at least the week's ending nicely, with news of a private re-enactment event down in Hampshire this weekend, and this afternoon I picked up a courtesy car so I can get down there tomorrow for the dawn assault with muskets and cannon. That should rudely awaken the locals. And though I don't use Aperture seriously, it's still good to see that today they've introduced 2.1 with a sort of dodge and burn tool.

Local adjustment was something I thought they would have introduced if they had wanted Aperture 2 to make a big splash, rather than just halt the drift away to Lightroom. But it's here now and shows one future direction for these DAM+Processing apps.

One thing to notice is that Aperture's dodge and burn has not been implemented within the main interface but in a plug-in window. This contains the sort of tools you might expect - brushes and size, feathering and strength sliders - and it looks consistent with some at least of Aperture's existing buttons. Still, when lack of modularity is supposed to be such an Aperture strength, it's odd that they've gone for a separate, modal window.

The other interesting detail is what happens once you're done and you click Save - a new TIF file is created. In other words, dodge and burn is not implemented like other adjustments as non-destructive parameters, which take up negligible disc space, but it is an old fashioned destructive tool. Oh well - better watch out for the iVolvo again.

Black and white and Lightroom 1.4

Never quite got round to posting about Lightroom 1.4, did I? I'd thought of doing so, and setting the post to display on the day of 1.4's release, but I had other things on my mind earlier this month. First was a small operation, and then I was hiding away in the Lake District for a couple of weeks. And by the time I'd found an excellent wifi cafe up there, 1.4 had been withdrawn anyway.

So why bother now? Well, this point release is particularly important for those of us who do black and white in Lightroom, and it changes the recommended way to do so.

Just read this from the release notes (and hold your nose at the description of black and white as “grayscale”):

In previous grayscale conversions the Color Noise setting was disabled and this could result in an image with excessive noise when grayscale channel mixing is applied. Both the tool and effect have been enabled in Lightroom 1.4 and Camera Raw 4.4 providing the ability to reduce noise in grayscale conversions.

This Color Noise issue meant you'd soon see nasty noise artefacts in saturated image areas, in rich blue skies for example, and it forced serious black and white workers to avoid using the so-called Grayscale mode. Luckily there was a decent workaround - setting all the colour saturation sliders to zero, and using the HSL panel's Luminance sliders to control the b&w tonal distribution - but it always felt counter-intuitive. Notice from the screenshot how the Color slider is now available - for us black and white enthusiasts, the updated 1.41 can't come soon enough.

Geotagging within Lightroom

geotag-lightroom-plugin is Jeff Barnes's plugin that adds GPS data to photos from within Lightroom. Locations are read from the standard GPX file format and exif information is stored in the image files using Phil Harvey's exiftool. Just tried it, and it seems to work, though it is a work in progress. Interestingly, it adds menu items to the standard Lightroom interface - hm, didn't know you could already do that.

XMP madness

Of course, you’ve got to be sceptical of a PC-using Lightroom author’s opinions on Aperture, even if he also uses a Mac and pretends to know a little bit about using it to manage and process his pictures. After all, would you listen to his view on driving a BMW once you know he’s driven Audi for 15 years? Or when he tells you what’s wrong with Liverpool when his loyalties lie firmly at the other end of the East Lancs Road? Perhaps you would.

I particularly rate James Duncan Davidson’s posts because he’s an Apple-using switcher, moving from Aperture to Lightroom – the decisive issue being working speed, not brand loyalty. His Aperture 2 quick impressions picks up on many of the points I keep banging on about. He likes preview mode and the belated addition of background processing, but he also picks up on one of Aperture’s strangest failings:

The lack of support for XMP sidecar files on import is puzzling. You can export XMP sidecar files, but not import. This little issue is going to cause a bit of a problem for people wanting to import large collections of RAW files that already have metadata into Aperture. It should be easier to round trip this information. Of course, what I?d really like to see is Aperture be able to interoperate fully using XMP data with other applications like Bridge and Lightroom, picking up changes as they happen either in sidecars or embedded into files. Currently, this is just a dream.

He’s not the only one dreaming. But the thing is, it’s not sci fi or voodoo – Aperture 1 was actually designed long after it was obvious that XMP metadata was the way to go. Writing XMP sidecars, but not reading them, is simply mind-numbingly stupid. And frankly, it doesn’t sound very Apple-like to leave Aperture’s exit door wide open, but bolt the entrance and burn the welcome mat.

Progress chasing

Looking over the fence as one does, and no doubt breaking a couple of biblical commandments, one Aperture feature that I've always liked is Smart Albums. Partly for me it's a very simple principle - any database-driven application should let users save any queries and search criteria. Modern business systems also help control and drive the workflow, so that call centre guy in India escalates your issue to his supervisor, who logs on in California and sees a task on her action list, while her manager reviews exception reports and overall clear-up rates, and no doubt wishes he'd never heard of outsourcing and offshoring. Data already present in the system is leveraged (forgive me) to drive the process forward and exceed customer expectations.

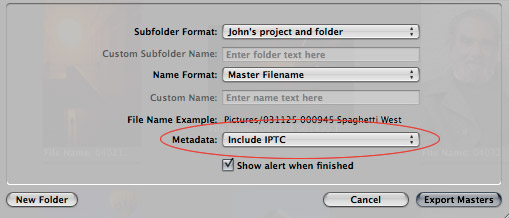
OK - and before I career off into a Scott Adams mission statement filled world - principle and analogy are all very well and good, but where does this help the photographer? Well, Aperture's smart albums are even better in v2.0 and you can now find pictures based on the adjustments you've applied, as well as on their IPTC metadata. How can this work in practice.

Let's imagine you're working your way through all those pictures from a trip, a wedding, or an event. To borrow a certain phrase, how many hundred images do you want to process today? You're a visual kind of guy? OK, then scan all those thumbnails or check them all full screen. You don't just do it once, do you? One pass is needed to check your copyright is there, another confirms the final white balance, another the overall brightness and contrast, and so on. How well are you doing? Exactly how efficient or certain is all this going to be? Still got the time or the enthusiasm, or would you prefer action lists, like those call centre guys in their suits and ties? Here you go then, a smart album shows you all the pictures without adjustments:

It's quality control as well as progress chasing, because smart albums let you target specific adjustments that might be important for the type of work you do. For example, part of a shoot might be in low light with high ISO settings, and you want to be certain that you set every image's noise reduction parameter. Here they are:

Get the idea? Pulling it all together, you can control a job by building the project as a series of to do's, where smart albums (the purple folders) first help you monitor your metadata entry - click on one to check you've not forgotten to add your copyright, or on another to check no pictures have gone missing. Then you move onto adjustments, and can quickly see which images are untouched, which haven't got edge sharpening etc. And then last of all might be some overall checks, a smart album to highlight any images that don't meet a minimum standard for adjustments - say noise reduction, edge sharpening, and a white balance setting. To top it off, because systems aren't everything, there's the blue “Checked and ready to go” folder.

I suppose I do have a lingering doubt - isn't this methodical, one step after another approach, one thing that Aperture lovers say they simply don't, can't follow? After all, they're artists. Is it too linear, too Lightroom? [A somewhat mischievous point thrown in as revenge for the umpteenth time they've played the irritating MacBookAir ad while I've been writing this in front of the telly]

With systems like Aperture and Lightroom, all the necessary information is there already. There's EXIF information to identify noisy high ISO images, or those on a lens which has chromatic aberration problems at a certain aperture. There's IPTC or other descriptive metadata might let you target just those pictures which you rate sufficiently to show the client. And there's the editing adjustment data, just begging to be exploited. That's the opportunity opened up by these changes to smart albums.
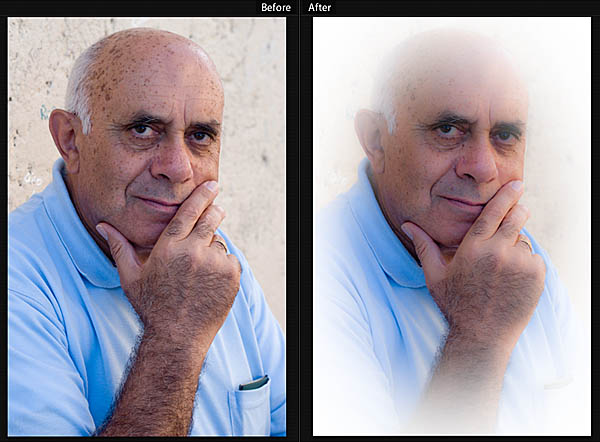
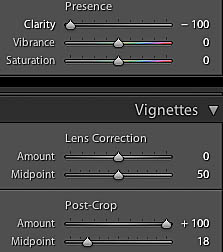
Dim not DAM

I knew this would happen. One day John Nack links to a misguided extract “Setting up an organizational system in Lightroom” from Rob Sheppard's fine book on Lightroom (apart from anything else, I'm glad to see it has Windows screenshots). A day or two later and it's popping up in an O'Reilly blog post to advocate the same silly advice - using your folder structure to categorize your images. Cue a predictable Beardsworth rant….

So what happens when a photo fits two categories? Do you put one copy in each folder? Or add more subfolders? Or say a country gains independence, as one has this weekend, or a location changes name, officially or because you got the place name wrong and those shots were actually taken over the state line? Go back and update your folder names, or just rely on memory that Bombay was Mumbai, or remember some Utah trip shots were taken over in Arizona? Or let's say you discover that some of those green necked parrots were actually of a particular species, while other shots showed a subspecies. A critical point for parrot lovers, no doubt. Add new subfolders and move the pictures? How many times and in how many locations did you photograph them? So how many subfolders does that mean updating? And what if you decide those shots were really landscapes rather than of birdies? I know I'm putting this forcefully, but these changes of how you see and find images do happen, and often.

Folders should be set up only to make the best use of storage space, to look after the physical security of your work, make sure you don't lose or duplicate anything, and to make it easy to restore after a crash or migrate (a nightmare when you have meaningful hierarchies). You have keywords and other metadata for finding images. Spend time adding those, not on too clever folder structures. Folder-based organization is dim not DAM.

Aperture and tethered shooting

I don’t do much tethered shooting and don’t have much feel for how common a requirement it is. But for some it obviously matters a lot, and it’s no surprise to see that Aperture 2.0 has introduced a tethered mode.

This morning I tried it out with a Nikon D200 (it’s worth noting you have to set its USB connection to peer to peer mode). After choosing a project, you then begin a tethered session by setting where the files should be written. You’re not forced to select its black hole (OK the managed folder) but can send them to a regular “referenced” folder, and can set filenaming options and add some descriptive metadata like your copyright. You then see this little palette, which you can move out of the way, and then fire the shutter with its Capture button. Once the new image arrives on your computer, it is immediately selected, on a second monitor if you like. It’s basic but works just fine.

Because of the way Aperture’s adjustment presets are granular (comparison with Lightroom here) you can’t add any initial global adjustments like white balance or highlight recovery during the tethered capture phase. So you’re then into the horror of Lift and Stamp, which is not a patch on Lightroom’s super Auto Sync mode, and even some way behind its more prosaic alternatives, Sync, and Cut and Paste.

But I do like the feature and am sure it will be popular. Since I have no other camera control software on my Mac, Aperture can serve as my tethered capture utility for Lightroom….

Update:
Transfer rate looks like 1.75 Mb per second. D200 15.75 Mb raw files appear in Aperture in just over 9 seconds, arriving a fraction earlier in Finder. This is under OSX 10.4.11, USB 2.0, on a MacBookPro with 2Gb Ram. Aperture 2.0 was in Quick Preview mode, which uses the embedded JPEG and so eliminates any raw rendering delay, and I was looking for the new shot to appear on my second monitor (a neighbour’s cat was the art director). To eliminate any camera buffer issues, I tested with single shots – though I later found that Aperture wouldn’t in fact let me make further captures during those 9 seconds. I don’t do a lot of tethered shooting, but I wonder if the transfer speed and lockout make this feature unworkable.

Aperture 2.0 speed

There's little doubt that Aperture has been harmed by being slower than Lightroom on equivalent Apple hardware - as well as by being worse than glacial on non-Apple computers. For myself, I never found version 1.56 was too bad on my MacBookPro with 2Gb RAM - slower though not impossibly so was my feeling. But I was very interested to see if 2.0 would be any quicker than the previous version, let alone a match for Lightroom

Overall, in my view 2.0's performance is definitely no worse than before, and Apple aren't strong-arming users into upgrading their hardware again (further evidence it's a 1.7?). And it is pretty clear that plenty of effort has indeed gone into making the program appear faster. So it quickly announces it has finished importing new pictures, even though to do anything useful with them you still have to wait while it quietly builds thumbnails and previews. Of course, speed that is apparent-only is no bad thing for the user, and helps the fanboys get away with blanket claims. But even when you define speed more a bit more tightly - as what really saves you time - I think one can point to Aperture 2.0 having taken some big steps forward.

One is Quick Preview mode (more here). You activate the mode by hitting the keyboard shortcut P (or via the button dumped down in the bottom right corner of the screen - yes, all those fiddly little buttons are still all over the place). Once in Preview mode, the program displays the JPEG preview that the camera added to the raw file, which means you can browse through pictures at lightning speed. You will not see any adjustments that you've made to the pictures, but that's irrelevant when you're under time pressure doing your initial review, working out what you've got and deciding on keepers and duds. I'd say Aperture 2.0's browsing speed is close to PhotoMechanic, the gold standard, and for some users that's going to be a big plus.

The other step forward is a bit of catch up with Lightroom. For this type of workflow application, the previous omission of background processing was little short of bizarre and meant you had to wait for big jobs to finish. Exports now happen in the background, so you can get on with other work while the program saves out TIFs or generates a web site. OK, things slow down a bit but you can't have it all - for some users, background processing of exports will greatly improve start to finish times.

So two days running, I say something nice about Aperture. Well, it is Valentine's Day.

PS For fair and balanced views of Aperture 2.0, see

Essential gear + Aperture 2

Ever have problems remembering your keyboard shortcuts? Some people just print them out and stick them to the monitor, while I go try use one new shortcut every day, but if you're an Aperture user, what you need is AUPN's long sleeve t shirt.

Update - Aperture 2 has just sneaked out. I suppose I am surprised that it looks so unexciting, as if they've copied a few of Lightroom's adjustments - Recovery, Vibrancy, Definition (ie Lightroom's lousily named Clarity which I always call Punch) - and then done a lot of tidying up to its remarkably fiddly interface.

The detail is here:

  • Proper DNG support so Aperture will now read files shot on a camera or camera back not natively supported by Mac OS X. If Adobe support it, Aperture will do so too. Given the recent fiasco over supporting new Canon and Nikon pro cameras, that's a very wise move indeed.
  • There is no mention of importing IPTC-XMP, which would make it a lot easier for new users to migrate their metadata inwards, but it's even easier for people to leave Aperture as it now embeds IPTC data in RAW files on export.
  • Background processing is now there, at least for exports like Lightroom, which should speed up end to end workflow.
  • There's an option to use the embedded JPEG from camera when possible - that will speed up early comparison and weeding out duds.
  • There's also a lot of good stuff like changing how Aperture searches within stacks - by default it now searches all items, not just the picks - and smart filters can now target adjustments - something I'd love to see in Lightroom.

But Aperture 2.0 looks like it's mainly about fine tuning and streamlining is clearly the buzzword. Streamlining's a very attractive word, but dangerous too, as if you're struggling for real excitement. And it's still limited to the Mac.

SlideShowPro for Lightroom, Dreamweaver menus, and a quick hack

I recently added some Flash-based galleries which are powered by the SlideShowPro for Lightroom engine, but I found that they had truncated my site's DHTML menus when the galleries were viewed in Firefox (my preferred browser on PC and Mac). These menus were “Spry” objects added in Dreamweaver CS3, though I suspect other similar menu systems would also be affected, but I already knew you had to take care with Flash and DHTML layers, so it only took a little Googling before I had a solution. This was to edit the swfobject.js script, which adds the SlideShowPro Flash object to the page. After the embed tag, add wmode=”transparent”. I am not 100% certain that this is the right solution - but seems to work.

So I spotted the same problem straight away when I read Michael Clark's post on SSP and followed a link to his web site. But something else came from our email exchange - Michael mentioned he was about to regenerate all his SSP galleries so they would start automatically.

The thing is, it's not always necessary to regenerate the SSP galleries if you only want to change some of the SlideShowPro movie's options. When you first generate an SlideShowPro for Lightroom gallery, it outputs a file called param.xml which contains many of the options that you set in Web's right panel. Hacking this file is a lot quicker than regenerating the galleries. In this case, I happened to know that automatic starting was a simple matter of changing displayMode=”Manual” to displayMode=”Auto”. You can generally guess the parameter options by looking at Web's right panel, but hopefully they'' soon by documented in the manual (as they are in the SSP for Flash manual). This just gives me another reason to like SSP.

Saving the (animal) farm?

I've said before that O'Reilly's Inside Aperture and Inside Lightroom blogs have been getting a bit tired lately. Folk evangelize about how their chosen program has revolutionized some aspect of their work, when either program - or indeed earlier DAM programs - would have done so. This is just one where you could just as well swap over the product names - “You need to present your photos. With a multimedia projector, and with your Mac and Aperture, you can create a quick showcase.” Hey, with a multimedia projector, and with your PC or Mac and Lightroom, you can create a quick showcase. It's all rather like “Thanks to the leadership of Comrade Napoleon, how excellent this water tastes!”

But one of the better writers there is James Duncan Davidson, on the Lightroom side but who had switched from Aperture, and his latest post The Economics of Online Backup looks at the costs and practicalities of online storage as they are right now:

As I see it, I need a much bigger pipe to the Internet to make these kinds of backups work well long term. Until Verizon FIOS shows up, or I score some really choice client gigs that really add to the bottom line and can put in my own dedicated T3, I'm a bit too bandwidth constrained to make it work out. This, however, is how things stacks up for me. After running the numbers yet again, I'm going to stick with my current program of rotating drives to a safe deposit box which has a nice cafe next door in which to get a cappuccino in. But, I'll keep running the numbers every so often and at some point, maybe the equation will change answers.

“In the cloud” storage cost remains too high, and the bandwidth and the time demands are even more prohibitive. But does anyone doubt the time will come?

50 ways to leave your lover

This post isn't really about Extensis Portfolio, iView or Lightroom - it's really another of my despairing rants - but today I was asked about getting metadata out of Portfolio and into something like iView or Lightroom.

The direct answer is that Portfolio lets you sync the metadata into jpeg and tif files, but for other file types your options are limited to using Portfolio's text file export. If your new program has a text import feature, then you can export all your data out of Portfolio and import it into the other program. Unfortunately, neither iView nor Lightroom has text file import - silly because migration inwards might make it easier to win new customers….

The other main route is via scripting, and this can be done in a number of ways:

  • A Portfolio script might generate xmp sidecars, which iView or Lightroom can read. This won't work if you want to move to the Mac-limited Aperture because, though some tout its DAM features as being better than the competition, it can't read xmp metadata in sidecars or if it's embedded in the image.
  • Script Portfolio and iView in tandem, so the script reads each Portfolio item and updates the corresponding item in iView. This method won't work with Lightroom because although it is marketed as “professional”, it doesn't support scripting. It might work with Aperture, but I don't know its scripting interface well enough to say.
  • Export Portfolio's text file and then read it in a script that updates iView - this might even be adopted to update the SQL database behind Lightroom. Essentially this last method was how I got from Portfolio to iView, importing the text file into Excel and using its scripting engine to update iView.

In short, nothing is as easy as it should be. Thinking back, I used to do a lot of data migration of big financial accounting systems and 5+ years ago almost all of them had better text file import facilities than DAM packages which, after all, are designed for left brained Mac fanboys who really need help with big words like metadata. It's as if DAM software vendors think your archive's worthless, or you wouldn't mind re-entering all those captions and keywords. Come to think of it, the DAM program with the best text import features is probably… Portfolio.

Lightroom Wiki

The Lightroom community help system has just gone public. Adobe's not the first software vendor to use Wiki technology to get customers to write the product manual that you used to expect the developer to provide. It makes a whole lot of sense too - users often know much more about the real world issues and can be more brutally honest than the manual writer (or Lightroom author). Just as supermarkets transferred to customers the work of being served, packing bags, even scanning bar codes at the checkout, software manuals are so 20th century.

Search trends

I never claim to be an early adopter, and only recently discovered the value of Google Alerts. Now Matthew Campagna shows me the use of Google Trends by charting searches for Adobe Lightroom and Apple Aperture:

One thing to consider, however, is that Aperture remains exclusive [JB: in the sense of “limited”] to Apple computers, while Lightroom enjoys searches from users of both Mac and Windows platforms. Clearly, Lightroom holds an advantage in this regard, but the disparity is nonetheless impressively in favor of Lightroom.

I'm unconvinced that one needs to be so kind to Apple - it's not as if the results are skewed by including all photographers - but it's also interesting to see how searches for both applications compare to those including Photoshop:

Lightroom, and the use of virtual copies for slideshow speaker’s notes

Someone asked an interesting question at Adobe's Lightroom forum - how can you make speaker's notes to accompany a slideshow? He wanted these notes to be hard copy printouts, with multiple images per page, and with notes beneath each picture. Having inflicted death by Powerpoint on many occasions, this is how I'd approach it in Lightroom.

Start in Library by putting the images for the slideshow into a new collection - this makes it easier to recall the set of pictures.

Then enter your speaker's notes in the Metadata panel. It may seem obvious to write the notes in the image's IPTC caption, but what if you don't want to overwrite any existing information in that field? You might use a more obscure field - the IPTC instructions for instance - but another idea is make virtual copies of each file and use these purely for the slideshow. This takes advantage of the virtual copy's ability to have completely different metadata from the master file, so now you can safely overwrite the caption field. Another benefit is that you may need to tweak your pictures' appearance to suit the projector or auditorium, and again virtual copies let you do so without affecting the masters.

Once you have entered your speaker's notes, then you need to print them in a way that helps you give the presentation. Go to Print and create a grid of images - start with a 2*1 grid. Eliminate as much unnecessary space as you can - margins, cell spacing etc - and then click the Add button in the left panel to save the print layout. Apart from anything else, this is simply a good habit.

To display your notes in this layout, go to Print's Overlays panel, tick Photo Info and choose Edit from the drop down menu. Add the caption or whatever other field you used, and update the Print template.

But if you want your presentation to be really slick, there's a little problem. While Lightroom now displays the caption below each slide, you can only set the maximum font size to 16. That's small, and no match for Powerpoint speaker's notes which are easy to read from a distance - without making it obvious to your audience.

Here's a handy trick to make the caption font more legible. Right click the template and choose Show in Explorer/Finder. Then edit the template file in Notepad/TextEdit and change the line “metadataFontSize = 16,” to “metadataFontSize = 32,” for example. Close and reopen Lightroom, and you have now forced Slideshow to use your choice of font size. You may not get the size right first time, and the larger the text the smaller the image, but these are speaker notes rather than handouts. Printed out, with the text nice and big, they're perfect for that quick glance during your show.

Here's my Slideshow speakers notes template.