My not quite famous enough 5 – #4

I'm not that keen on Lightroom 2's new Filter Panel, as I said here. When I do use it, it's usually because I want to temporarily filter the visible items down by key such as rating or sometimes by masters or virtual copies - ie by one of the old Lightroom 1.4 filters.

Display the Filter panel for this purpose and you lose a very prominent chunk of screen space, where your pictures belong. Then you'll eyeball which iTunes-style columns are already visible, perhaps wait while Lightroom starts chugging through populating and counting them up. Clear whatever filter is already present (not an issue for me as I never use the Panel) and then click “Attributes” to set your filter on rating, colour or whatever. Now that's a bit of a palaver, isn't it?

So the fourth little gem is that you can save these Filter Settings. I'm currently running with about a dozen of these, and always access them through the Filmstrip. Some will actually configure the Filter Panel as I might want, but mostly they're for those important things like ratings. If I want anything fancier, it's Smart Collections.

Lightroom web galleries from the ground up

One reason why I still use iView rather than switching completely to Lightroom is because I prefer its HTML web gallery templates. iView takes about a third of Lightroom's time to output a big contact sheet style web gallery of say 100-300 pictures because it uses my DNG files' embedded previews, while Lightroom seems to insist on re-rendering the raw files when you're previewing the gallery in Web, again each time you change an output setting, and then again when it actually starts generating them.

A second reason is because I can edit iView's HTML-based templates much more easily. Going back to Lightroom 1.0, the original XML and XSLT templates appealed to the geek in me, but I always felt they were misguided, a developer's solution which demanded a far higher level of skill than even the IT-minded photographer was likely to possess. While you can inch up the HTML learning curve, tweaking templates in small yet rewarding steps, XML and XSLT customization require much more experience. That aspect didn't worry me too much because I used to implement XML and XSLT solutions professionally, but iView works perfectly for my contact sheet galleries and my main site is powered by an online database and some iView scripts. So I never felt customizing the Lightroom XML and XSLT templates was worth the effort. I was rather surprised, impressed, that anyone else bothered.

That thunderous lack of interest cascaded over to the Lua-based templates or “engines” which arrived with Lightroom 1.3. And at the time I was much more enthusiastic about learning Flash and ActionScript. In fact I still am - once I actually launch the Flash site, I'll update it via SlideShowPro's excellent Lightroom-SSP Director export plug-in. That's one click to run the Lightroom export, one click to activate the new web gallery. Beat that, Lua.

Still, I'm really glad to see Sean McCormack is doing a bite-sized series on writing Lightroom web engines, starting with Anatomy of a Lightroom HTML Gallery:

Lightroom HTML galleries used to be written in a mix of XSLT and XML. The simpler coding in Lua makes it a pleasure to create HTML galleries with. You can write Flash galleries in Lua, but because IE doesn't allow plugin loading on PC Lightroom, you can't see them in the preview window. Hence 3rd party Flash galleries use the old method for cross platform compatibility.

Lua galleries were introduced in Version 1.3 and have matured somewhat with V2.0. The new syntax is much tidier and more compact. In fact Matthew Campagna shaved 500 lines off one of his galleries for version 2, and my new website in a gallery LRB Portfolio managed close to that also.

So what comprises a Lua Gallery? Well the absolute minimum a gallery can contain is 3 files: galleryInfo.lrweb, manifest.lrweb and a HTML file. Let's look at them in a little more detail….

And part 2 is over here. You never know, now I've cracked Flash and ActionScript, this might even encourage me to learn Lua at long last.

Other resources for Lightroom Web:

Plug-ins (Senator, you’re no Jack Kennedy)

It's easy to see real positives in Aperture's announcement of plug-in architecture. Taking advantage of existing third party tools can quickly flesh out its features, while positioning it at the centre of a viable “ecosystem”. Meanwhile third party developers can be working on fully-integrated solutions.

On the other hand, it's a long way short of the original concept of the one ring to rule them all, and might even be seen as defining limits on what's going to appear in the core product.

In any case, even if that fear's untrue, it seems pretty obvious that people don't really want to pay for a range of plug-ins for essential tasks like noise reduction or lens distortion - they will do so, but reluctantly, as a distress purchase. Then there's the hassle each time the host or the plug-in upgrades, or the palaver of tracking down licence numbers when you get a new computer (I'd love to know how many Mac users actually use the automated transfer processes). And when your chosen plug-in developer vanishes? Hopefully the plug-in works in the host's next version, and in cases like noise reduction, there'll always be a replacement, at a price. But will any of your settings transfer? Should you welcome plug-ins so uncritically, forgetting that you have grudgingly accepted you'll always be shelling out for them? Or should you demand the functionality in the box?

It's for reasons like this that I've never been particularly enamoured of plug-ins for Photoshop - only NoiseWare and PTLens have ever made it past an upgrade or change of computer - and I have the same doubts about them in Aperture and Lightroom. Still, it is the accepted wisdom that plug-ins played a seminal role in Photoshop's early history and so they have acquired a semi-mythical status. Questioning their virtue seems as heretical as doubting the Founding Fathers or Good Queen Bess, or Ivan the Terrible if you're Russian.

Just as these personalities can symbolize their nations, and embody certain values, so in the field of digital imaging the term plug-in has a history and a special meaning. It's certainly great PR to announce Aperture has plug-ins, but we're talking about a program whose raison d'etre is non-destructive editing and non-modality. So how can the current crop of external TIF editors in modal windows really be dignified with the term “plug-ins”? Fundamentally that's the question Lightroom product manger Tom Hogarty asks in Plug-in or External Editor? when he explains why we haven't seen image processing plug-ins for Lightroom is because of the:

incredibly powerful link between the raw and rendered workflow, and half measures (my emphasis) with marketing spin labeled as “plug-ins” are not the highest priority for the Lightroom team.

Not surprisingly, that touched a raw nerve, so over at AUPN Micah Walter has a crack at gerrymandering the term plug-in by including batch processing (by which criterion a command line program might qualify as a Lightroom plug-in, let alone Noise Ninja's new standalone) and tries to shift attention to what the plug-in specification allows. Derrick Story makes the same point:

Some of the advantages of the plug-in architecture include: access to metadata, batch processing, Raw processing, and control over Aperture objects.

Surely that's a bit like saying you're already a Latter Day Saint because one day your unborn grandchildren are going to become Mormons? If the host program's essence is as a non-destructive editor, a true plug-in operates within that concept. Until then, all you've got is an external editor strapped on in a modal window.

My not quite famous enough 5 – #3

The third feature in this little list is something which I won't swear is new, but which if it was there in version 1 is something I never noticed and can't get working now - autocomplete drop down lists.

Previously Lightroom remembered whatever you'd entered in the Metadata panel, and would then autocomplete your entry the next time you started off typing something similar in the same box. That could be both helpful and an irritant, especially when a few of the most recent entries began similarly. Still, I liked the feature.

What LR2 does is take the 12 most-recent entries and displays them in a list when you click the field's name. So here I clicked Title and LR shows me the most recent entries in that field, and it's the same for most other items in the panel. It's a real time saver, and makes me wonder if there's anything I can hack which will make LR remember many more of recent entries….

SlideShowPro Director and Lightroom – update

OK, I tried it out. After my little joke about Ahmedinejad and his centrifuges, I should say that this little toy didn't work 100% properly first time…. The Lightroom side of it worked perfectly, and the plug-in also created a new album (a grouping of pictures) on my server, but it didn't send the payload - no pictures were uploaded. OK, so I hadn't bothered updating Director 1.20 beforehand, but it should still have worked.

Once I'd updated Director to the latest 1.22, the process was as slick as can be. You select your images, begin an Export using the SSP export plug-in, and press Export. A few minutes later and it uploads your files to the server and takes you to Director's control panel in your default browser. You're ready to go. Very neat.

The one thing I don't like is not having control over the sizes of file that are uploaded. I would prefer to upload at the size at which I anticipate and set the sharpening option accordingly. Instead it uploads full size files, making the upload slower, taking up more disc space, and invalidating your sharpening choices.

UPDATE - It's easy to edit the plug-in and gain access to the file sizes and quality settings.
UPDATE 2 - Now you don't have to do so because a bug fix for the plug-in also restores your control over file sizes and quality settings.

SlideShowPro Director and Lightroom

While the existing SlideShowPro for Lightroom generates individual web galleries, when your site consists of multiple galleries you have to do some manual editing of xml files which (a) not everyone can do (b) is still manual work for those who can do it. It's much more efficient to power a site with an online database.

That's where SlideShowPro Director comes in - it's a database which supplies the data to SlideShowPro. Previously Director let you import Lightroom's SlideShowPro web galleries, which worked but was still a bit of an effort, but now SlideShowPro has released a Lightroom export plug-in for SlideShowPro Director. This is an export plugin that allows you to upload pictures directly from your Lightroom library to an existing or new album inside SlideShowPro Director. It works with both the self-install version of Director 1.2, as well as their hosted subscription accounts (more here).

Just like President Ahmedinejad unwrapping a shiny new delivery of centrifuges, I can't wait to try it on my still-hidden Flash-based site.

My Hot 5 – #1

I've never used the word “cool” in the American sense. I remember hearing it as a teenager, but then 1976 and punk reached Bolton and swept away all such hippy Americanisms along with all the rock dinosaurs (for some reason it's always Rush who spring to mind) we'd previously admired as the height of musical dexterity. I don't recall hearing the word again until my first business trip to Dayton Ohio in the mid 1990s and at the time I put it down to being in the backwoods with pickup trucks everywhere, the odd Confederate flag, and no doubt with Rush on the stereo. Much as “cool” is now commonplace again in British usage, it's still a word I don't think my age group could use, Still, it is on the borderline of acceptability, while firmly on the wrong side lie “hot” or “awesome” or “killer”….

Whether or not I find that sort of language foreign or juvenile, or both, it's not me, is it? Much as I might enthuse about Lightroom 2's most obvious new features, such as non-destructive dodging and burning and gradient tools, I could never call them “awesome”, superb though they are. So more like the Housemartins, whose hype was to call themselves the 4th best band in Hull, here is the first of my “not quite famous enough 5” - Keywords are metadata again!

I never liked how Lightroom 1 treated keywords as if they weren't metadata like any other descriptive metadata. After all, if you photograph the same subject more than once, there's a fair chance those pictures will share the same title, caption, locations, and many if not all of the same keywords. Bridge metadata templates let you apply all that information in one fell swoop, but in Lightroom 1 keywords were excluded from its Metadata Presets. And if you wanted to copy metadata from one image to another, Sync Metadata also failed to copy the keywords. You were back to cut and paste.

But next time you cut and paste keywords from one picture to another, take a quick look at Metadata Presets and Sync Metadata. They now include keywords too. Isn't that awesome? Hm - not quite me. Bravo!

5 new ways to while away the summer

A not altogether random selection of blogs:

  • John Paul Caponigro now has a blog and mentions he has written 3 new artist's statements this summer alone (each a classic of its type). Interestingly, he has also used Blurb for a new book of photos and had a good experience. Interesting as I've been also looking at it instead of Lulu. Shame I can't do it from Lightroom….
  • Lightroom engineer Eric Scouten has also written this week about using smart collections to manage workflow.
  • Photo Attorney is a US lawyer who works for photographers and covers issues both sides of the pond. After all, we're in the same mess….
  • War on Photography is about how (some) police and (most) security guards fight the good war against Osama bin Laden
  • Edward Vallance is an academic historian who writes on 17th century history or as he puts it “Radicalism, history and occasional pop culture references”

Smart collections for controlling your workflow

When you have a library of many thousands of pictures, querying or searching is clearly a very important feature. And you’ve got to be able to save those search criteria – after all, each time you narrow down your catalogue to find certain pictures, it’s a fair bet that you may want to find the same pictures again before too long. The more efficiently you find those pictures, the more time you’ll have for perfecting them. So two of the biggest and most welcome changes in Lightroom 2’s Library are the iTunes-style Filter panel (below), which replaces the old disc-thrashing Metadata Browser, and the introduction of Smart Collections.

Both the Filter panel and Smart Collections let you filter down the catalogue to find a selection of pictures, and each lets you save and recall the criteria you used to find them. What’s less clear is which you should use and when. The answer, well my answer, might be a bit controversial…. Use Filters when you don’t know what you’re doing, use Smart Collections when you do.

Having been lucky enough to have been using both for a few months, I’ve happily settled down to using Smart Collections almost all the time, and visit the Filter panel only for quick filtering by star rating, flag, coloured label, or master/virtual (though more often than not, I’ll apply these quick filters through the Filmstrip). I do use the Filter panel’s Text section, but just once in a blue moon, and use its iTunes Metadata section so rarely I really wouldn’t miss it.

  • While the Filter panel menu does let you save a preset including your criteria, after you’ve added a few presets you soon have a long and unhelpful list. On the other hand, you can work easily with a large number of Smart Collections, group them in multi-level families, and mix them with Dumb Collections too. A filter doesn’t remember any output settings, while a Collection stores the last Print, Slideshow or Web settings applied to it. Smart Collections let you organize and add structure to your catalogue.
  • The Filter panel’s iTunes-style columns hang around when they’re no longer wanted. I’m always going back to folders and wondering why some pictures seem to be missing – and then realize it’s because the folder has remembered some filter applied last time I visited it (which might be months ago). Clearing filters each time you change folder is about as practical as locking interior house doors every time you change room. It’s a lot easier not to use them.
  • I find Filter panel’s iTunes-style columns of more interest when you’re exploring a catalogue, hacking your way into unknown territory and discovering the way it’s laid out. You don’t have a clear aim in mind, and your search criteria are changing as you discover how you previously tagged your pictures (like slicing and dicing with Excel pivot tables or Cognos). But the thing is, I don’t normally need to explore my catalogue – I know, pretty well, what I want to find.

So while the Filter panel is fine for temporary filtering, chopping and change what rating or flag values are visible, Smart Collections are much better for ongoing needs to manage a catalogue and it makes sense to invest time learning their nuances and then applying them as ingeniously as possible.

The Workflow Smart Collection

As an example, here’s how I now manage new work. My objective is to see at a glance what’s been done and what I’ve got to do next. For instance, I want to be confident every picture has my copyright and know that I’ve added descriptive metadata like keywords. Likewise I want to be sure I’ve adjusted all the pictures without eyeballing the badges on a few hundred thumbnails, and I want the catalogue to help point out pictures which need special attention. In other words, I want to introduce some quality control.

  • The key is a single Dumb Collection, called “0.00 Current work” into which I drag the pictures I want to process (the 0.00 is there to assist sorting).
  • I then have a series of Smart Collections which mostly check for images containing “Current work” in the Collection name, and then target specific criteria. So 1.30 No Captions checks that those pictures in “Current work” have something in the caption field – here it’s zero so I’m happy. On the other hand, 1.40 No Copyright shows me that for some reason I’ve overlooked two pictures in “Current work”. I can see straight away if there’s any missing metadata in my shoot.
  • You can, to a certain extent, apply the same technique to Develop adjustments too. The caveat’s because, unlike Aperture 2, unfortunately Lightroom 2 doesn’t let you target individual adjustments so a Smart Collection can’t identify for you any ISO1000+ images where the Luminance and Color Noise settings are less than certain values. But what you can do is what I’ve done – identify high ISO images and remind yourself that you might want to treat those pictures as a group. Anyway I’m sure we’ll catch up, probably before most Aperture users realize they have the feature.

That’s how it works. In practice, it’s very simple – after a weekend away, I clear out any existing items from this Collection and drag in the newest pictures. The Smart Collections recalculate automatically and I always can see what’s done and what needs attention.

If “Current work” has existing items which still need work, I can move them to another Dumb Collection “Last week’s work” so that my Smart Collections don’t pick them up.

If you want to try this out, you can build up such a Smart Collection structure yourself. Alternatively, save yourself a load of time by saving it from here or from my Lightroom downloads section. This zip file contains a small “Workflow” catalogue which you can import into your own working catalogue. Use File > Import as Catalog, point to my Workflow.lrcat file, and import the single JPEG file (which you can delete afterwards). This should import the Smart Collections in their groupings. They obviously took me a bit of time to get right, so you can always say “thanks” or “grazie” or “yeah buddy that’s f***ing cool” via my Amazon wish list.

Choice cuts

A few other Lightroom links… Product manager Tom Hogarty writes about what’s really a plug-in and how so-called plug-ins (Aperture’s and others) are really external editors. Tom and marketing manager Frederick Johnson are interviewed about LR2 in this new O’Reilly podcast, and Adobe Camera Raw engineer Eric Chan writes about the Adobe profiles. The whole lot’s worth reading:

We have a new set of camera profiles called the Adobe Standard profiles. Our goal in designing these profiles is to give photographers a better default color: that is, a better starting point for making image adjustments. With the new profiles, the main improvement is in the warm colors: reds, oranges, and yellows. Deep saturated reds should indeed appear red, without messing up skin tones. Saturation is better maintained in warm highlights, and warm colors are easier to distinguish. There are also improvements in other colors, but the changes in warm colors are the most noticeable.

I’ve never felt strongly about Adobe Camera Raw colour, though generally prefer it to the look from Nikon Capture or other converters. But as shown here in Lightroom 2’s calibration panel, these new roll-your-own profiles should keep the pixel peepers and colour charters happy.

Stripping while exporting from Lightroom

Jeffrey Friedl has released a set of Lightroom 2 export plug-ins including one feature which really caught my eye - his “Metadata Wrangler” which:

allows you to strip selected metadata components from images as they are exported. You can use it, for example, to remove the embedded thumbnail and any Lightroom “develop” metadata, while retaining other metadata, such as the exposure settings, lens information, copyright, etc.

While this filter can be used with Jeffrey's plug-ins, you can download and install it on its own and use it as part of Lightroom's standard export dialog. And apart from what it does, it's also interesting for how it does it - using the Exiftool tool to post process the exports. Nice work.

Five for Three

Somewhere in one of the “Lightroom 2 Is Out” articles I saw a list of 5 features someone would most like to see in Lightroom 3, and so got thinking about the next 5 steps I would want. In my view, Develop now needs incremental progress rather than a bunch of new features as big as the local adjustment brush and the graduated filter. Its main needs are now for deepening the program’s ability to manage your pictures, and for richer output possibilities. So on that basis, this is what I’d like in 3.0:

  1. Books – for now, just match Aperture for “good enough” functionality
  2. Manage in Library any file type including CMYK, sound, Word etc, allowing assignment of keywords and other metadata, exporting copies and file movements, but no processing
  3. Let Smart Collections target all the metadata in the catalogue including individual Develop values
  4. Backup data validation – hard disks often show signs of going bad, DNGs have hashes, backups need reconnecting with catalogues based on GUIDs and not on mere filenames, let along someone writing SQL
  5. Make soft proofing something people don’t need to worry about. Maybe I’m a dreamer but I’m not actually proposing Soft Proofing. I’m pretty convinced that fewer photographers use it in Photoshop than some like to think. What’s more, it obscures that most LR users don’t actually want Soft Proofing as such – they just their prints to come out as they look on screen. Hiding complexity is supposed to be the Lightroom design, and Soft Proofing if it ever comes has got to be no more scary, and as routinely used, as “Print Preview”.

AutoSync, Gradient Presets, and wet haddock

Yes, I do throw up my hands in despair every time I read some Lightroom user saying he has hundreds of Develop Presets. It’s the same personality type who will trumpet the hundreds of Velvia-effect Photoshop actions he’s collected, who’ll leap for his wallet every time another newly-released plug-in promises black and white conversion just like Ansel Adams, and who worst of all has an unshakeable belief in the accuracy of his digital HP5+ effect despite never having touched the real stuff or seen the warm orange light of a darkroom. These religiously-gullible folk need a firm slap around the jaws with the proverbial wet haddock.

That’s not to say I don’t use any Lightroom Develop Presets (currently 20), Photoshop plug-ins (just NoiseWare), or that I have never touted my own Photoshop actions to mimic albumen or palladium prints (after spending days in the V&A print room, I should add). But you’ve got to use these things sparingly. That’s partly a creative thing, but it’s also because the actual range of HP5+ prints or palladium print tones varies much more widely than the gullible victim of Presetitis will ever see – for all his unconvincing talk of using Presets or actions as a starting point.

Now, that said, you might now expect my fire’s going to turn towards Sean McCormack’s graduated filter Presets for Lightroom 2 – after all, I might ask if we’re talking B+W neutral grads, Lee, or some other filter maker. But while I might question the need for as many as 70 variations, Sean and I seem to have been working on similar lines. After all, a tobacco filter for example can contain a range of slightly-fiddly settings, and Presets let you store and visualize a range of subtly-different results.

But the other big reason for changing my tune – at least in this case – is because of AutoSync, which as you know is the most efficient way to work in Lightroom. Although the Gradient filter is very elegantly implemented, sadly Adobe haven’t let the time-poor snapper use AutoSync to apply the Gradient to multiple images at once. So instead of Shift dragging the same Gradient onto a series of frames needing the same grad effect , such as the elements of a panorama, instead you’re forced to do the Copy and Paste Two Step (the same inefficient process you have to follow in Aperture).

All is not lost however – you can apply a Gradient Preset to multiple images at once (and as an aside, the Gradient’s Reset button works in AutoSync mode too).

My little group of Gradient Presets are similar in concept to Sean’s, though I hadn?t thought of charging for them. That’s an interesting toe in the water and I?m sure he?ll tell me quietly if it makes him rich. I?m not sure if he did the same with his Presets, but I’ve biased mine to a rule of thirds approach to composition.

So, work in AutoSync mode, use it with Gradient Presets, and remember to use them only as a starting point ? my haddock?s within easy reach!

On target

Lightroom 2's out, and there are comprehensive lists of its new features at Lightroom Team Journal, by Victoria Bampton, and Ian Lyons. Here, like I did after Lightroom 1, I'm going to stay away from the detail of how features work and focus on the whys and what fors, and on best practice.

I'm going to start by drawing attention to a small feature which could easily be overlooked but which I find unbelievably useful - the Target collection. When you're racing through lots of pictures, it's pretty common to want to mark up certain images so it's easy to return to them later - for example, I've recently been shortlisting pictures for a number of new web galleries. Previously you'd hit B which added pictures to the Quick Collection, and then you might save the Quick Collection as a regular, Dumb Collection.

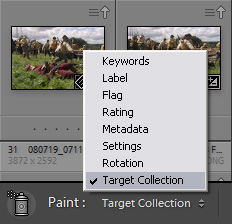
The change in LR2 is that you can right click any Dumb Collection and set it as the Target Collection, which means that hitting B will now send the current picture(s) directly to it, not to the Quick Collection. This keyboard shortcut is most useful when you're reviewing images full screen, but when you're running through a big grid of thumbnails it's faster to use the Painter - Target Collection has been added to the list of metadata it can paint. So it's B when you're reviewing images full screen, and the Painter in grid view.

As an aside, this use of the Painter is one way in which Adobe can make a somewhat-maligned tool really punch its weight. Another would be to let you copy and paste adjustments from one image to another, just like the Format Painter in Microsoft Office. While to some extent you can do this already - it's Settings in this screenshot - this is limited to Develop presets. If you've got the brains to use the Painter, you've got the brains to have pushed your adjustments beyond Develop presets….

Also, for those who want to catalogue CMYK images in Lightroom, see Ian Lyons' Trojan Horse workaround. It's the first Lightroom article I've seen with allusions to Hellenic mythology, but his choice of pictures makes me think it can't be long before we see allusions to the Icelandic sagas too….

New stuff

Just refreshed the site with a few new pictures - the new gallery is again all new stuff, as it should be, while the wedding gallery includes newer work as well as some old favourites.

Both galleries are Flash-based and use the excellent SlideShowPro. I'm using the SSP for Lightroom web engine purely to generate the content, the jpegs and the xml file with all the filenames and captions. But they're displayed via my own Flash movie which is based on an SSP for Flash component. This approach means I can quickly create new galleries to add to existing pages, while the power of ActionScript lets me show extra information like the gallery's name and description. As my long-threatened Flash-based site uses the same SSP galleries, the transition - if it ever happens - should be painless….

A true story

I was going to reply to Sean's comments on filenaming conventions in this Lightroom forum thread:

Nothing wrong with using yymmdd-camera sequence, lots of people do.

I generally just use Custom Name_YYMMDD_3 dig Seq (or 4 for larger shoots)

It's not a pedantic point either - I'll assume his “generally” using a filenaming convention was a slip of the tongue - but I'm more interested in the two conventions he contrasts.

Either method satisfies the basic principle of no two pictures sharing the same file name, and I happen to follow something similar to the first - YYMMDD_A081234.nef where the “1234” came from the camera-generated “DCS_1234.nef”. The additional letter is “A” or “B” and allows for the chance of two camera bodies shooting a DCS_1234.nef on the same day. Yet I often wish I'd gone Sean's way from the start as it results in a shorter unique file ID and gives you the possibility to check you've not accidentally deleted any items - in accountancy (eek) we used to call this a “sequential continuity” control. However, Lightroom users who renumber the files in this way have a problem if their hard drive crashes. Here's a true story….

A couple of weeks back, a friend/client had a hard drive crash. He shoots 6-900 pictures a day, 4-5 days a week, and had just lost 2-3 weeks' worth of client pictures. But his Lightroom catalogue was safely backed up, and he restored the originals Lightroom had backed up as part of its import process. Sounds wonderful? Well, not quite.

The problem was that after editing down each shoot to around 300 pictures, he renames them YYMMDD-0001.cr2 through YYMMDD-0300.cr2. His newly-restored Lightroom catalogue was looking for those file names, but his restored originals still had the original camera-generated names like KLKJ1244.cr2.

Now in my case, my filenaming convention is repeatable and I could have renamed the restored originals - DCS_1234.nef would again become YYMMDD_A081234.nef. LR would then have had no trouble remarrying its thumbnails to the renamed backup files, and the whole job would have taken a few minutes (I'd have done it in Bridge or in a new, temporary Lightroom catalogue).

But in his case, he had deleted hundreds of rejects before he had renamed the keepers. To reconnect Lightroom's thumbnails to the originals, he would have needed to examine each thumbnail in turn, allow for tiny variations between frames (he uses two Canon 1D Mk III tripod mounted-bodies), and then rename the original file so it matched the new 001-300 name in Lightroom. For one or two images that might be acceptable - but for thousands?

This is clearly a downfall of Lightroom's backup upon import feature - as a minimum it needs a corresponding feature that switches its thumbnails back to the original file names. As it stands, with this unrepeatable filenaming convention you need to back up the images again immediately after renaming them. In my friend's case, he happened to know someone who knew the original filename was stored in Lightroom's catalogue and who could also write the SQL to restore it and overwrite the current filenames….

Result

Had a surprising couple of days. Imagine you go along to a trade show, and just wander up to see if you knew anyone on the Adobe stand - a gentle bit of networking, nothing more. You ask why they're showing Lightroom 1 rather than 2's public beta, but apparently they weren't even showing version 1 - the speaker hadn't shown up and no-one on the stand knew the software. Then the Adobe guy starts to say if you do want to learn Lightroom…. Well, you respond, actually I…. Ooh - and 5 minutes later you're miked up and doing an impromptu presentation and Q&A.

Well, that's what happened on Thursday at the Digital Photo and Imaging Show at the Design Centre, Islington. I was there as a regular visitor and was then meeting a friend for a pint. I'd enjoyed a Hasselblad presentation and was fascinated by the H3D MultiShot which moves the sensor after each exposure. My initial thought was of those 19th century cameras which moved the lens or film back so that 4 pictures could be exposed onto a single sheet negative, but obviously that wasn't the concept. Moving the sensor 1 pixel at a time, right, down, left, then back up, an image is built up of 4 exposures - with each pixel recording red, green and blue values, rather than the standard RGGB mosaic. Its main application is in archival work, such as in the Vatican library, but I also wondered how far it is away from the mainstream where many current digital SLRs have mechanisms to shake the sensor for dust cleaning. Anyway, that was just a thought. I then stayed in my front row seat for Colin Prior's talk, and I can't remember what was next but that was when I thought I'd do my innocent bit of networking.

Unknown to me, the seminar area had been full for the earlier LR slot and there had been a “mini riot” or “mass exodus” when Adobe announced a PS Elements demo instead. I'll confess my presentation skills are rusty and date from my financial IT days, but I do “know my stuff”, and no sooner had I disentangled myself from the cabling than the conference organizers were asking what I was doing on Friday. So yesterday, after three Lightroom presentations and Q&A's, each an hour long and unscripted apart from 20 bullet points scribbled on a notepad, I deserved a pint or two - and it was fun too.

What’s the buzz?

For years they've been saying web-based office applications like word processing and spreadsheets are not far from becoming mainstream. Since they own Flash, Adobe look in a pretty good position to make this reality and the bundling together in Acrobat.com looks like an interesting effort. You've got Buzzword, a Web-based word processor, ConnectNow conferencing for up to three people, a PDF creator, and file sharing with 5GB of storage. Read more here:

What is clear is that Adobe hasn't been sitting idly by watching as services move to the cloud. This launch of a hosted suites of services, not to mention this huge shift with Acrobat 9, now a web-powered tool, shows the company's focus on combining the best of web office tools with their current set of products.

Even with all these new, integrated products and services, you still get the sense that these are all tools meant to enhance the Acrobat experience as opposed to an attempt to compete with traditional business software like Microsoft Office. If anything, their word processor seems like more of a way to begin the task of PDF creation - especially with the service's handy “convert to PDF feature” - than it is an attempt to be a Microsoft Word competitor.

All styled in a very Lightroom-like black. And with such a cute time-out screen.

Print Lightroom ratings as stars

It's always been an irritant that while Lightroom makes it easy to print contact sheets, it can only print the rating as a numeral, not as stars.

My own use of the DNG format means I go over to iView and can print adjusted thumbnails with starred ratings, but that's no use if you keep your pictures in raw format or don't have iView, and last week a pro friend asked me once too often to explain the workaround I'd devised for him a while back. It wasn't exactly complicated - generate jpeg files from Lightroom, get them in iView, and print the contact sheet from there. But when you're shooting 6-900 a day, 4-5 days a week, and processing them all yourself, you can only remember so many tricks and other things inevitably slip. There had to be an easier way.

During our conversation I came up with a Bridge-Lightroom solution which allows Lightroom (1 or 2) to print ratings as stars. I call it “pseudo ratings” because it converts the rating to asterisks and puts them into another field which you don't use (I chose the IPTC subject code) but which Lightroom can print. The main work is done by a Bridge script, but the zip file also contains my Lightroom print template (it inserts a line return under the filename).

It is still a workaround but is a lot more efficient - and even if I can't get Adobe to update LR2's Print so the workaround's unnecessary, I have something even better bubbling for LR2…. The solution is in a “zip file here” and includes a readme file which I'll copy below:

SETUP

1. Put file “Contact sheet with pseudo ratings.lrtemplate” into:
XP C:Documents and SettingsUSERNAMEApplication DataAdobeLightroomPrint TemplatesUser Templates
Mac: USERNAMElibraryapplication support….

2. Put file “Pseudo ratings.lrtemplate” into:
XP: C:Documents and SettingsUSERNAMEApplication DataAdobeLightroomText Templates
Mac: USERNAMElibraryapplication support….

3. Put file “Pseudo ratings.jsx” into:

C:Documents and SettingsUSERNAMEApplication DataAdobeBridge CS3Startup Scripts
Mac: USERNAMElibraryapplication support….

Create folder if it doesn't exist.

RUNNING IT

1. Start Lightroom, select the folder of images you want to print

2. Select them all, hit Ctrl S, and wait till complete

3. Open Bridge CS3 - you may have to accept a dialog about “Pseudo ratings.jsx”

4. Go to the folder and select all the files - you'll see their ratings appear

5. Wait till the cache has built - the bottom left line of the Bridge window

6. Use the Bridge menu: Tools > Pseudo Ratings > Copy ratings as asterisks into IPTC subject code

7. Wait for “Done” message

8. Wait till the cache has rebuilt - the bottom left line of the Bridge window

9. Back to Lightroom. Make sure they're still selected and choose Metadata > Read Metadata from Files

10. Wait till all done

11. Over to Print. From Template Browser, choose “Contact sheet with pseudo ratings”

12. In Overlays, Photo Info should be ticked

Aperture versus Lightroom

Ian Wood ( here too) has written an interesting and lengthy Aperture versus Lightroom 2 beta comparison.

He admits “Obviously I'm pretty biased towards Aperture (contributing to an Aperture blog, writing Aperture-related software, top-rated poster on the Apple discussion forum, posting on pretty well every Aperture-related forum on the net etc.), but I like to think I can put together a reasonably balanced list of pros and cons. The comments on those pros and cons, on the other hand, will be strictly personal… ;-)”

Fair enough - both in terms of sufficient knowledge and admitting up front to being an Aperture enthusiast. It's therefore hardly surprising that the choice of language supposedly describes the opposition's strengths yet carries a barb (it all reminds me of hearing Bill O'Reilly on Fox commend Kerry not for being more eloquent than Bush but as “more glib”). So I don't think I would have spun Lightroom's clear advantage in non-destructive local adjustments quite as “assuming you're happy using beta software and a warning that rendering of your images will probably change when the final version comes out.” Probably? Maybe. Significantly? Well, in a few cases and for even fewer people. And once we're comparing released products? Then the caveat will be completely irrelevant and Lightroom's local adjustment advantage will be even clearer.

Let's look at another Lightroom advantage: “Cross-platform. This may be vital to you, it may have no effect whatsoever.” There you go again. Let's rephrase this - one might say you're not forced to buy a Mac to use Lightroom, or you could say it as Aperture won't work on non-Mac computers. Cross-platform running doesn't sound so minor any more, does it? While anyone with any sense doesn't routinely move current work between platforms (I do so all the time), Ian's also looking “years down the line”, and it really should be a big concern that the program you use to manage your archive is limited to one platform. Now, with a bit of thought you can reassure yourself that Aperture does allow you an appropriate exit strategy, but failure to run on both the major operating systems is not something that should be dismissed so lightly.

Again, is it really an advantage that Aperture has editing plug-ins? Of course, no-one's against plug-ins and the name harks back to a warm misty time before most of us used Photoshop and when, according to accepted wisdom, plug-ins helped Photoshop rise to its lofty position. Perhaps they did, but we're not in such a virgin wasteland any longer. Would you really pay $250 for Nik's Viveza for local adjustments, when Lightroom has it in the box? Isn't the existence of plug-ins bound to stunt development of similar features within Aperture? Short term gain, long term $pain?

“Bigger marketshare” is a Lightroom advantage, “but nobody seems to know by how much.” Well, the last figures I saw indicated that, even when we gerrymander and only let shiny white Mac users in the voting booth, 2:1 were opting for Lightroom, while forum posts on pro-oriented sites show a much higher ratio. Share is, to some extent, irrelevant anyway - all you need is a sufficiently large support/learning ecosystem - but it's weak minded to dismiss it on the basis of ignorance of the balance. You're already finding many more learning resources for Lightroom and once Adobe addresses the wider market place you're going to find an awful lot more third party solutions for a cross platform application that has a bigger share of the whole market.

I do agree with some of the points. For example, custom fields should have been in Lightroom from day 1 and still aren't in the LR2 beta, LR2's smart collections remain more limited than Aperture, needlessly so, and Aperture has more flexible print layout and book output. I would also like Lightroom to allow scripting, though I disagree about its importance in a class of software whose raison d'etre is to process images in volume and eliminate much of the need for scripting and other ways of automating. Some other pros and cons are more or less irrelevant - eg what's the value of a full screen mode when you're covering it up with a tools palette? - or so down to personal taste that they have no value. And of course, the old modal canard is there and as off beam as usual - I do actually prefer Aperture's pre 2007 Microsoft Office style interface, but rename Lightroom's modules something like task-dedicated workspaces and you're putting a wholly different spin on the design, aren't you?

But more seriously, so much so that the comparison is unbalanced, is that Ian has made a big mistake in leaving out at least one Lightroom feature - Auto Sync mode. Some like me work in this mode almost all the time because you can select any number of images and then make an adjustment that applies to all selected pictures at once. In Aperture - and correct me if I am wrong - an adjustment only applies to the current image and you're then forced you to do a lift and stamp to apply that change to the others. You can work much faster with Lightroom's Auto Sync than you ever can with Aperture's lift and stamp two step.

Another big omission is adjustment presets. Ian rightly points out that you can apply these upon import in Lightroom, but the much more powerful application is that each Lightroom preset can contain adjust multiple parameters, while Aperture presets are still limited to just a single parameter. Again, you can get your work done much faster in Lightroom.

Ian also downplays another big disadvantage of Aperture. “Organisation within Aperture is mostly 'virtual' - it's not reflected in the Finder. Whether this is a con and never a pro I?ll leave you to decide for yourself.” Now that's what I call a cop out. Of course, you can import your files into Aperture so that your projects mimic your folder structure, but after the point of import there's no guarantee that the catalogue and your drive structure remain in sync - this basic control goes up in smoke the moment you move a folder in Finder or move a project in Aperture. This leaves you wholly dependent on Apple's backup and on staying with Aperture. By comparison, Lightroom shows both the physical folders and virtual hierarchical structures (which are multipurpose too). While displaying the folders does lead some Lightroom users down the dead end of trying to use their folder structure to describe their pictures (eg wildlife/animals/big cats/), it also allows you to apply proper long term DAM principles of using your folder structure for a robust backup that's agnostic of platform and cataloguing software.

Of course, people like Ian or me can spin every feature each way we want, but we do agree on one thing - “The best advice, I find, is to download both the trial versions and set aside a solid block of time to test them heavily, making sure to watch as many tutorial videos as possible.” That is the only way to decide.