Lightroom 5 favourite no 1: the Visualize Spots mask
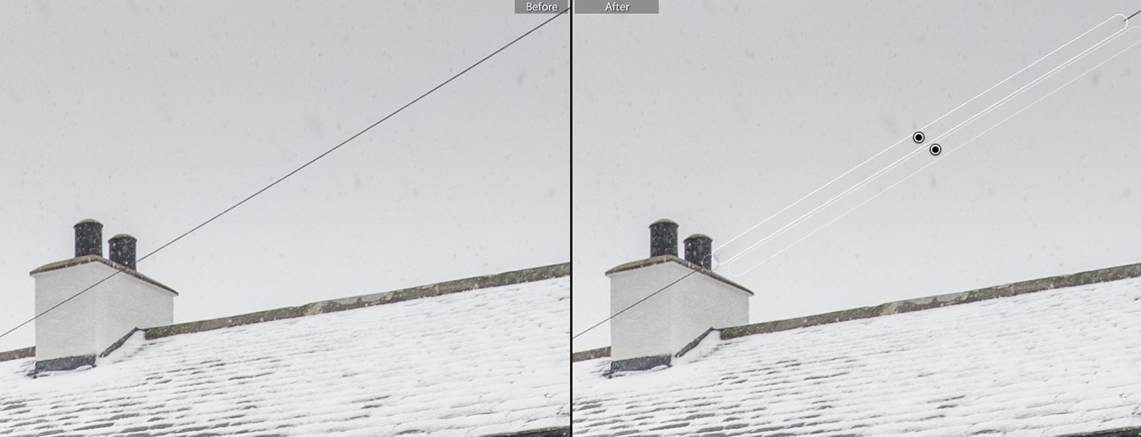
The most obvious and welcome improvement to dust spotting is that you can now drag the brush over an irregularly-shaped area, so you can wave a fond goodbye to the days of removing telephone cables by pretending they were a series of dust spots. In fact, when you are correcting a straight line you can click one end, then Shift and click the other extreme, making Lightroom draw a correction “spot” along that axis. In an example like this, I might still make a series of corrections in more detailed areas, or even switch to Photoshop, but this can be a big time saver.

A changed shortcut
Incidentally, a tiny change is to the shortcut for correcting a dust spot while simultaneously setting the spotting tool’s default size. Previously you would hold down PC:Ctrl Mac:Cmd and drag, but LR5 changes this shortcut to PC:Alt+Ctrl Mac:Opt+Cmd. It’s a trivial change, not ordinarily worth mentioning, but it will trip you up if you already used that feature or be a pleasant surprise if the tip is new to you.
The wonderful Visualize Spots mask
A much more significant improvement to dust spotting is rapidly becoming a favourite, especially when dealing with landscape photos shot with smaller apertures – Visualize Spots.
Ever since we’ve been able to correct sensor dust spots in a raw converter (something that seemed revolutionary in its day) I’ve always found that the biggest problem has been finding the spots. Some are obvious, of course, but sometimes you only notice the more subtle spots when you are reviewing a print, or in the worst cases when someone else is looking at it. So my old method to avoid this costly or embarrassing moments was to begin dust spotting by applying 4 doses of +100 Clarity in the graduated filter (via a home-brewed preset) which really made the less-obvious spots stand out. Afterwards I’d reset the graduated filter. That workaround is now a thing of the past.
Lightroom 5 adds a little Visualize Spots check box and a slider:

You tick the box, and as I have found no good reason for setting the slider at anything below 100%, I just whack the slider up to 100%.
The photo is shown as a mask with dust spots identified as little white bagel-shaped circles. Even subtle ones suddenly become nice and obvious. Here, for example, you can see 3 or 4 spots that I’d initially overlooked.
For me the only thing that would make this feature completely-perfect is if it followed the visibility setting from Tools > Overlay. I leave this set to Auto, which means I can quickly move the cursor outside the frame and evaluate the final results without the distraction of the spotting tool’s circles.
Sadly this Auto option doesn’t affect the Visualize mask. Instead there’s a keyboard shortcut – A.
- Pressing A will disable Visualize Spots exactly like unticking the checkbox
- Hold A down so that the mask is temporarily hidden and reappears as soon as you release the key
While this shortcut is “good enough”, at least for a right handed person whose left hand is free to lurk over the Q and A keys, I wonder what a left handed person would make of it. And it is pretty silly to be forced to use both the mouse and the keyboard when a simple flick of the cursor would do the job. Maybe next time?
That’s a minor quibble though, and this Visualize Spots box is certainly an excellent addition. You do a better job cleaning up those dust spots, and do it faster too. What’s not to like? Apart from discovering that your camera’s sensor isn’t as clean as you hoped….