Outside
Lightroom v1.0 is finally announced. At $200 or under ?150 I feel the price is about right and am also pleased the licence isn't limited to one brand of computer (Tom Hogarty here).
Already people are posting v1 tutorials - see the wonderful Adjustment Painter - and I thought of doing one or two, but my book's out in a couple of months and I really don't feel like going over what already seems old ground, not here anyway. I have though been lucky enough to been working with beta 5 daily, so I thought that over the next few days I'd try to be a little more reflective while highlighting one or two features I really like.
Tutorials always risk focusing on detailed tactics rather than overall strategy, and that's particularly true of a program like Lightroom. Sure you need to know the tools, but when you're working with large numbers of pictures, you've got to lose the fine art one-off mentality that's appropriate for Photoshop. In Lightroom the best analogy is with humble spreadsheets and you've a grid of hundreds of records (pictures in OldSpeak) to manage and process - it's efficiency that matters. So unless you've time on your hands, try never to work on one image at a time.
This means using Library's Quick Develop as much as possible. That may be a surprise, especially if you fall into the trap of thinking QD is only “quick and dirty“. QD has two key uses - during evaluation to adjust pictures so they can be fairly compared, and then for processing many pictures so they are very close to their finished state. There will be times when you need a premature foray into Develop - for instance yesterday I accidentally underexposed a sequence by three stops and needed to see noise reduction's effect before I could decide whether to keep the pictures. But in general, develop your pictures in Quick Develop, until you can do no more or need a specific feature that is only available in Develop.
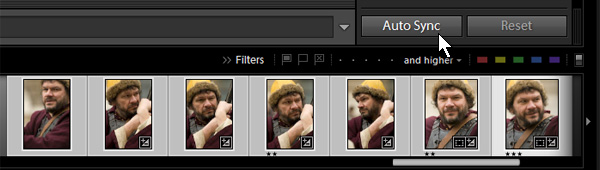
Keeping this focus on volume, my favourite Beta 5 feature is in Develop - Auto Sync mode. In Develop, the default process is to adjust one picture and then use the Sync button to copy the adjustments to the rest. That's not terribly efficient. So hold down the Ctrl/Cmd button and click the Sync button - it changes to read Auto Sync and Lightroom stays in this mode until you change it back (why???). What it means is that any Develop adjustments apply to all the images you've selected. Sure, every now and then I forget which items I have selected and apply adjustments to the wrong pictures. But that's no big deal - you have undo, and can flash the Filmstrip with the F6 key. And you either learn fast or are too slow-witted to benefit. Since this feature was introduced, it's the only way I work.
Update
Notice that holding down Alt/Opt + Ctrl/Cmd changes the button's display and switches you temporarily into Auto Sync mode, so you can use the mouse to change a slider setting. Ctrl/Cmd clicking the Sync button switches you “permanently” into that mode.