Lightroom 11 – Masking
A couple of days ago Adobe posted a sneek peek of a feature coming in the next version of Lightroom – bringing together local adjustments as Masking and adding significant new capabilities.
I use local adjustments extensively, mainly the Radial and Linear Gradients, the brush to a lesser extent. For example, I frequently add a little Clarity as a local adjustment, often with a small boost to Shadows. To my eye rather than making the whole image area “shout” with the Basic panel Clarity (which I rarely use), this combination of local adjustments make faces or other key details stand out. It’s a modern dodging and burning, if you’re familiar with darkroom techniques!
So I’ve been one of the lucky ones who has been able to try out these new features, and have been given permission to give my impressions publicly.
Old frustrations
Adobe have addressed some of the frustrations I used to have with local adjustments. One is how they were in different “silos”. What I mean here is that I often want to fine tune a photo, sometimes from a year or more ago, and suspect that I might have done a local adjustment over a face. So first I’d look in the Radial adjustments, not see one, and then see if I’d used the Brush, or vice versa. They have now brought all adjustments together in a floating Masks panel, and that means I can instantly see all the local adjustments at once. Great, that’ll save time.
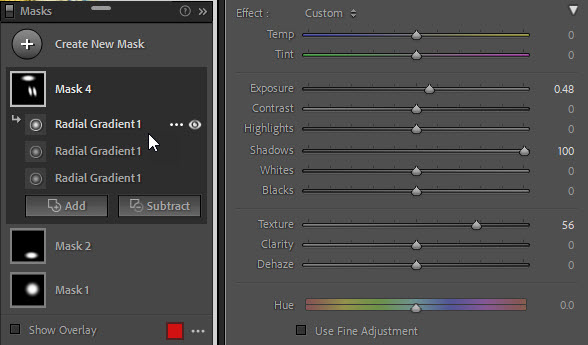 Another similar frustration was that I often want to make similar adjustments in different parts of a picture but was forced to fine tune each local adjustment individually. For instance, imagine there’s more than one face that I want to emphasize, so I might add a couple of my Clarity/Shadow Radial filters. But then if I wanted to change both adjustments, I’d have to select one and then the other. I much prefer Nik’s SilverEfex where you could group and fine tune multiple control points at once. Adobe have fixed that inefficiency, so here you can see that Mask 4 is a group or “layer” of three Radial Gradients sharing the same slider values. Again, this is great.
So you’re now wondering what if you now want to adjust one of the three Radial Gradients independently? In that case you just drag that Gradient and drop it on the Create New Mask button. The Gradient is now moved onto its own mask with the same initial settings.
One downside is that this dragging and dropping – which is so useful – isn’t mentioned on the Help panel that appears when you click the little ? button they’ve hidden at the top of the Masks panel. This Help lists a lot of keyboard shortcuts, probably too many, but doesn’t give the user a hint about dragging and dropping.
New features
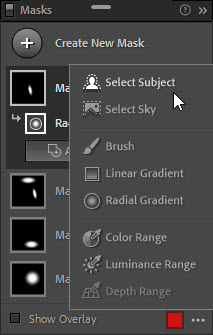
Four new ways to select image areas for local adjustment
So they’ve united the old splits or silos between the different local adjustment tools, and they’ve allowed you to group local adjustments. For me those are big, practical wins.
But new features are what usually draws the eye, and Adobe have added new ways to select image areas for adjustment:
- Automatically select the subject
- Automatically select the sky
- Automatically select a colour range
- Automatically select a luminance or brightness range
The first two will probably attract most attention, and no doubt there will be many images which fool the AI-based logic and no shortage of “it didn’t recognize my kangaroo” complaints.
Yet while subject and sky selection are handy enough on their own, for me the real power of these tools comes once you combine them with the other local selections – adding or subtracting. There’s also an “intersect” which I suspect few people will ever need or use (even if they find it via its Alt/Opt modifier key).
Here for example I first selected the sky using the new tool, but initially it produced a sharp edge. Fair enough, the shape is from a modern building. So I then added a Linear Gradient and set it to “Subtract”
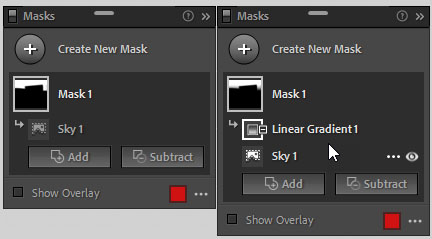
Notice how subtracting a gradient from the sky blurs the outline
– ie subtracting from the sky selection – and this combination of two selections has produced a softer edge around the building.
A couple of thoughts on the Sky feature:
- I am surprised that Adobe didn’t add some kind of sky replacement feature.
- It’s a shame that there’s no feathering control that would allow you to smooth the edges of the adjustment. As shown on the right, you need to add one or more subtractions.
While it’s likely that the Sky and Subject selections will draw most attention, don’t ignore their Color Range counterpart. For some photographers, it will be at least as useful, and here you can see how it allows one to select and adjust the blues in this image.
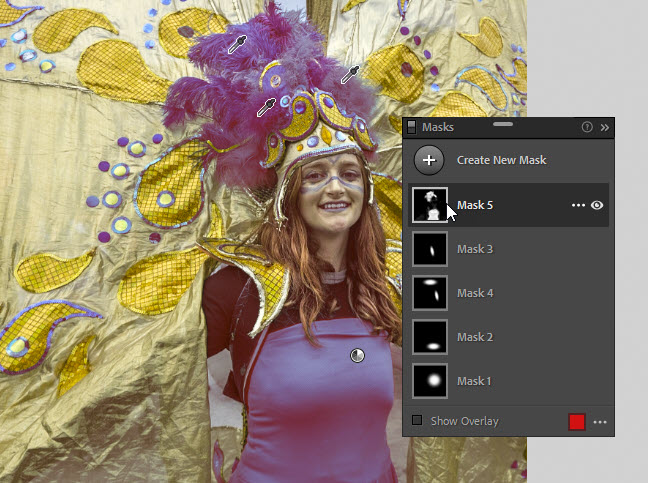
In this screenshot the cursor is over the mask and the red overlay makes the blues purple, if you’re wondering.
Notice how I used Shift + click to add different shades of blue to the range – these are the Color Pickers on her headdress. Shift + click is already standard elsewhere in LR whenever you use a Color Picker.
Yes, it was always possible to use the HSL panel to change all the blues throughout this image.
But remember my earlier comment that the real power comes from combining the tools, so here the Color Range selection can be used in conjunction with other selections. For example, I might add Radial Gradients to subtract her t shirt and her face paint, and this would allow me to change the blues only in the headdress and wings.
Conclusion
This is going to be a major upgrade to how many of us work with images. I’d say that in some ways I do find Masks less pleasant an experience, more fiddly than the old local adjustments. The Help panel shows how in some ways it’s over-specified. On the other hand, they’ve successfully unified the local adjustments into a single feature, and the new ways to select image areas make Masking an altogether more powerful tool. Even fewer trips to Photoshop?
No excuse for not using a mask
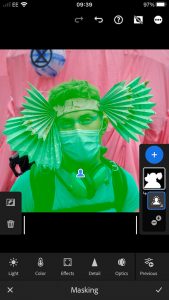
To finish, while I have shown screenshots from Classic Lightroom, I have always been a big fan of Lightroom Mobile and would advise anyone to explore what they can do with it. Sometimes on the train home I’ll import new raw files using my iPhone, or I’ll play with adjustments to pictures I imported earlier when I was at home. It’s so damned convenient to have this mobile extension of Lightroom. And as you’d hope, the new Masking does work in all parts of the Lightroom world.
So here I added a Select Subject – but doing it on my phone. Mine’s not the latest phone – it’s an iPhone 8 – and the raw file isn’t in the cloud which means Lightroom Mobile is working from a smart preview.
In this case the selection isn’t perfect, even if it is pretty good. But for me Lightroom Mobile is not the final stage before printing or whatever, and I don’t expect perfection. What I want is, as I say, the convenience of trying these things when I’m on the move, and I can easily refine the Select Subject in Classic Lightroom.
I’m not being cruel when I say that I can’t tell you when you’ll be able to get your own hands on Lightroom 11. But it can’t be too far away now, can it?
Update November 1, 2021
When I wrote this post in late September 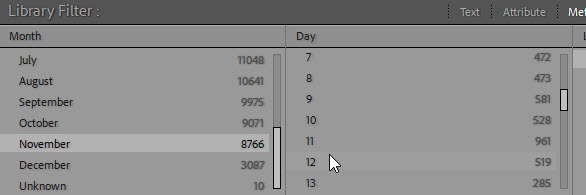 I wasn’t allowed to write about other features, but one of the most handy is that you can now filter on months and dates. So imagine you want to find all the pictures you’ve taken at Christmas or in the first week of November, this long-requested little feature is ideal.