This is Lightroom 6

Lightroom CC is Lightroom 6 plus the mobile features
The rumours have been bubbling around for a while, and in the last couple of days the news has been dribbling out in not the most elegant way….
But now one can say officially that Lightroom 6 is here. See this post on Adobe’s own Lightroom Journal.
After a few years of confusing people with the clumsy-sounding “Adobe Photoshop Lightroom” they are now calling this new version “Lightroom CC” and frightening those who are already disconcerted by the lurch towards subscription-limited software. However, you still have the choice to buy Lightroom 6 normally.
Adobe’s focus is certainly on workflows such as I described in my recent post on Adobe Slate and on Adobe Comp which require the subscription version Lightroom CC.
Integrating these cloud workflows is something Adobe are doing across their product range, not just with Lightroom, and you should keep an eye on posts I’ve been making about LrMobile and LrWeb which may give you ideas about where these developments may benefit you.
These apps aren’t just for trivial things like posting to Facebook, if that is indeed trivial, but they already allow “pro” workflows such as a basic client proofing system or remote review of your pictures.
So, what do I think?
[ros_float title=’Nice details’ text=’Catalogue backups are now zipped, saving 90% of their disc space and stopping idiots opening backup catalogues and doing new work in them…’ width=30%]
There are headline features which are needed to shift boxes or drive subscriptions, but with new versions it’s often the smaller details that make the real difference when you’re using the program. In fact, I wish Adobe would put much more effort into those usability tweaks. So in this article I don’t intend to itemise the headline features. Instead I want to convey which ones I like and point to some of the smaller details that are worth trying for yourself.
So in descending order:
- Radial and graduated filters – fine tune the area they affect
- Panorama and HDR Merge – create panorama stitches and HDR blends inside Lightroom
- GPU acceleration – speed up Develop, 5k screens, and more will come – quietly
- Collections filter – manage your Collections panel
- Import – add new items to a collection
- Slideshow – Ken Burns and multiple music tracks
- Tethering – share new photos via LrMobile and LrWeb
- Face recognition – glad it’s there, but it doesn’t work for me
Brushing radial and graduated filters
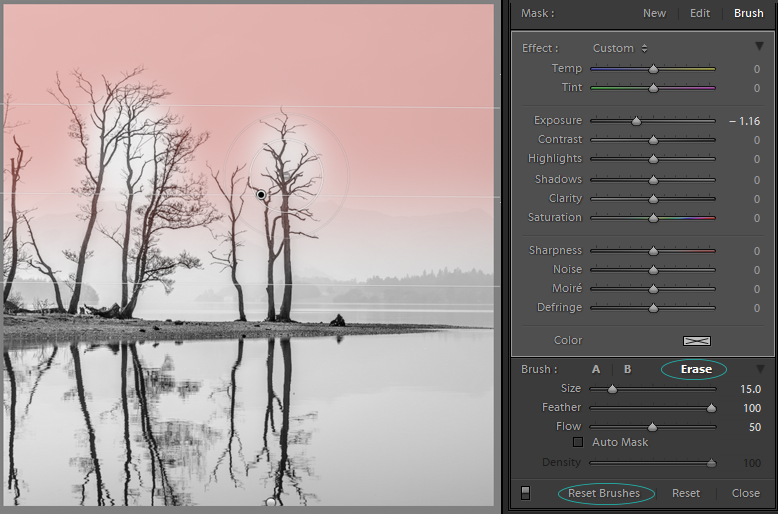
You can now fine tune the areas affected by graduated and radial filters. If you want to restore a filter’s original state, just hit Reset Brushes.
Each of these tools now has an extra brush option (top right of panel) that lets you modify the area affected by the graduated or radial filter adjustment.
This addition is not, of course, a big surprise as it had already appeared in the version of Adobe Camera Raw available with the subscription Photoshop CC, but I suspect it will be a hugely welcome in Lightroom.
I seem to use it mostly to erase the effect of graduated or radial filters, much less to extend adjustments. So as this example shows, I might have darkened a sky with a graduated filter adjustment but didn’t want to darken items that extend above the horizon.
So I’ll either click the Erase button, or use the Alt/Option key as a quick way to switch between extending and erasing.
One little detail is the Reset Brushes button at the bottom left. This is for those times when you’ve done too much brushing and you just want to get back to the filter’s original state. I often use it when I’ve synced adjustments from one picture to another, and then find the brushing is in the wrong place. It’s a nice touch.
Panorama and HDR Merge
Although each of these is worthy of being a headline item, I’ll group Panorama and HDR into one as I think they’ll generally be viewed as a single “Merge” feature.
While welcome, and surprisingly quick, I think it’s worth pointing out a few details. Firstly, Merge feels more like a plugin experience – you open a modal dialog box rather than a Lightroom-style window – and it’s in Library too, not Develop. It doesn’t matter in the end, but it’s not as elegant as one expects.
Secondly, what happens is that Lightroom bakes an entirely new file, a big DNG containing data from all the original component frames. This DNG is a demosaiced linear DNG but Adobe don’t change the post de-mosaic data so effectively you’re still editing the raw data.
Unfortunately you still have all the component frames cluttering up your catalogue, as well as the new merged monster. So Merge doesn’t handle the merge as a parametric edit (ie like other adjustments) and simply add a virtual copy to the catalogue. Apparently speed was the deciding factor. Nor does it zip the component files into the big DNG so you can extract them in future – you need to keep the component frames. Adobe don’t even stack the new merged file with its components. You can’t use Library Filter to distinguish these DNGs from others – except by using the suffix on the file name, which isn’t a robust method. So they’ve done a good job of the processing, but left you with the problem of managing the clutter.
Adobe aren’t going to please everyone. You’re not going to be pleased if you’re into your recti-spherical-Mercator-curvilinear projections that straighten your fisheye lens frames into a perfect panorama, and equally Lightroom’s not really the tool for the grungy monstrosities that give HDR such a bad name. In those cases, stick to third party specialist tools.
Instead, Lightroom’s two Merge tools are designed for what most people need, and I must admit that I don’t think most people want to be bothered with projections you’ve never heard of. They just want simple guidelines such as overlapping by 30% when shooting a panorama, and they want a Merge tool that doesn’t frighten them. That’s what they’ve got.
Merge first, adjust later – or the other way round? The easiest way is to merge first, and then adjust the merged image (also Julieanne Kost’s preference), but it doesn’t really matter.
GPU acceleration – don’t expect performance boosts everywhere

Get a recent generation card with at least 2Gb of memory such as the AMD R9 2xx series or nvidia’s Geforce 700 or 900
For a long time the best advice has been that Lightroom didn’t require you to spend much money on the graphics card. Lightroom didn’t exploit the GPU’s resources and Adobe have said that pushing data to the display simply wasn’t the bottleneck, while processing raw image data isn’t suitable to graphics hardware acceleration.
With Lightroom 6 the advice is changing, but it’s important to note that this is not a general application of GPU acceleration. Don’t expect to see performance improvement in every area of the program. Instead Adobe have begun by targeting areas where the GPU can offer benefits:
- Develop’s After window – so look for faster screen updating after dragging a slider or changing a dust spot
- Support for 5K monitors
Ongoing improvements….
Adobe should be able to add GPU acceleration in Lightroom 6.1 and other “dot releases”. Unlike the brushing of graduated and radial filters, which couldn’t be introduced until 6.0 because of Adobe’s accounting policies, performance tuning doesn’t count as a new feature and can be implemented whenever it becomes available.
Where you won’t see any change
- Sadly there’s no Photo Mechanic speed browsing of embedded previews. Will there ever be?
- It won’t work with older graphics cards
Supporting GPUs opens up a hardware support can of worms, so which graphics cards will give you most benefit?
- Adobe aren’t going to try to make GPU acceleration work on older cards. Adobe are saying you need a graphics card that runs on OpenGL 3.3 and later. See Adobe’s GPU FAQ.
- If you’re thinking about what card to buy, you don’t need to go for a high end one, although that may future proof your spending.
- Get a recent generation card with at least 2Gb of memory such as the AMD R9 2xx series or nvidia’s Geforce 700 or 900.
- Ensure your card is running the latest drivers. On Mac, that’s done by updating to the latest operating system updates. On Windows, you need to download and install the latest drivers from the card manufacturer’s site.
Slideshow
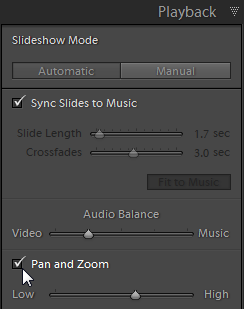
Sync Slides to Music lets you sync slides to the beats or rhythms in the music
Slideshow has had the complete rewrite that was long overdue. While most of the work has been “under the hood”, there are significant new features:
- Multiple music tracks
- A Ken Burns effect
I’m pleased with both of these additions, because for a long time they forced me to use Aperture or other tools for producing slideshows.
But something almost-as-important remains missing – a timeline that lets you to vary the duration of individual slides. Rewriting Slideshow was a great opportunity to include this key feature for audiovisual presentations, and maybe it’s been written but held back so it can be popped into Lr7, but one suspects it’ll now be a few versions before it appears. If so, that’s a shame.
Import to Collection
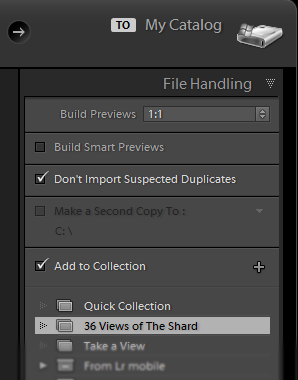 In the Import dialog box you can now specify a collection to which the imported photos should be added.
That may seem only a small change, but as I said earlier it’s often the little improvements that matter most.
It’s nice enough that you can now automatically add new pictures to the Project XYZ collection, for instance, or maybe to a Current Work collection if you use a system like my Workflow Smart Collections.
But you can also choose a collection that is synced to LrMobile, meaning that Import automatically brings the files into your catalogue and sends them to Lightroom Mobile.
Tethered capture – direct to LrMobile
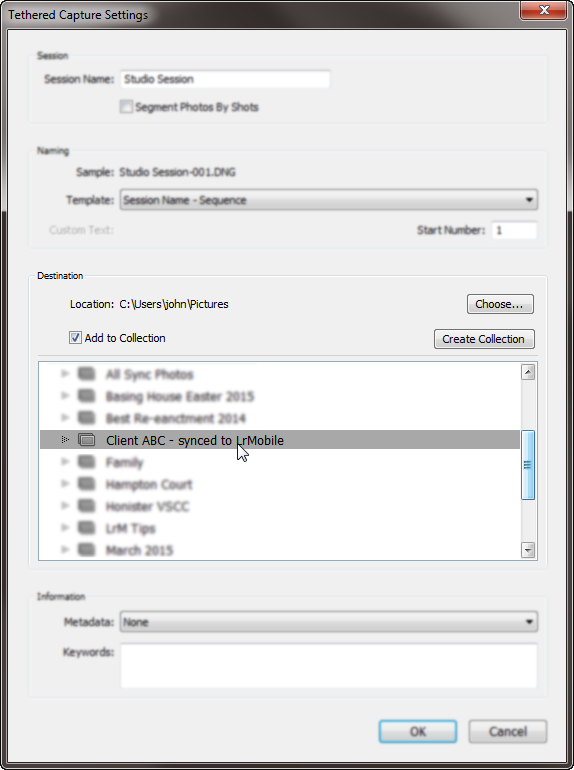
Combine tethered shooting with LrMobile and newly-taken frames can be reviewed on devices or remotely via web browsers
I bet every other review of Lr6 will miss this one (it’ll be amusing to see), but it could be a real beauty for anyone who uses Lightroom for tethered shooting. You can now specify a collection to which newly-captured images will be added.
While this may seem like a repetition of the previous point, this little feature becomes much more exciting when you imagine how the tethered photographer could use it in combination with LrMobile and LrWeb. Automatically adding new photos to a synced collection makes this feature Adobe’s answer to CaptureOne’s Capture Pilot app:
- A client could review and choose new pictures, even if the client is elsewhere
- An assistant could be making broad adjustments and crops
Setting up this workflow is very easy. Before you start the tethered session:
- Set up a collection such as my Client ABC (screenshot)
- Sync it to LrMobile
- Make it “public”
- Share its URL with the client
You can now go back to shooting, and the client can watch newly-taken images appear – even if they are far away from your studio – and make selections by identifying “favourites” or send comments on photos. The client may be sitting in your studio and using LrMobile on your iPad, but they could also be sat at their desk in another country using LrWeb to view 2048 pixel colour- managed images on a colour managed screen.
There could be many permutations, but just imagine this scenario. In the studio one client watches you shoot and reviews the new pictures appearing full screen on the monitor. Meanwhile your assistant uses LrMobile on your iPad to make broad adjustments and crops which soon appear on the studio screen – and via LrWeb on the screen back in the client’s office where their art department are watching the results and making their choices. This could be a big winner.
Collections filter
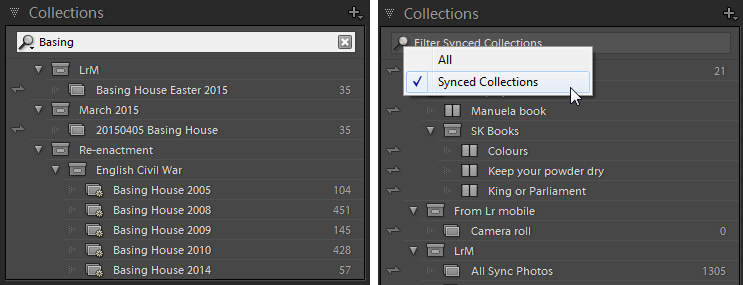
Notice the handy new filter box at the top of the Collections panel
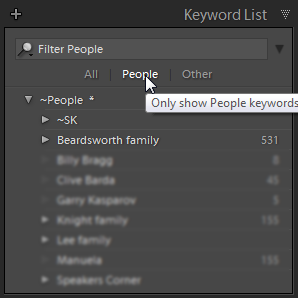
Another really handy little feature is that a filter box has been added at the top of the collections panel.
I’m one of those people who has lots of collections and like then grouped (or hidden) in collection sets. So instead of digging around and remembering shortcuts like Alt/Option click (which opens or closes entire sets) it’s now very easy to search for the collection you want to use.
One little detail is that there’s a little drop down icon below the filter’s magnifying glass. This allows you to make the collections panel show you only those collections that you’ve synced to LrMobile. I suspect that Sync is the reason why Adobe added this filter box, but I use it all the time for other reasons.
What’s sad is that Adobe could have enhanced other panels where users often have unmanageably long lists. Since Lr4 there has been a similar feature in the Keyword List panel and it’s proved incredibly useful. It’s a real shame they didn’t take the opportunity to do the same for Folders and Develop Presets.
Face recognition
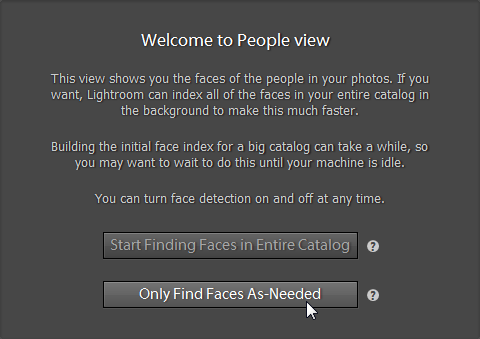
Upon startup you get this clear message. In my view it’s better to choose the second option.
Face recognition is one of the most-frequently requested features on Adobe’s feedback forum – including from those who make their living from photography.
To my mind, that fact alone justifies its addition to Lightroom. It isn’t just bloat, catching up with other apps like Aperture or Picasa, and it isn’t just a trivial toy for Facebookers (in fact, it doesn’t even integrate with Facebook). Some photographers want it for trivial reasons, some because it saves them time.
Personally I am undecided about its value, and in fact I have disabled it in the catalogue settings.
But to see it in action, go to Julieanne Kost’s video on face recognition.
[ros_clear]
Why I am not using face recognition
I am genuinely open-minded about the value of adding this face recognition feature. My doubts are about Lightroom’s recognition system which seems to be unable to distinguish my teenage niece from middle aged guys with bushy beards. While it’s not always so ridiculously unreliable, I’ve little faith in it.
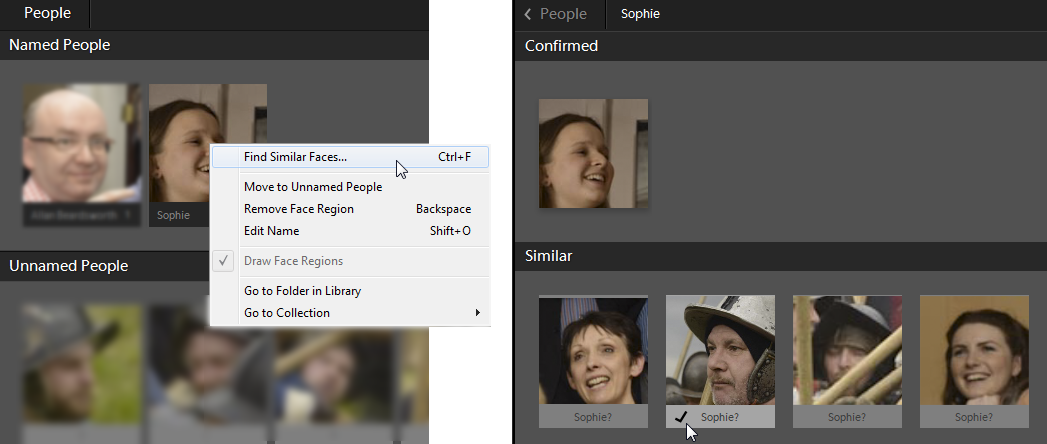
You can try Find Similar Faces, and there are other pictures of Sophie in this set of photos, but none of the suggestions is her.
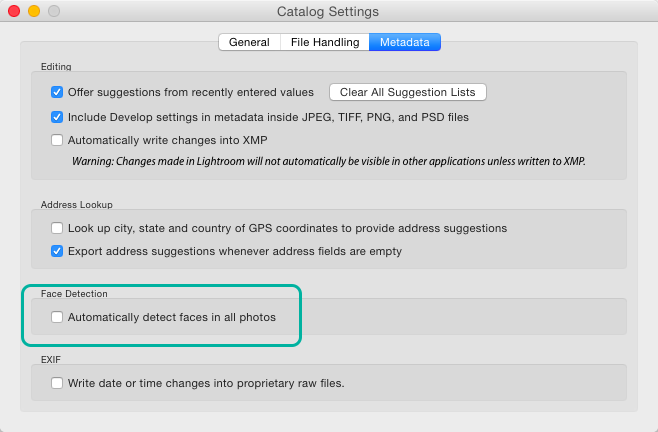
I have so little faith in the face recognition that I have disabled it
In any case I am not very interested in recording exactly where someone is in a photo, and for me it’s sufficient to add keywords as normal.
But I do take advantage of how you can set a keyword to signify a person box. This has practical benefits:
- When you export a photo, information about people is not included in exported file’s metadata.
- In export, you can uncheck the option Remove Person Info box and names will then be included in exported file’s metadata as
- keywords
- IPTC Extension Person Shown
- Metadata Working Group Regions
- The keyword appears in the Person tab if the Keyword List
If these metadata aspects are also important to you, I suggest you dig into the details for yourself. Export a photo with Remove Person Info unchecked and then examine its metadata carefully in the Advanced tab of Bridge’s File Info dialog box, or in some other metadata tool.
Setting a standard for recording who is in a photo
A standard way to record who is in a photo is as important as Face Recognition that barely works.
While I don’t use the face recognition feature, what I think is important is that Adobe have now established a standard Lightroom way to record who is in a photo, and provided some control over the confidentiality of personal data. In fact, I think this is a big enough deal that I wish Adobe had created a separate People panel.
One point is about where they record the information. I used to think it should be in the IPTC Person Shown field, technically the correct place. But while Lightroom was ahead of the game in supporting these IPTC Extension fields, there is little sign of their widespread adoption and I accept it’s best that Adobe chose to use keywords. They then made a wise move by distinguishing People keywords from regular keywords, so you can easily filter the Keyword List.
Buy or rent – a mess of Adobe’s own making?
Perpetual licences remain available but are fxxxing difficult to find on Adobe’s site. Sadly, that seems deliberate. But you can find it if you look carefully, and one place to buy the perpetual licence is by going to Adobe’s Products page ( USA UK ). More info here.
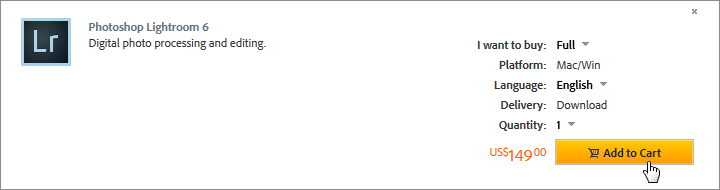
You can still buy a standard perpetual licence
Boxed versions remain available. However, full versions are only from third parties such as Amazon, while Adobe are only selling upgrades to boxed purchases (click Buy then change it to an upgrade).
Summary
Some very nice details, some important new features, some missed opportunities.