Lightroom 6.8 / 2015.8
Lightroom 6.8 / 2015.8 has just been released.
For CC subscribers the big new feature is the introduction of the Reference Photo view in Develop, and it’s a feature I like very much. It means that you can now split Develop’s central pane between the image you’re editing and another photo. While it looks quite similar to the existing Before/After view, which I use all the time, here the idea to help you adjust the active photo by comparing it with some aspects of an existing picture.
Until now you’ve had to know a rather obscure and cumbersome trick using Lightroom’s second screen with a locked photo. This new Reference Photo feature is much simpler – you just use Shift R to split the screen, and drag the other photo into the left side.
This might be handy in a number of circumstances. For example, you might have a series of pictures and want a consistent look, or you may want to edit a picture so it can be used alongside an older one. I’ve found the feature helps when I correct the white balance of photos taken with extreme ND filters such as Lee’s Big and Supper Stoppers. Since I’ll usually have other pictures taken at the same time without the filter, I can use one as the Reference Photo.

Here I’m editing a long exposure image which has a colour cast due to a 10 stop ND filter. An earlier picture was taken without the filter and is my Reference Photo.
There are a few ways to set the Reference Photo:
-
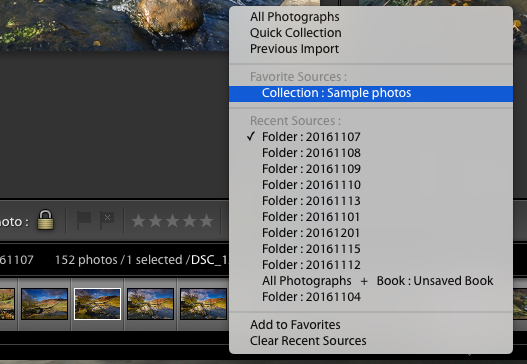
One idea is to maintain a collection of reference photos and add it to your Favorite Sources
When you want to use a photo you just worked on, it would still be in the filmstrip and you can often just drag and drop it into the Reference Photo side.
- If the filmstrip contains lots of photos and you can’t see the one you want, just hit G and find it in Library. Then right click it, choose Set As Reference Photo, and then go back to Develop.
- Sometimes you want to use a photo from a different folder or collection, so remember the filmstrip has the Recent Sources list. This could let you switch quickly back to a previous folder, or you could add folders or collections to Favorite Sources – such as a collection of sample or reference photos.
Another little feature is Has Snapshots, a new criterion added to Smart Collections and the Library Filter. It’ll be handy in the sense that there’s previously been no ability to find pictures that do have snapshots. But it’s been implemented in such a half-baked way that I’m not sure why they bothered – you can simply find pictures that have snapshots, or those that don’t. What you can’t do is search for the snapshot name, so you can’t find all the pictures with a certain paper profile in the snapshot name, or with a phrase like “final” or whatever. A lost opportunity which I mention just in case you may find a use for it.